
How to Use hmi nb7w-tw01b: Examples, Pinouts, and Specs
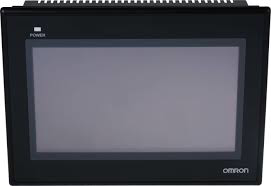
 Design with hmi nb7w-tw01b in Cirkit Designer
Introduction
The HMI NB7W-TW01B, manufactured by Omron, is a human-machine interface (HMI) device designed to facilitate seamless interaction between users and industrial machines or systems. Equipped with a 7-inch widescreen touchscreen display, this HMI provides an intuitive platform for monitoring, controlling, and visualizing operational data in real-time. Its robust design and versatile functionality make it an ideal choice for industrial automation applications.
Explore Projects Built with hmi nb7w-tw01b
 Open Project in Cirkit Designer
 Open Project in Cirkit Designer
 Open Project in Cirkit Designer
 Open Project in Cirkit Designer
Explore Projects Built with hmi nb7w-tw01b
Open Project in Cirkit DesignerOpen Project in Cirkit DesignerOpen Project in Cirkit DesignerOpen Project in Cirkit DesignerCommon Applications and Use Cases
- Industrial automation and process control
- Monitoring and controlling PLCs (Programmable Logic Controllers)
- Data visualization for manufacturing systems
- Operator interface for machinery
- Building management systems
Technical Specifications
Below are the key technical details of the HMI NB7W-TW01B:
| Specification | Details |
|---|---|
| Manufacturer | Omron |
| Model | NB7W-TW01B |
| Display Size | 7-inch widescreen (16:9 aspect ratio) |
| Resolution | 800 x 480 pixels (WVGA) |
| Touchscreen Type | Resistive touchscreen |
| Power Supply Voltage | 24 V DC (±10%) |
| Power Consumption | 5 W (typical) |
| Communication Ports | RS232, RS485, Ethernet, USB Host |
| Operating Temperature | 0°C to 50°C |
| Storage Temperature | -20°C to 60°C |
| Dimensions | 200 mm x 146 mm x 36 mm |
| Weight | Approximately 0.8 kg |
| Certifications | CE, UL, cUL |
Pin Configuration and Descriptions
The HMI NB7W-TW01B features multiple communication ports for interfacing with external devices. Below is a summary of the pin configurations for the RS232 and RS485 ports:
RS232 Port Pinout
| Pin Number | Signal Name | Description |
|---|---|---|
| 1 | DCD | Data Carrier Detect |
| 2 | RXD | Receive Data |
| 3 | TXD | Transmit Data |
| 4 | DTR | Data Terminal Ready |
| 5 | GND | Ground |
| 6 | DSR | Data Set Ready |
| 7 | RTS | Request to Send |
| 8 | CTS | Clear to Send |
| 9 | RI | Ring Indicator |
RS485 Port Pinout
| Pin Number | Signal Name | Description |
|---|---|---|
| 1 | A(+) | Positive Data Line |
| 2 | B(-) | Negative Data Line |
| 3 | GND | Ground |
Usage Instructions
How to Use the HMI NB7W-TW01B in a Circuit
Power Supply Connection:
- Connect a 24 V DC power supply to the HMI's power input terminals. Ensure the voltage is within the specified range (±10%).
- Use proper grounding to avoid electrical noise interference.
Communication Setup:
- Use the RS232, RS485, or Ethernet port to connect the HMI to a PLC or other control devices.
- Configure the communication settings (baud rate, parity, stop bits, etc.) in the HMI software to match the connected device.
Software Configuration:
- Install Omron's NB-Designer software on your PC to create and upload HMI projects.
- Design the user interface, including buttons, indicators, and data visualization elements.
- Upload the project to the HMI via USB or Ethernet.
Mounting:
- Securely mount the HMI on a control panel using the provided mounting brackets.
- Ensure proper ventilation to maintain the operating temperature range.
Important Considerations and Best Practices
- Power Supply: Use a regulated 24 V DC power supply to prevent damage to the device.
- Communication Protocols: Ensure the communication protocol (e.g., Modbus RTU, Modbus TCP) is compatible with the connected devices.
- Environmental Conditions: Avoid exposing the HMI to extreme temperatures, humidity, or direct sunlight.
- Firmware Updates: Regularly check for firmware updates from Omron to ensure optimal performance and security.
Example: Connecting to an Arduino UNO
The HMI NB7W-TW01B can be connected to an Arduino UNO via the RS232 port. Below is an example Arduino sketch for basic communication:
#include <SoftwareSerial.h>

// Define RX and TX pins for SoftwareSerial
SoftwareSerial mySerial(10, 11); // RX = pin 10, TX = pin 11

void setup() {
  // Initialize serial communication
  Serial.begin(9600); // Arduino's default serial port
  mySerial.begin(9600); // RS232 communication with HMI

  // Send initialization message to HMI
  mySerial.println("HMI Connected");
}

void loop() {
  // Check if data is available from the HMI
  if (mySerial.available()) {
    String dataFromHMI = mySerial.readString();
    Serial.println("Data from HMI: " + dataFromHMI);
  }

  // Send data to HMI
  mySerial.println("Hello from Arduino");
  delay(1000); // Delay for 1 second
}
Troubleshooting and FAQs
Common Issues and Solutions
HMI Does Not Power On:
- Cause: Incorrect power supply voltage or loose connections.
- Solution: Verify the power supply voltage is 24 V DC and check all connections.
No Communication with PLC:
- Cause: Mismatched communication settings or incorrect wiring.
- Solution: Ensure the baud rate, parity, and stop bits match between the HMI and PLC. Double-check the wiring.
Touchscreen Not Responding:
- Cause: Calibration issue or physical damage.
- Solution: Recalibrate the touchscreen using the HMI settings menu. If the issue persists, inspect for damage.
Display Flickering or Blank:
- Cause: Electrical noise or faulty power supply.
- Solution: Use a noise filter on the power supply and ensure proper grounding.
FAQs
Q: Can the HMI NB7W-TW01B be used outdoors?
A: No, the HMI is designed for indoor use and should be protected from direct sunlight, moisture, and extreme temperatures.
Q: What software is required to program the HMI?
A: Omron's NB-Designer software is used to create and upload projects to the HMI.
Q: Does the HMI support Modbus communication?
A: Yes, the HMI NB7W-TW01B supports Modbus RTU and Modbus TCP protocols.
Q: How do I update the firmware?
A: Firmware updates can be downloaded from Omron's official website and installed via USB or Ethernet.
Q: Can the HMI be connected to multiple devices simultaneously?
A: Yes, the HMI supports multiple communication ports, allowing it to interface with multiple devices.