
Cirkit Designer
Your all-in-one circuit design IDE
Home /
Component Documentation
How to Use _h3_MPL115A1 (SPI) and MPL115A2 (I2C) Miniature Digital Barometer__h3_: Examples, Pinouts, and Specs

 Design with _h3_MPL115A1 (SPI) and MPL115A2 (I2C) Miniature Digital Barometer__h3_ in Cirkit Designer
Introduction
The MPL115A1 and MPL115A2 are miniature digital barometers designed for accurate pressure and temperature measurements. These sensors are compact, low-power, and ideal for applications requiring precise atmospheric pressure readings. The MPL115A1 communicates via the SPI protocol, while the MPL115A2 uses the I2C protocol, making them versatile for integration into various systems.
Explore Projects Built with _h3_MPL115A1 (SPI) and MPL115A2 (I2C) Miniature Digital Barometer__h3_
ESP-8266 Based Environmental Monitoring System
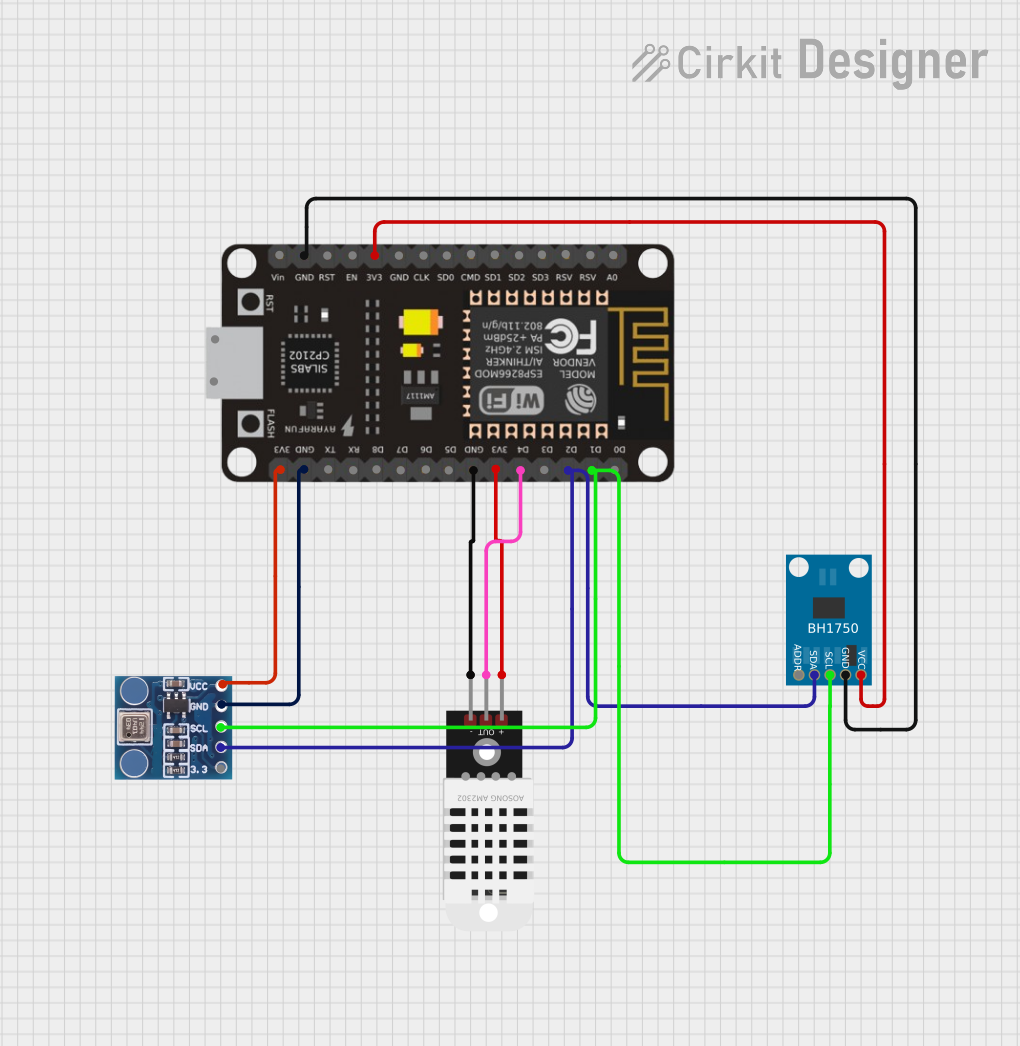
This circuit features an ESP-8266 microcontroller connected to a BMP180 barometric pressure sensor, a BH1750 light intensity sensor, and a DHT22 temperature and humidity sensor. The ESP-8266 uses its I2C interface, with pins D1 and D2 connected to the SCL and SDA lines of both the BMP180 and BH1750, to communicate with the sensors. The DHT22 sensor is connected to a digital pin (D4) for direct signal reading, and all sensors share common power (3V3) and ground (GND) connections with the microcontroller.
Open Project in Cirkit DesignerESP8266-Based Environmental Monitoring System
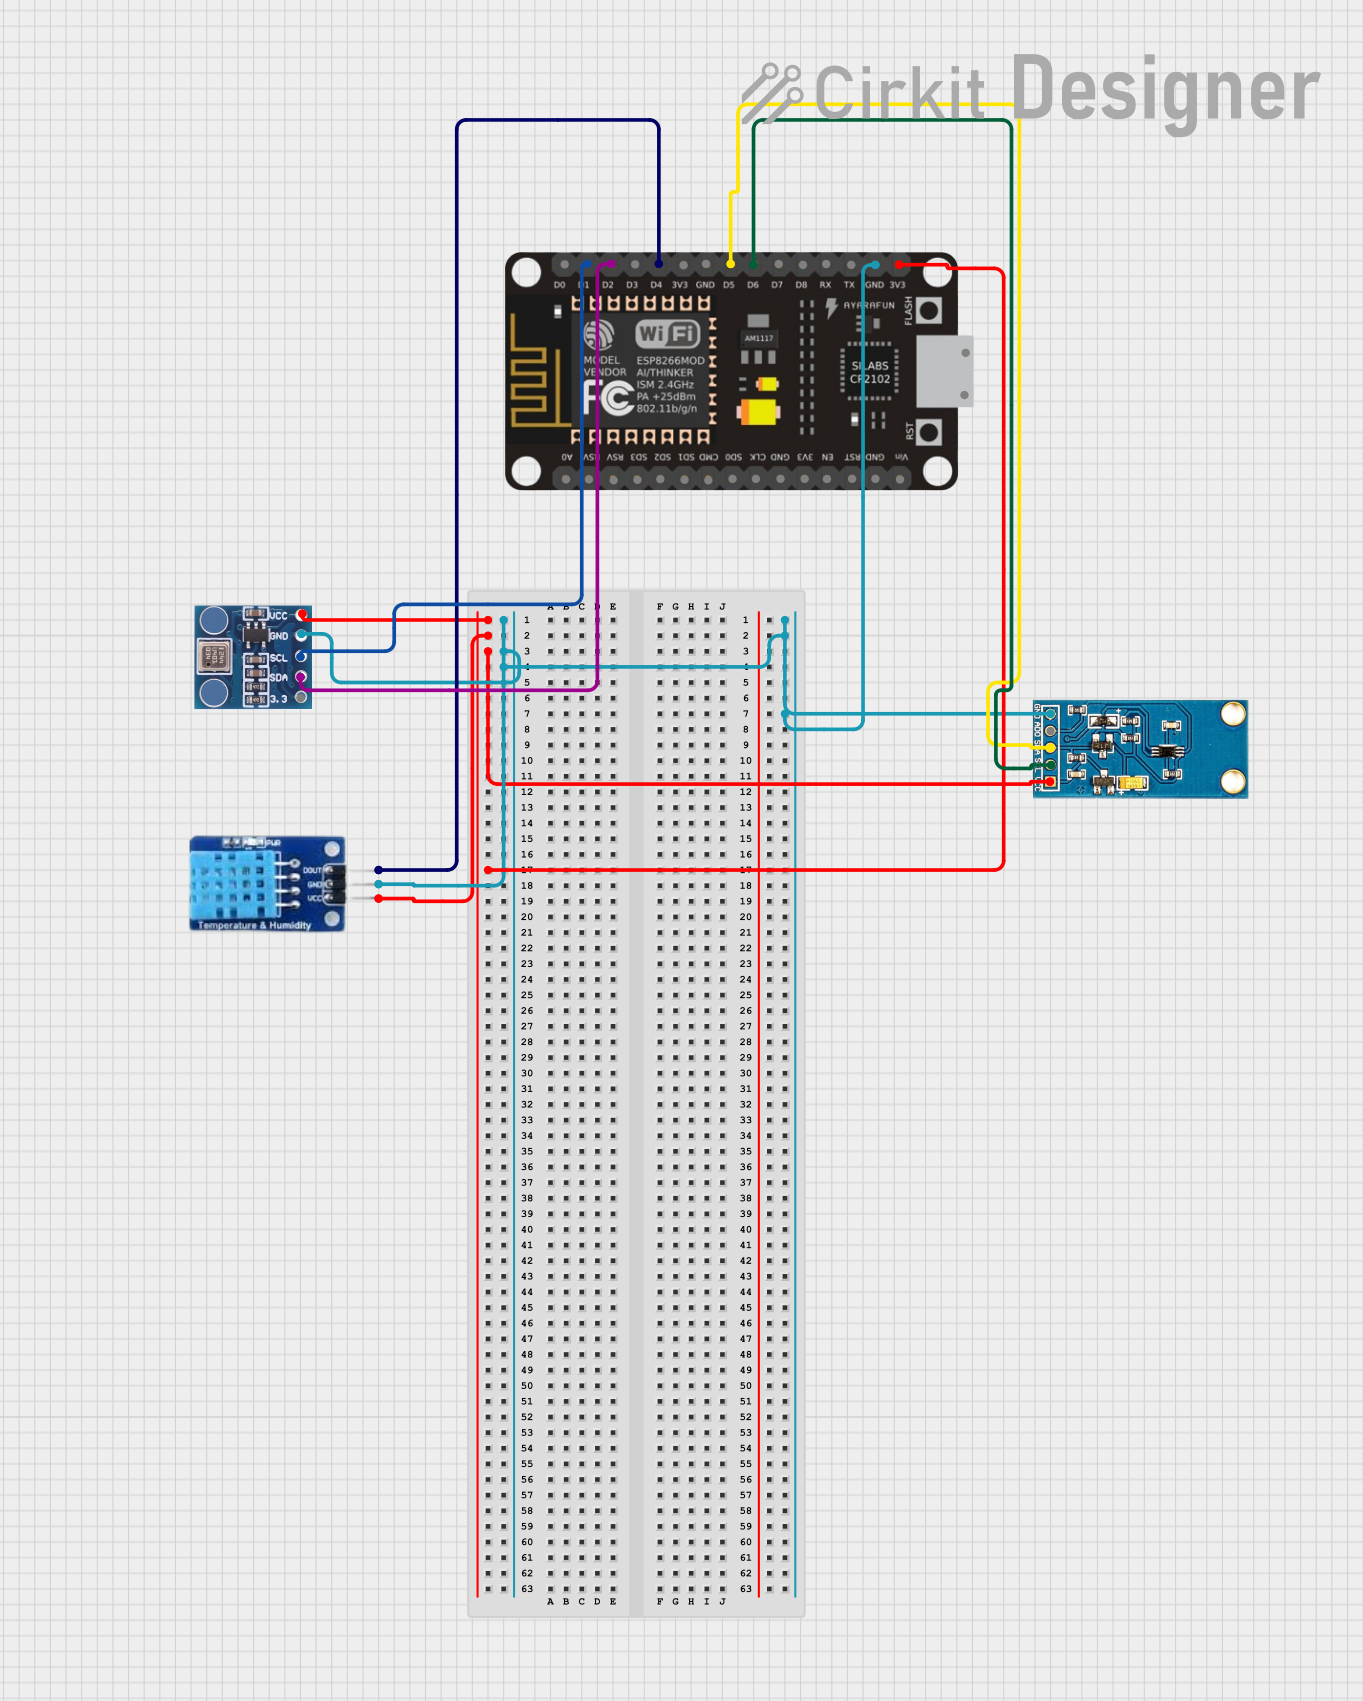
This circuit is designed to collect environmental data using an ESP-8266 microcontroller connected to a BMP180 barometric pressure sensor, a GY-30 BH1750FVI digital light intensity sensor, and a DHT11 temperature and humidity sensor. The sensors are interfaced with the ESP-8266 via I2C (SCL and SDA lines) and digital IO pins, and they share a common power supply (3.3V) and ground. The circuit is likely intended for weather monitoring or home automation applications, with capabilities to measure temperature, humidity, barometric pressure, and light intensity.
Open Project in Cirkit DesignerWemos D1 Mini Based Soil Moisture and Temperature Monitoring System
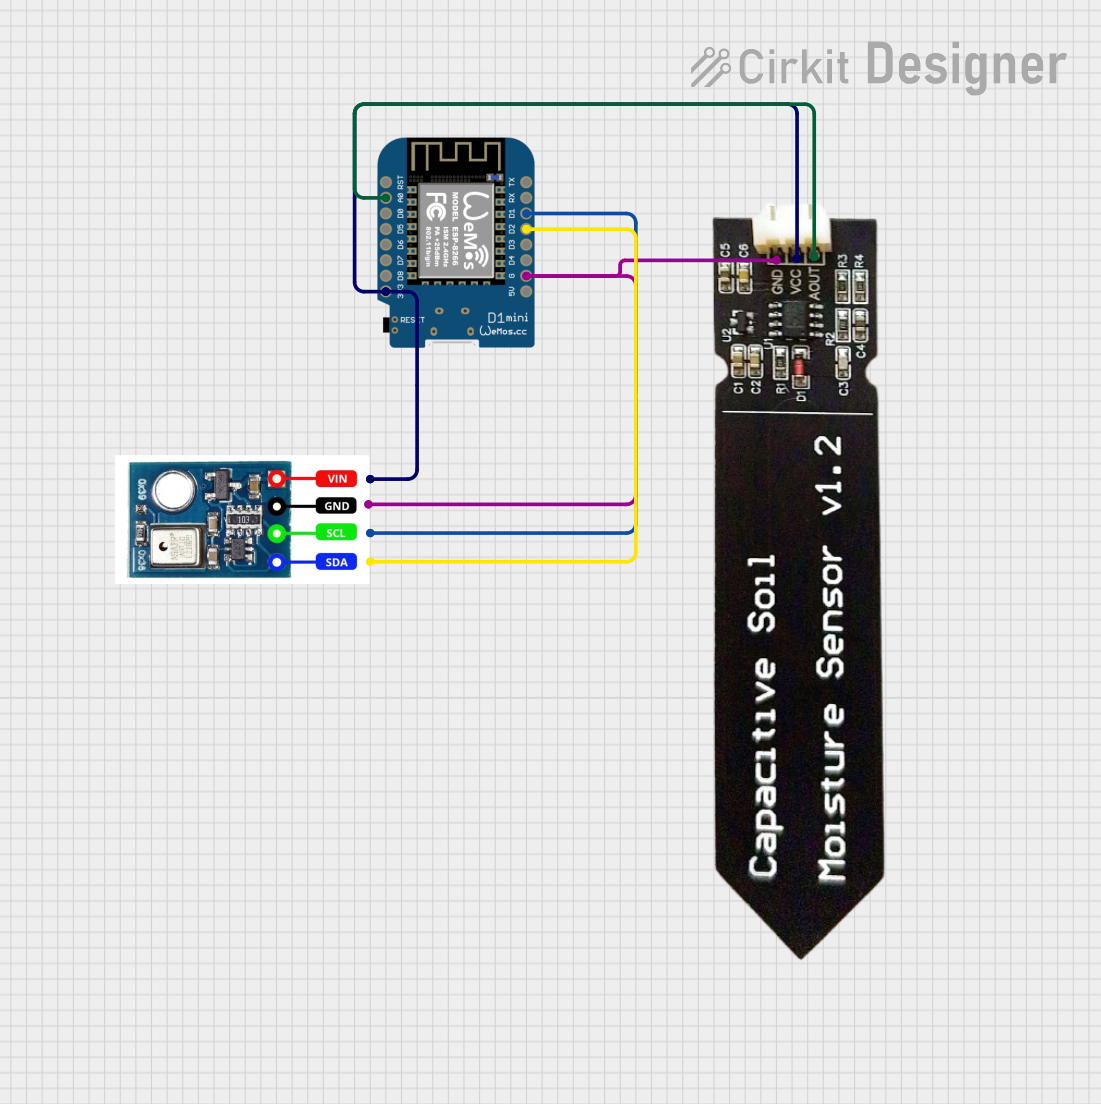
This circuit features a Wemos D1 Mini microcontroller connected to an AHT10 temperature and humidity sensor and a capacitive soil moisture sensor. The AHT10 communicates with the Wemos D1 Mini via I2C (with SDA connected to D2 and SCL to D1), while the soil moisture sensor's analog output is connected to the A0 pin of the Wemos D1 Mini. Both sensors and the microcontroller share a common power supply, with the 3V3 pin of the Wemos D1 Mini providing power to the sensors.
Open Project in Cirkit DesignerArduino UNO WiFi Weather Station with Adafruit MPL115A2 Sensor
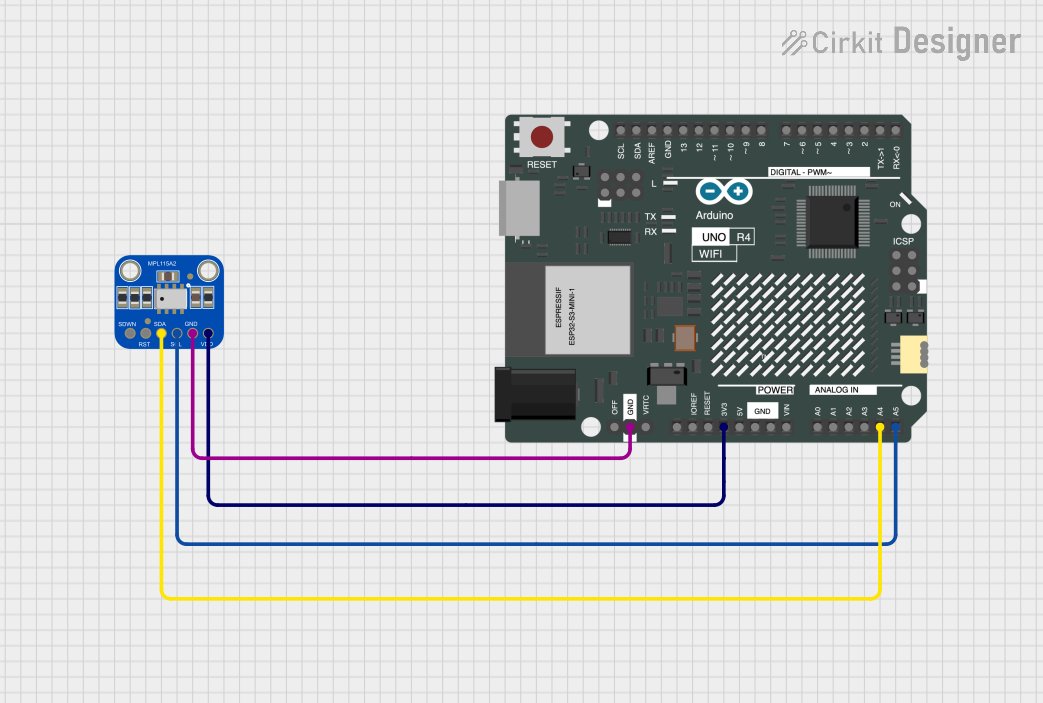
This circuit uses an Arduino UNO R4 WiFi to interface with an Adafruit MPL115A2 I2C Barometric Pressure and Temperature Sensor. The Arduino reads pressure and temperature data from the sensor via I2C communication and outputs the readings to the serial monitor.
Open Project in Cirkit DesignerExplore Projects Built with _h3_MPL115A1 (SPI) and MPL115A2 (I2C) Miniature Digital Barometer__h3_
ESP-8266 Based Environmental Monitoring System
This circuit features an ESP-8266 microcontroller connected to a BMP180 barometric pressure sensor, a BH1750 light intensity sensor, and a DHT22 temperature and humidity sensor. The ESP-8266 uses its I2C interface, with pins D1 and D2 connected to the SCL and SDA lines of both the BMP180 and BH1750, to communicate with the sensors. The DHT22 sensor is connected to a digital pin (D4) for direct signal reading, and all sensors share common power (3V3) and ground (GND) connections with the microcontroller.
Open Project in Cirkit DesignerESP8266-Based Environmental Monitoring System
This circuit is designed to collect environmental data using an ESP-8266 microcontroller connected to a BMP180 barometric pressure sensor, a GY-30 BH1750FVI digital light intensity sensor, and a DHT11 temperature and humidity sensor. The sensors are interfaced with the ESP-8266 via I2C (SCL and SDA lines) and digital IO pins, and they share a common power supply (3.3V) and ground. The circuit is likely intended for weather monitoring or home automation applications, with capabilities to measure temperature, humidity, barometric pressure, and light intensity.
Open Project in Cirkit DesignerWemos D1 Mini Based Soil Moisture and Temperature Monitoring System
This circuit features a Wemos D1 Mini microcontroller connected to an AHT10 temperature and humidity sensor and a capacitive soil moisture sensor. The AHT10 communicates with the Wemos D1 Mini via I2C (with SDA connected to D2 and SCL to D1), while the soil moisture sensor's analog output is connected to the A0 pin of the Wemos D1 Mini. Both sensors and the microcontroller share a common power supply, with the 3V3 pin of the Wemos D1 Mini providing power to the sensors.
Open Project in Cirkit DesignerArduino UNO WiFi Weather Station with Adafruit MPL115A2 Sensor
This circuit uses an Arduino UNO R4 WiFi to interface with an Adafruit MPL115A2 I2C Barometric Pressure and Temperature Sensor. The Arduino reads pressure and temperature data from the sensor via I2C communication and outputs the readings to the serial monitor.
Open Project in Cirkit DesignerCommon Applications:
- Weather monitoring systems
- Altitude measurement in drones and aircraft
- HVAC (Heating, Ventilation, and Air Conditioning) systems
- Portable devices requiring barometric pressure sensing
- IoT (Internet of Things) environmental monitoring
Technical Specifications
Key Technical Details:
| Parameter | Value |
|---|---|
| Operating Voltage | 2.375V to 5.5V |
| Operating Temperature | -40°C to +85°C |
| Pressure Range | 50 kPa to 115 kPa |
| Pressure Resolution | 0.15 kPa |
| Temperature Accuracy | ±1°C |
| Communication Protocol | SPI (MPL115A1), I2C (MPL115A2) |
| Power Consumption | 5 µA (standby), 6 mA (active) |
Pin Configuration and Descriptions:
MPL115A1 (SPI):
| Pin Name | Pin Number | Description |
|---|---|---|
| VDD | 1 | Power supply (2.375V to 5.5V) |
| GND | 2 | Ground |
| CSB | 3 | Chip Select (active low) |
| SCLK | 4 | Serial Clock Input |
| MOSI | 5 | Master Out, Slave In |
| MISO | 6 | Master In, Slave Out |
MPL115A2 (I2C):
| Pin Name | Pin Number | Description |
|---|---|---|
| VDD | 1 | Power supply (2.375V to 5.5V) |
| GND | 2 | Ground |
| SDA | 3 | Serial Data Line |
| SCL | 4 | Serial Clock Line |
| NC | 5 | Not Connected |
Usage Instructions
Using the MPL115A1 (SPI):
- Wiring: Connect the sensor to your microcontroller as follows:
- VDD to 3.3V or 5V power supply
- GND to ground
- CSB to a GPIO pin configured as output
- SCLK, MOSI, and MISO to the corresponding SPI pins on the microcontroller
- Initialization:
- Configure the SPI interface with the following settings:
- Clock polarity: 0
- Clock phase: 0
- Data order: MSB first
- Set the CSB pin low to enable communication.
- Configure the SPI interface with the following settings:
- Reading Data:
- Send the command to start a pressure and temperature conversion.
- Wait for the conversion to complete (typically a few milliseconds).
- Read the pressure and temperature data from the sensor registers.
- Calculating Pressure:
- Use the coefficients stored in the sensor to calculate the compensated pressure value.
Using the MPL115A2 (I2C):
- Wiring: Connect the sensor to your microcontroller as follows:
- VDD to 3.3V or 5V power supply
- GND to ground
- SDA and SCL to the corresponding I2C pins on the microcontroller
- Use pull-up resistors (typically 4.7 kΩ) on SDA and SCL lines.
- Initialization:
- Configure the I2C interface with the sensor's default address (0x60).
- Reading Data:
- Write to the sensor to start a pressure and temperature conversion.
- Wait for the conversion to complete.
- Read the pressure and temperature data from the sensor registers.
- Calculating Pressure:
- Use the coefficients stored in the sensor to calculate the compensated pressure value.
Example Code for MPL115A2 (I2C) with Arduino UNO:
#include <Wire.h>

// MPL115A2 I2C address
#define MPL115A2_ADDRESS 0x60

// Register addresses
#define START_CONVERSION 0x12
#define PRESSURE_MSB     0x00
#define PRESSURE_LSB     0x01
#define TEMP_MSB         0x02
#define TEMP_LSB         0x03

void setup() {
  Wire.begin(); // Initialize I2C
  Serial.begin(9600); // Initialize serial communication
}

void loop() {
  // Start pressure and temperature conversion
  Wire.beginTransmission(MPL115A2_ADDRESS);
  Wire.write(START_CONVERSION);
  Wire.endTransmission();

  delay(5); // Wait for conversion to complete

  // Read pressure and temperature data
  Wire.beginTransmission(MPL115A2_ADDRESS);
  Wire.write(PRESSURE_MSB);
  Wire.endTransmission();
  Wire.requestFrom(MPL115A2_ADDRESS, 4);

  uint8_t pressureMSB = Wire.read();
  uint8_t pressureLSB = Wire.read();
  uint8_t tempMSB = Wire.read();
  uint8_t tempLSB = Wire.read();

  // Combine MSB and LSB for pressure and temperature
  uint16_t pressureRaw = (pressureMSB << 8) | pressureLSB;
  uint16_t tempRaw = (tempMSB << 8) | tempLSB;

  // Convert raw data to human-readable values (example calculation)
  float pressure = pressureRaw / 64.0; // Example scaling factor
  float temperature = tempRaw / 64.0; // Example scaling factor

  // Print results
  Serial.print("Pressure: ");
  Serial.print(pressure);
  Serial.println(" kPa");

  Serial.print("Temperature: ");
  Serial.print(temperature);
  Serial.println(" °C");

  delay(1000); // Wait 1 second before next reading
}
Important Considerations:
- Ensure proper pull-up resistors are used for I2C communication.
- Avoid long wires to minimize noise and signal degradation.
- Use decoupling capacitors near the sensor's power pins for stable operation.
Troubleshooting and FAQs
Common Issues:
No Data from Sensor:
- Check wiring and ensure proper connections.
- Verify the communication protocol (SPI or I2C) matches your setup.
- Ensure the correct I2C address (0x60) is used for MPL115A2.
Incorrect Pressure or Temperature Readings:
- Verify the calculation formula and coefficients.
- Ensure the sensor is not exposed to extreme environmental conditions.
Communication Errors:
- Check for proper pull-up resistors on I2C lines.
- Verify SPI settings (clock polarity, phase, and data order).
Tips for Troubleshooting:
- Use an oscilloscope or logic analyzer to debug communication issues.
- Test the sensor with a known working library or example code.
- Ensure the power supply voltage is within the specified range.
By following this documentation, you can effectively integrate the MPL115A1 or MPL115A2 into your project and achieve accurate pressure and temperature measurements.