Cirkit Designer Logo
Cirkit Designer
Your all-in-one circuit design IDE
Home / 
Component Documentation

How to Use BFD-1000 5 Channel: Examples, Pinouts, and Specs

Image of BFD-1000 5 Channel
Cirkit Designer LogoDesign with BFD-1000 5 Channel in Cirkit Designer

Introduction

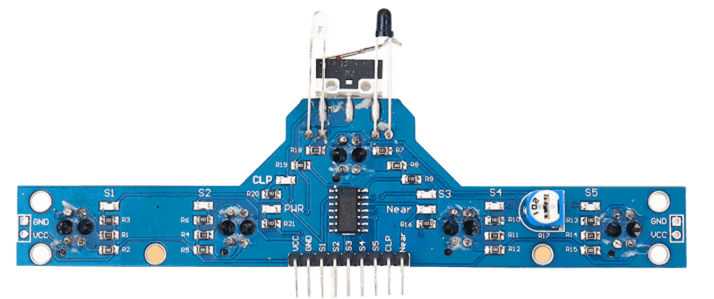
The BFD-1000 5 Channel is a high-performance multi-channel audio signal processor designed to enhance sound quality in a variety of audio applications. With five independent channels, it provides precise control over audio output, making it an essential tool for professional audio setups, live sound reinforcement, and studio environments. Its robust design and advanced features ensure reliable performance and exceptional sound clarity.

Explore Projects Built with BFD-1000 5 Channel

Use Cirkit Designer to design, explore, and prototype these projects online. Some projects support real-time simulation. Click "Open Project" to start designing instantly!
Arduino Pro Mini FM Radio with LCD Display and Battery Power
Image of DIY FM Radio RDA5807M V2: A project utilizing BFD-1000 5 Channel in a practical application
This circuit is a portable FM radio receiver with an integrated display and audio output. It uses an Arduino Pro Mini to control an RDA5807M FM receiver module, an ADS1115 ADC for additional analog inputs, and a PAM8403 amplifier to drive loudspeakers. The circuit also includes a rotary encoder for user input, an LCD screen for displaying information, and a boost converter for power management.
Cirkit Designer LogoOpen Project in Cirkit Designer
DC-DC Converter and Relay Module Power Distribution System
Image of relay: A project utilizing BFD-1000 5 Channel in a practical application
This circuit consists of a DC-DC converter powering a 6-channel power module, which in turn supplies 5V to a 2-relay module. The power module distributes the converted voltage to the relay module, enabling it to control external devices.
Cirkit Designer LogoOpen Project in Cirkit Designer
Arduino UNO Controlled Soundwave Generator with IR Sensor Activation and Relay Switching
Image of Fish Attractor: A project utilizing BFD-1000 5 Channel in a practical application
This circuit features an Arduino UNO microcontroller interfaced with a 4-channel relay, two IR sensors, a servo motor, an LCD I2C display, a PAM8403 audio amplifier connected to a speaker, and an XR2206 function generator with a resistor and capacitor for frequency shaping. The Arduino controls the relays based on a potentiometer input, displays frequency information on the LCD, and adjusts the servo position in response to the IR sensors. The XR2206 generates an adjustable frequency signal, while the PAM8403 amplifies audio for the speaker.
Cirkit Designer LogoOpen Project in Cirkit Designer
Arduino-Controlled Soundwave Generator with IR Sensor Activation and LCD Feedback
Image of Fish Attractor: A project utilizing BFD-1000 5 Channel in a practical application
This circuit features an Arduino UNO R4 WiFi microcontroller programmed to control a 4-channel relay, read from two IR sensors, and adjust a micro servo's position based on the IR sensors' input. It also generates variable frequency sound waves through a speaker using an XR2206 function generator, with the frequency adjusted by a potentiometer. An LCD I2C display is used to show the frequency and IR sensor status, and the sound's volume is controlled by a PAM8403 amplifier.
Cirkit Designer LogoOpen Project in Cirkit Designer

Explore Projects Built with BFD-1000 5 Channel

Use Cirkit Designer to design, explore, and prototype these projects online. Some projects support real-time simulation. Click "Open Project" to start designing instantly!
Image of DIY FM Radio RDA5807M V2: A project utilizing BFD-1000 5 Channel in a practical application
Arduino Pro Mini FM Radio with LCD Display and Battery Power
This circuit is a portable FM radio receiver with an integrated display and audio output. It uses an Arduino Pro Mini to control an RDA5807M FM receiver module, an ADS1115 ADC for additional analog inputs, and a PAM8403 amplifier to drive loudspeakers. The circuit also includes a rotary encoder for user input, an LCD screen for displaying information, and a boost converter for power management.
Cirkit Designer LogoOpen Project in Cirkit Designer
Image of relay: A project utilizing BFD-1000 5 Channel in a practical application
DC-DC Converter and Relay Module Power Distribution System
This circuit consists of a DC-DC converter powering a 6-channel power module, which in turn supplies 5V to a 2-relay module. The power module distributes the converted voltage to the relay module, enabling it to control external devices.
Cirkit Designer LogoOpen Project in Cirkit Designer
Image of Fish Attractor: A project utilizing BFD-1000 5 Channel in a practical application
Arduino UNO Controlled Soundwave Generator with IR Sensor Activation and Relay Switching
This circuit features an Arduino UNO microcontroller interfaced with a 4-channel relay, two IR sensors, a servo motor, an LCD I2C display, a PAM8403 audio amplifier connected to a speaker, and an XR2206 function generator with a resistor and capacitor for frequency shaping. The Arduino controls the relays based on a potentiometer input, displays frequency information on the LCD, and adjusts the servo position in response to the IR sensors. The XR2206 generates an adjustable frequency signal, while the PAM8403 amplifies audio for the speaker.
Cirkit Designer LogoOpen Project in Cirkit Designer
Image of Fish Attractor: A project utilizing BFD-1000 5 Channel in a practical application
Arduino-Controlled Soundwave Generator with IR Sensor Activation and LCD Feedback
This circuit features an Arduino UNO R4 WiFi microcontroller programmed to control a 4-channel relay, read from two IR sensors, and adjust a micro servo's position based on the IR sensors' input. It also generates variable frequency sound waves through a speaker using an XR2206 function generator, with the frequency adjusted by a potentiometer. An LCD I2C display is used to show the frequency and IR sensor status, and the sound's volume is controlled by a PAM8403 amplifier.
Cirkit Designer LogoOpen Project in Cirkit Designer

Common Applications and Use Cases

  • Professional audio systems for concerts and live events
  • Studio environments for mixing and mastering
  • Home theater systems for enhanced audio quality
  • Public address (PA) systems
  • Audio signal routing and processing in broadcasting setups

Technical Specifications

The following table outlines the key technical specifications of the BFD-1000 5 Channel:

Parameter Specification
Number of Channels 5
Input Voltage Range 12V DC ±10%
Signal-to-Noise Ratio ≥ 90 dB
Frequency Response 20 Hz – 20 kHz
Total Harmonic Distortion ≤ 0.01%
Maximum Output Level +18 dBu
Input Impedance 10 kΩ
Output Impedance 600 Ω
Power Consumption ≤ 10 W
Dimensions 200 mm x 150 mm x 50 mm
Weight 1.2 kg

Pin Configuration and Descriptions

The BFD-1000 features a standard pin interface for power and audio signal connections. Below is the pin configuration:

Pin Number Pin Name Description
1 VCC Power input (12V DC)
2 GND Ground connection
3 CH1_IN Channel 1 audio input
4 CH1_OUT Channel 1 audio output
5 CH2_IN Channel 2 audio input
6 CH2_OUT Channel 2 audio output
7 CH3_IN Channel 3 audio input
8 CH3_OUT Channel 3 audio output
9 CH4_IN Channel 4 audio input
10 CH4_OUT Channel 4 audio output
11 CH5_IN Channel 5 audio input
12 CH5_OUT Channel 5 audio output

Usage Instructions

How to Use the BFD-1000 in a Circuit

  1. Power Connection: Connect the VCC pin to a stable 12V DC power supply and the GND pin to the ground.
  2. Audio Input: Feed audio signals into the respective input pins (CH1_IN to CH5_IN) using standard audio cables.
  3. Audio Output: Connect the output pins (CH1_OUT to CH5_OUT) to the desired audio output devices, such as amplifiers or speakers.
  4. Signal Processing: Use the onboard controls or external software (if supported) to adjust parameters like gain, equalization, and channel mixing.

Important Considerations and Best Practices

  • Ensure the power supply voltage is within the specified range (12V DC ±10%) to avoid damage.
  • Use shielded audio cables to minimize noise and interference.
  • Avoid overloading the input or output channels to prevent distortion or damage.
  • Keep the device in a well-ventilated area to prevent overheating during prolonged use.
  • Regularly check and clean the connectors to maintain optimal performance.

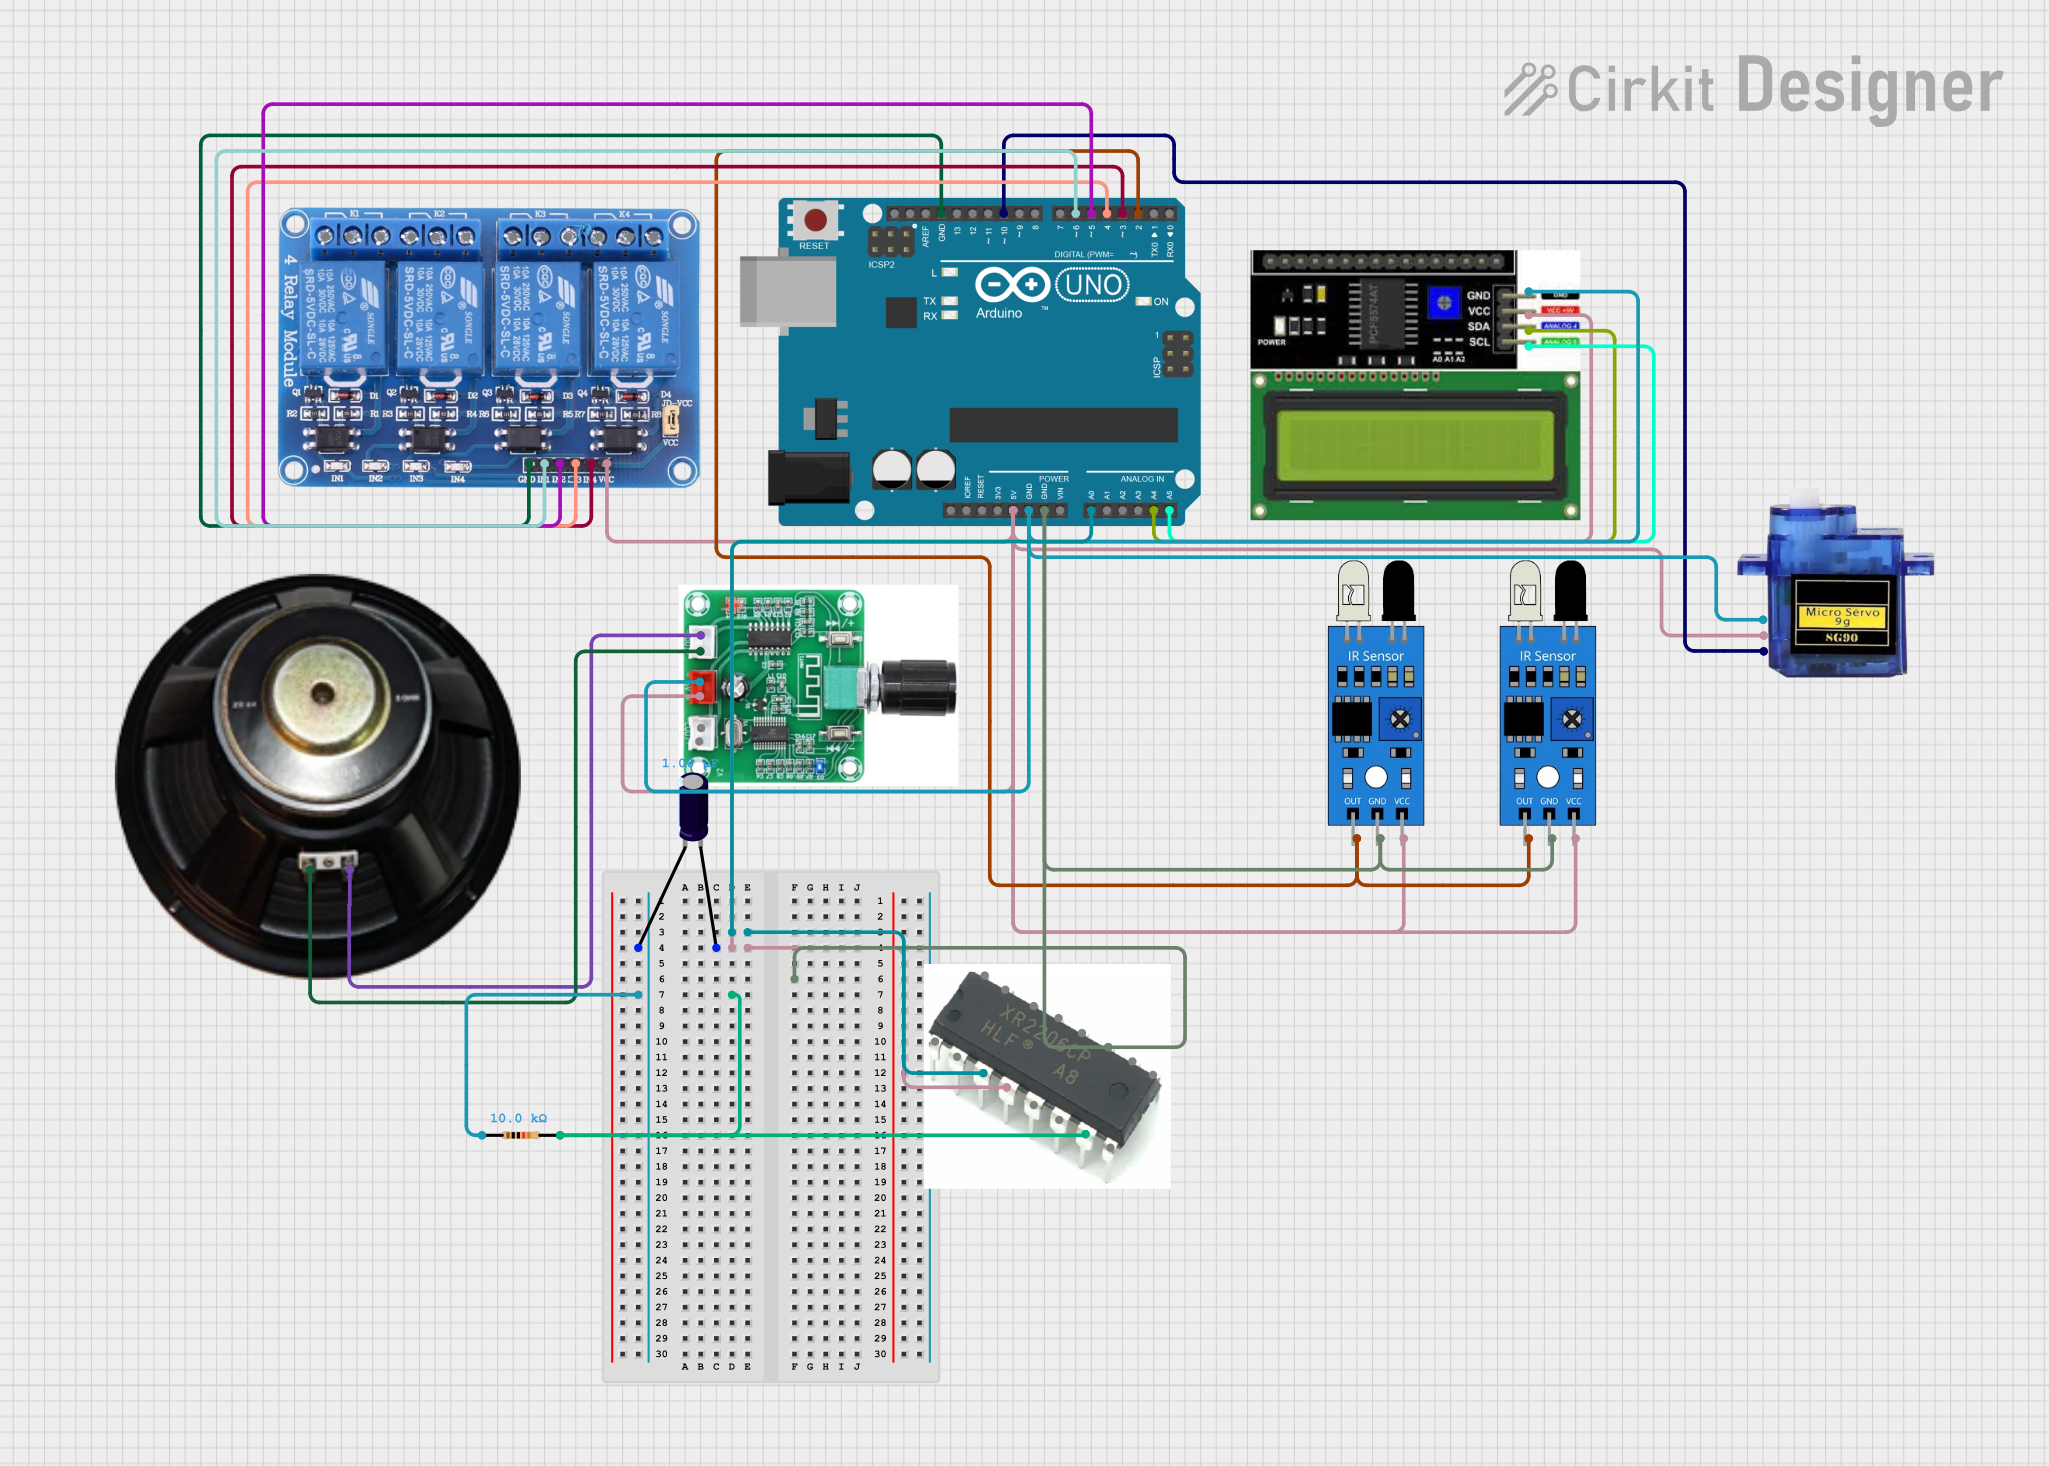
Example: Connecting to an Arduino UNO

While the BFD-1000 is primarily an audio processor, it can be integrated with an Arduino UNO for automation or control purposes. Below is an example code snippet for controlling the BFD-1000's power using a relay module connected to the Arduino:

// Define the pin connected to the relay module
const int relayPin = 7;

void setup() {
  // Set the relay pin as an output
  pinMode(relayPin, OUTPUT);

  // Turn off the relay initially (no power to BFD-1000)
  digitalWrite(relayPin, LOW);
}

void loop() {
  // Example: Turn on the BFD-1000 for 10 seconds, then turn it off
  digitalWrite(relayPin, HIGH); // Power on the BFD-1000
  delay(10000);                // Wait for 10 seconds
  digitalWrite(relayPin, LOW); // Power off the BFD-1000
  delay(5000);                 // Wait for 5 seconds before repeating
}

Note: Ensure the relay module is rated for the BFD-1000's power requirements.

Troubleshooting and FAQs

Common Issues and Solutions

  1. No Audio Output

    • Cause: Incorrect wiring or loose connections.
    • Solution: Verify all input and output connections. Ensure the power supply is stable and within the specified range.
  2. Distorted Sound

    • Cause: Overloaded input or output channels.
    • Solution: Reduce the input signal level or check the output device's impedance compatibility.
  3. Device Overheating

    • Cause: Poor ventilation or excessive usage.
    • Solution: Place the device in a well-ventilated area and avoid prolonged operation at maximum capacity.
  4. Interference or Noise

    • Cause: Unshielded cables or nearby electronic interference.
    • Solution: Use shielded cables and keep the device away from sources of electromagnetic interference.

FAQs

Q1: Can the BFD-1000 process digital audio signals?
A1: No, the BFD-1000 is designed for analog audio signals only.

Q2: Is the BFD-1000 compatible with 24V power supplies?
A2: No, the BFD-1000 operates on a 12V DC power supply. Using a higher voltage may damage the device.

Q3: Can I use fewer than five channels?
A3: Yes, you can use any number of channels as needed. Unused channels can remain unconnected without affecting performance.

Q4: Does the BFD-1000 support remote control?
A4: The BFD-1000 does not natively support remote control, but it can be integrated with external controllers like Arduino for basic automation.

Q5: What is the maximum cable length for audio connections?
A5: For optimal performance, keep cable lengths under 10 meters to minimize signal degradation. Use high-quality cables for longer distances.