Cirkit Designer Logo
Cirkit Designer
Your all-in-one circuit design IDE
Home / 
Component Documentation

How to Use DHT11 Temperature & Humidity Sensor: Examples, Pinouts, and Specs

Image of DHT11 Temperature & Humidity Sensor
Cirkit Designer LogoDesign with DHT11 Temperature & Humidity Sensor in Cirkit Designer

Introduction

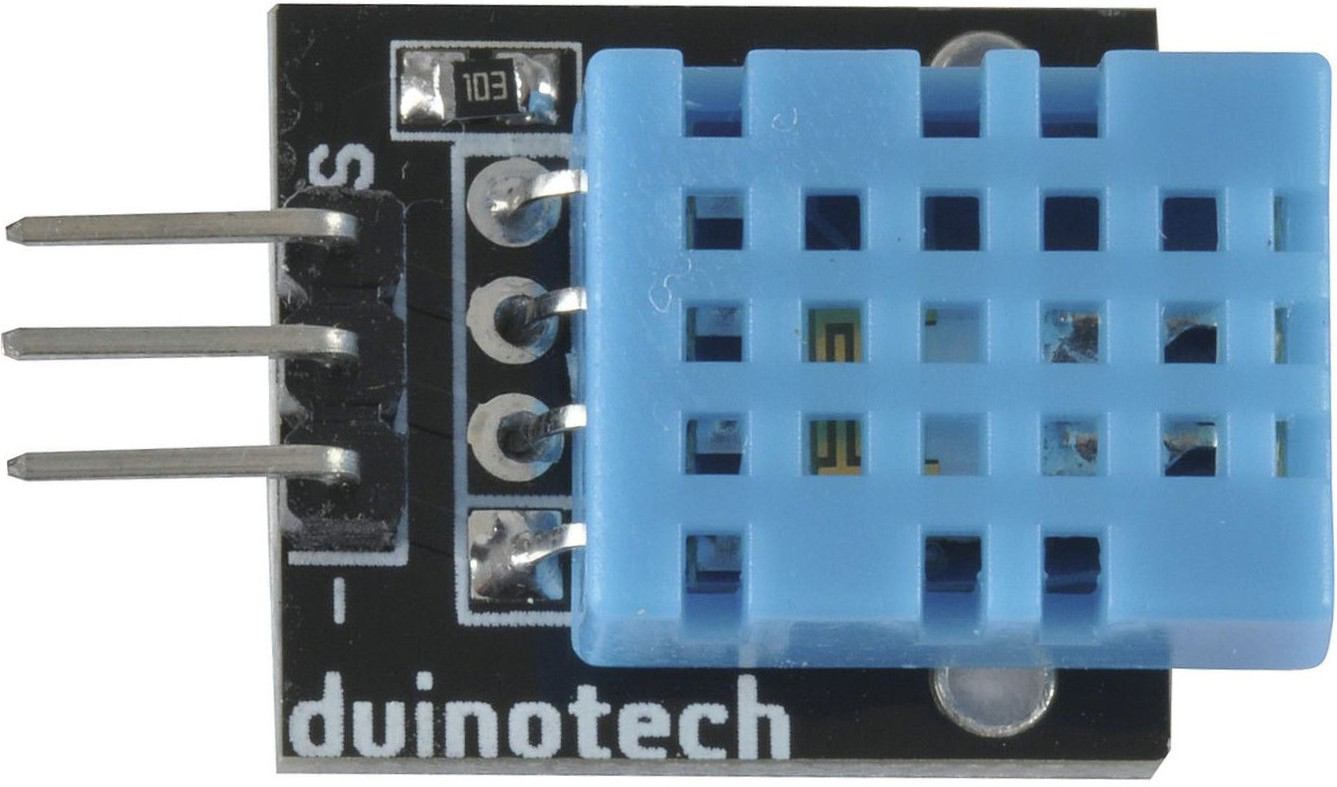
The DHT11 Temperature & Humidity Sensor (Manufacturer: Duinotech, Part ID: XC4520) is a digital sensor designed to measure temperature and humidity with high accuracy. It is widely used in environmental monitoring and control applications due to its simplicity, reliability, and low cost. The DHT11 outputs calibrated digital signals, making it easy to integrate into microcontroller-based systems.

Explore Projects Built with DHT11 Temperature & Humidity Sensor

Use Cirkit Designer to design, explore, and prototype these projects online. Some projects support real-time simulation. Click "Open Project" to start designing instantly!
Arduino UNO and DHT11 Sensor-Based Temperature and Humidity Monitor
Image of DHT11: A project utilizing DHT11 Temperature & Humidity Sensor in a practical application
This circuit uses an Arduino UNO to read temperature and humidity data from a DHT11 sensor. The sensor is powered by the Arduino's 5V and GND pins, and communicates data through digital pin D2. The Arduino runs a program to collect and print the sensor measurements to the serial monitor.
Cirkit Designer LogoOpen Project in Cirkit Designer
Arduino UNO and DHT11 Sensor-Based Temperature and Humidity Monitor
Image of temp and humidity sense: A project utilizing DHT11 Temperature & Humidity Sensor in a practical application
This circuit uses an Arduino UNO to read temperature and humidity data from a DHT11 sensor. The DHT11 sensor is powered by the Arduino and sends data to the Arduino's analog pin A0, which is then processed and displayed on the serial monitor.
Cirkit Designer LogoOpen Project in Cirkit Designer
Arduino UNO and DHT11 Sensor-Based Temperature and Humidity Monitor
Image of Measure Temperature a: A project utilizing DHT11 Temperature & Humidity Sensor in a practical application
This circuit uses an Arduino UNO to read temperature and humidity data from a DHT11 sensor. The sensor is powered by the Arduino's 5V and GND pins, with a 10k ohm pull-up resistor connected to the data line, which is read by the Arduino on digital pin 2. The Arduino runs a program to collect and print the sensor data to the serial monitor.
Cirkit Designer LogoOpen Project in Cirkit Designer
Arduino UNO-Based Temperature and Humidity Monitor with DHT11 Sensor
Image of DHT11: A project utilizing DHT11 Temperature & Humidity Sensor in a practical application
This circuit consists of an Arduino UNO microcontroller connected to a DHT11 temperature and humidity sensor. The DHT11 sensor is powered by the 3.3V and GND pins of the Arduino, and its data output is connected to the A0 analog input pin of the Arduino. The Arduino is programmed to read data from the DHT11 sensor.
Cirkit Designer LogoOpen Project in Cirkit Designer

Explore Projects Built with DHT11 Temperature & Humidity Sensor

Use Cirkit Designer to design, explore, and prototype these projects online. Some projects support real-time simulation. Click "Open Project" to start designing instantly!
Image of DHT11: A project utilizing DHT11 Temperature & Humidity Sensor in a practical application
Arduino UNO and DHT11 Sensor-Based Temperature and Humidity Monitor
This circuit uses an Arduino UNO to read temperature and humidity data from a DHT11 sensor. The sensor is powered by the Arduino's 5V and GND pins, and communicates data through digital pin D2. The Arduino runs a program to collect and print the sensor measurements to the serial monitor.
Cirkit Designer LogoOpen Project in Cirkit Designer
Image of temp and humidity sense: A project utilizing DHT11 Temperature & Humidity Sensor in a practical application
Arduino UNO and DHT11 Sensor-Based Temperature and Humidity Monitor
This circuit uses an Arduino UNO to read temperature and humidity data from a DHT11 sensor. The DHT11 sensor is powered by the Arduino and sends data to the Arduino's analog pin A0, which is then processed and displayed on the serial monitor.
Cirkit Designer LogoOpen Project in Cirkit Designer
Image of Measure Temperature a: A project utilizing DHT11 Temperature & Humidity Sensor in a practical application
Arduino UNO and DHT11 Sensor-Based Temperature and Humidity Monitor
This circuit uses an Arduino UNO to read temperature and humidity data from a DHT11 sensor. The sensor is powered by the Arduino's 5V and GND pins, with a 10k ohm pull-up resistor connected to the data line, which is read by the Arduino on digital pin 2. The Arduino runs a program to collect and print the sensor data to the serial monitor.
Cirkit Designer LogoOpen Project in Cirkit Designer
Image of DHT11: A project utilizing DHT11 Temperature & Humidity Sensor in a practical application
Arduino UNO-Based Temperature and Humidity Monitor with DHT11 Sensor
This circuit consists of an Arduino UNO microcontroller connected to a DHT11 temperature and humidity sensor. The DHT11 sensor is powered by the 3.3V and GND pins of the Arduino, and its data output is connected to the A0 analog input pin of the Arduino. The Arduino is programmed to read data from the DHT11 sensor.
Cirkit Designer LogoOpen Project in Cirkit Designer

Common Applications

  • Home automation systems (e.g., HVAC control)
  • Weather monitoring stations
  • Greenhouse and agricultural monitoring
  • IoT (Internet of Things) devices
  • Industrial process control

Technical Specifications

Key Technical Details

Parameter Value
Operating Voltage 3.3V to 5.5V
Operating Current 0.3mA (measuring), 60µA (idle)
Temperature Range 0°C to 50°C
Temperature Accuracy ±2°C
Humidity Range 20% to 90% RH
Humidity Accuracy ±5% RH
Sampling Period 1 second
Communication Protocol Single-wire digital signal

Pin Configuration and Descriptions

Pin Number Pin Name Description
1 VCC Power supply pin (3.3V to 5.5V)
2 DATA Digital data output pin for temperature and humidity readings
3 NC Not connected (leave unconnected)
4 GND Ground pin

Usage Instructions

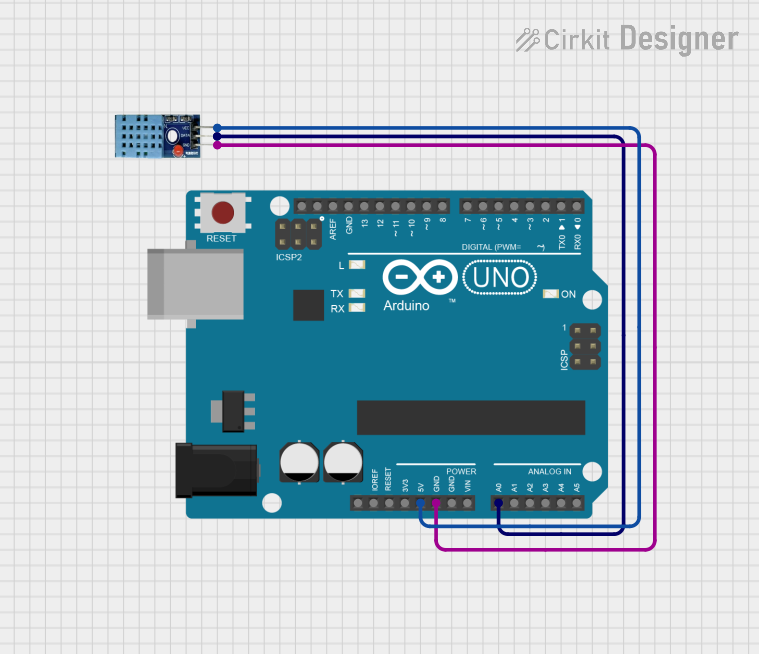
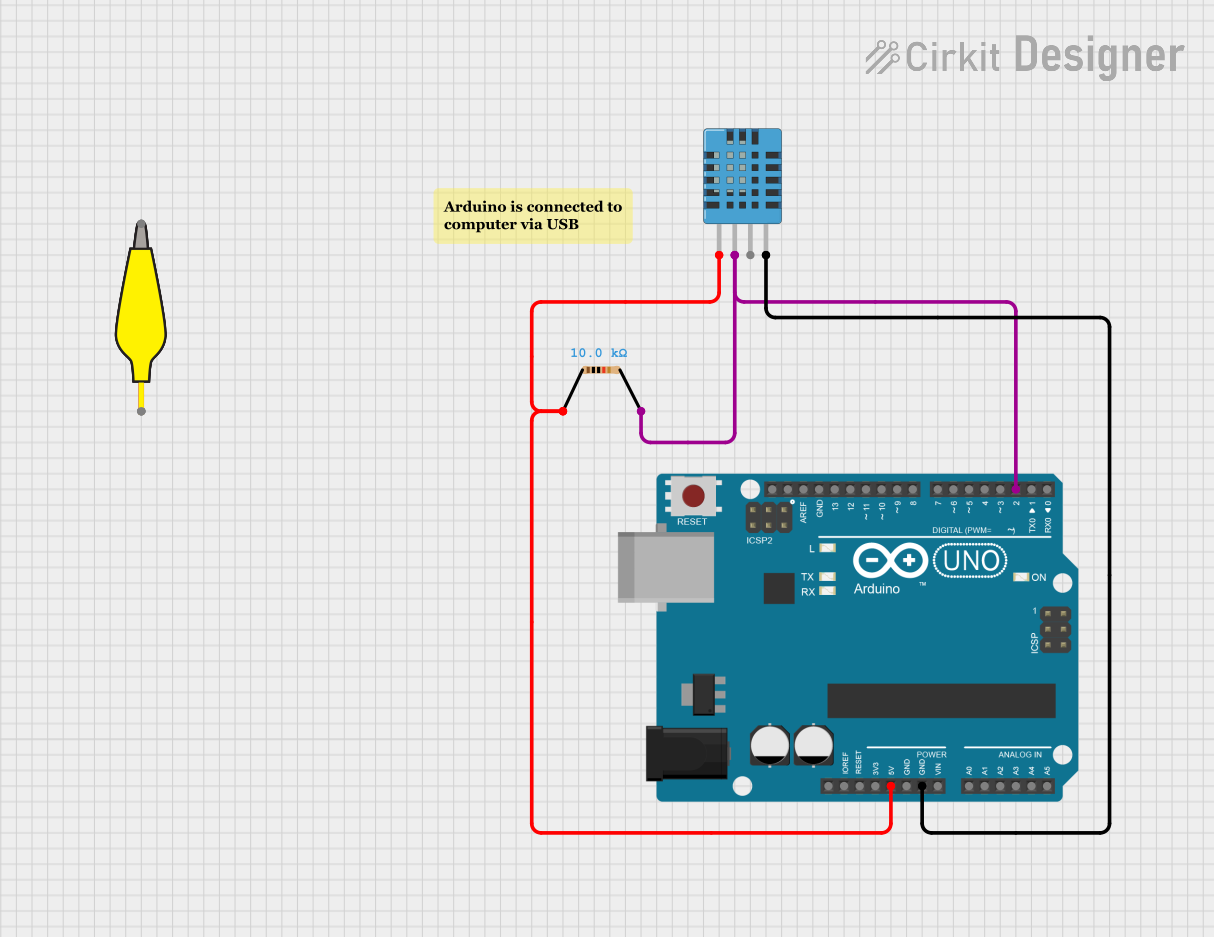
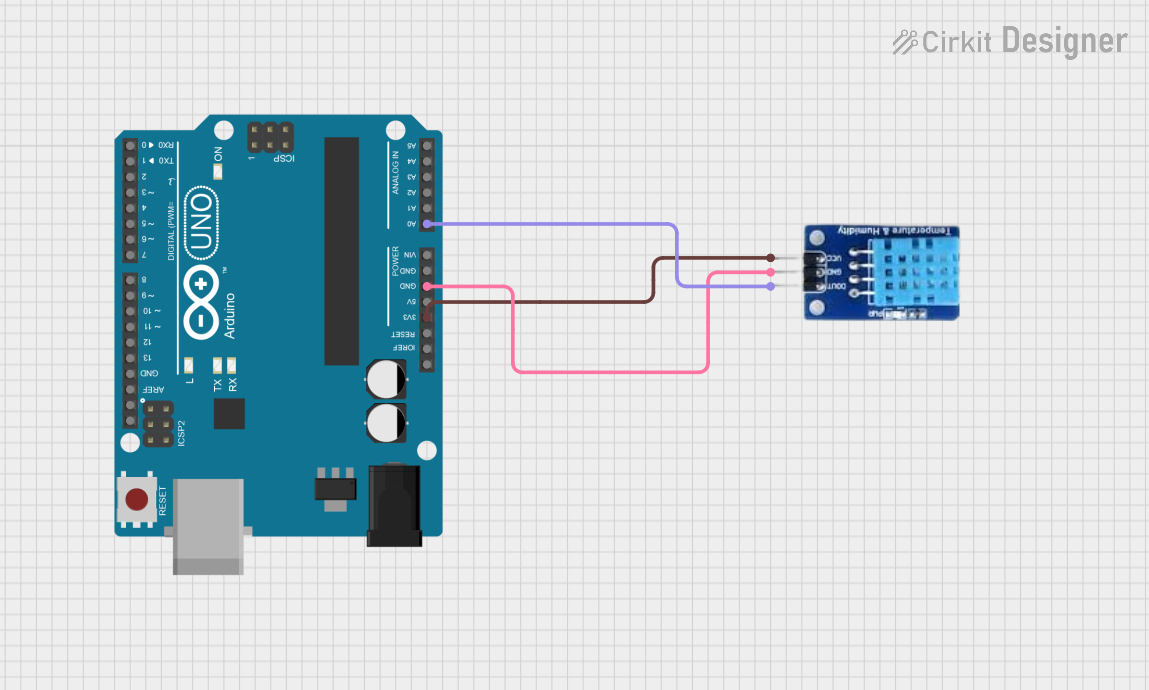
How to Use the DHT11 in a Circuit

  1. Power the Sensor: Connect the VCC pin to a 3.3V or 5V power source and the GND pin to ground.
  2. Data Communication: Connect the DATA pin to a microcontroller GPIO pin. Use a 10kΩ pull-up resistor between the DATA pin and VCC to ensure reliable communication.
  3. Timing Requirements: The DHT11 requires precise timing for data communication. Use a library or pre-written code to handle the protocol.
  4. Sampling Interval: Allow at least 1 second between consecutive readings to ensure accurate data.

Important Considerations

  • Environmental Conditions: Avoid exposing the sensor to extreme temperatures or humidity levels beyond its specified range.
  • Placement: Place the sensor in a location with good airflow for accurate readings.
  • Wiring Length: Keep the wiring between the sensor and microcontroller as short as possible to minimize signal degradation.

Example Code for Arduino UNO

Below is an example of how to use the DHT11 sensor with an Arduino UNO. This code uses the popular DHT library.

#include <DHT.h>

// Define the DHT11 pin and type
#define DHTPIN 2       // Pin connected to the DATA pin of DHT11
#define DHTTYPE DHT11  // Specify the sensor type (DHT11)

// Initialize the DHT sensor
DHT dht(DHTPIN, DHTTYPE);

void setup() {
  Serial.begin(9600);  // Start serial communication
  Serial.println("DHT11 Sensor Initialization");
  dht.begin();         // Initialize the DHT sensor
}

void loop() {
  delay(2000);  // Wait 2 seconds between readings

  // Read temperature and humidity
  float humidity = dht.readHumidity();
  float temperature = dht.readTemperature();

  // Check if readings are valid
  if (isnan(humidity) || isnan(temperature)) {
    Serial.println("Failed to read from DHT sensor!");
    return;
  }

  // Print the readings to the Serial Monitor
  Serial.print("Humidity: ");
  Serial.print(humidity);
  Serial.print(" %\t");
  Serial.print("Temperature: ");
  Serial.print(temperature);
  Serial.println(" °C");
}

Notes on the Code

  • Install the DHT library from the Arduino Library Manager before uploading the code.
  • Ensure the DATA pin is connected to the correct GPIO pin (in this case, pin 2).

Troubleshooting and FAQs

Common Issues

  1. No Data Output:

    • Cause: Incorrect wiring or missing pull-up resistor.
    • Solution: Double-check the wiring and ensure a 10kΩ pull-up resistor is connected between the DATA pin and VCC.
  2. Invalid Readings (e.g., NaN):

    • Cause: Timing issues or sensor malfunction.
    • Solution: Verify the sampling interval (minimum 1 second) and ensure the sensor is not damaged.
  3. Inconsistent Readings:

    • Cause: Poor placement or environmental interference.
    • Solution: Place the sensor in a stable environment with good airflow and away from heat sources.

FAQs

Q1: Can I use the DHT11 with a 3.3V microcontroller?
A1: Yes, the DHT11 operates within a voltage range of 3.3V to 5.5V.

Q2: What is the maximum cable length for the DHT11?
A2: The recommended maximum cable length is 20 meters, but shorter lengths are preferred for better signal integrity.

Q3: How do I know if my DHT11 is faulty?
A3: If the sensor consistently outputs invalid readings (e.g., NaN) despite correct wiring and code, it may be damaged and require replacement.