How to Use Loncont LSA-H3P50YB: Examples, Pinouts, and Specs
Introduction
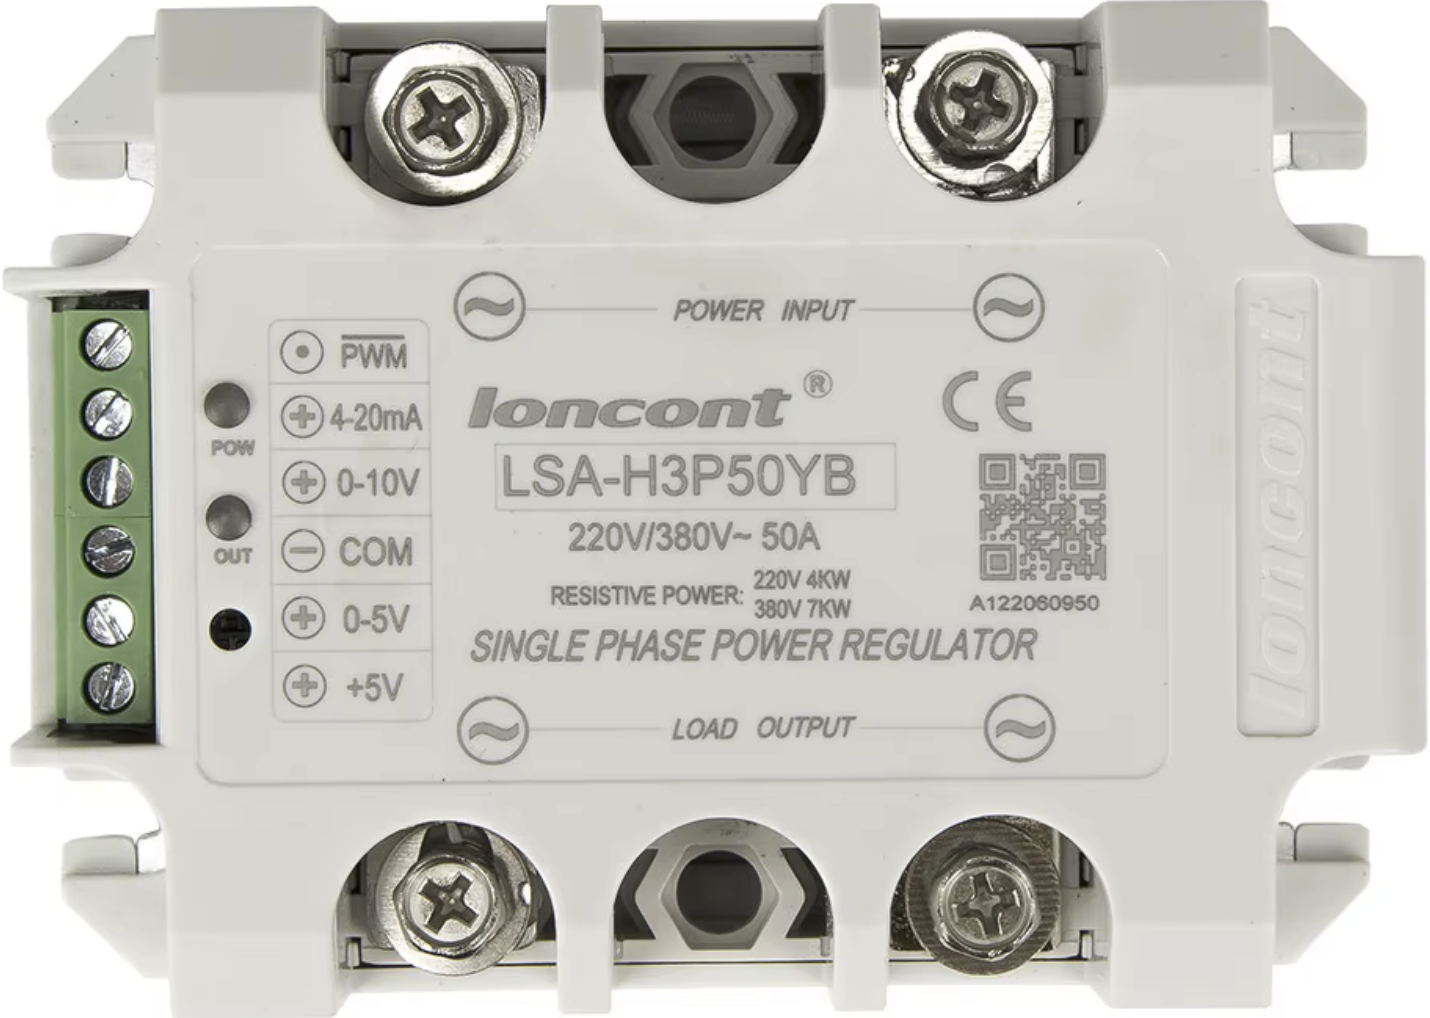
The Loncont LSA-H3P50YB is a high-performance LED driver designed for efficient power management in lighting applications. It features adjustable output current, thermal protection, and a compact design, making it ideal for a wide range of LED lighting systems. This component ensures stable and reliable operation, even under varying environmental conditions, and is suitable for both indoor and outdoor lighting solutions.
Explore Projects Built with Loncont LSA-H3P50YB


Explore Projects Built with Loncont LSA-H3P50YB
Common Applications and Use Cases
- LED streetlights and outdoor lighting
- Commercial and industrial lighting systems
- Architectural lighting
- LED signage and displays
- Smart lighting systems with dimming capabilities
Technical Specifications
The following table outlines the key technical details of the LSA-H3P50YB LED driver:
| Parameter | Value |
|---|---|
| Input Voltage Range | 90–305 VAC |
| Output Voltage Range | 20–50 VDC |
| Output Current Range | 350–1050 mA (adjustable) |
| Maximum Output Power | 50 W |
| Efficiency | Up to 92% |
| Dimming Control | 0–10V dimming interface |
| Operating Temperature | -40°C to +85°C |
| Protection Features | Over-temperature, over-voltage, |
| short-circuit, and over-current | |
| Dimensions | 95 mm x 45 mm x 30 mm |
| Weight | 150 g |
| Compliance | UL, CE, RoHS |
Pin Configuration and Descriptions
The LSA-H3P50YB has a simple pinout for easy integration into lighting systems. The table below describes the pin configuration:
| Pin Name | Type | Description |
|---|---|---|
| AC-L | Input | Live input for AC power (90–305 VAC). |
| AC-N | Input | Neutral input for AC power. |
| GND | Ground | Ground connection for the driver. |
| LED+ | Output | Positive terminal for LED connection. |
| LED- | Output | Negative terminal for LED connection. |
| DIM+ | Control Input | Positive terminal for 0–10V dimming control. |
| DIM- | Control Input | Negative terminal for 0–10V dimming control. |
Usage Instructions
How to Use the Component in a Circuit
- Power Input: Connect the AC-L and AC-N pins to the live and neutral wires of the AC power source. Ensure the input voltage is within the specified range (90–305 VAC).
- LED Connection: Connect the LED+ and LED- pins to the positive and negative terminals of the LED load. Ensure the LED load matches the output voltage and current range of the driver.
- Dimming Control (Optional): If dimming functionality is required, connect a 0–10V dimming signal to the DIM+ and DIM- pins. Adjust the dimming voltage to control the brightness of the LEDs.
- Grounding: Connect the GND pin to the system ground to ensure proper operation and safety.
Important Considerations and Best Practices
- Thermal Management: Ensure adequate ventilation or heat sinking to prevent the driver from overheating. The driver includes thermal protection, but proper cooling will enhance its lifespan.
- Load Compatibility: Verify that the LED load is within the specified output voltage and current range to avoid damage to the driver or LEDs.
- Dimming Signal: Use a stable 0–10V dimming signal for smooth brightness control. Avoid noise or fluctuations in the dimming input.
- Wiring: Use appropriate wire gauges for the input and output connections to handle the current safely.
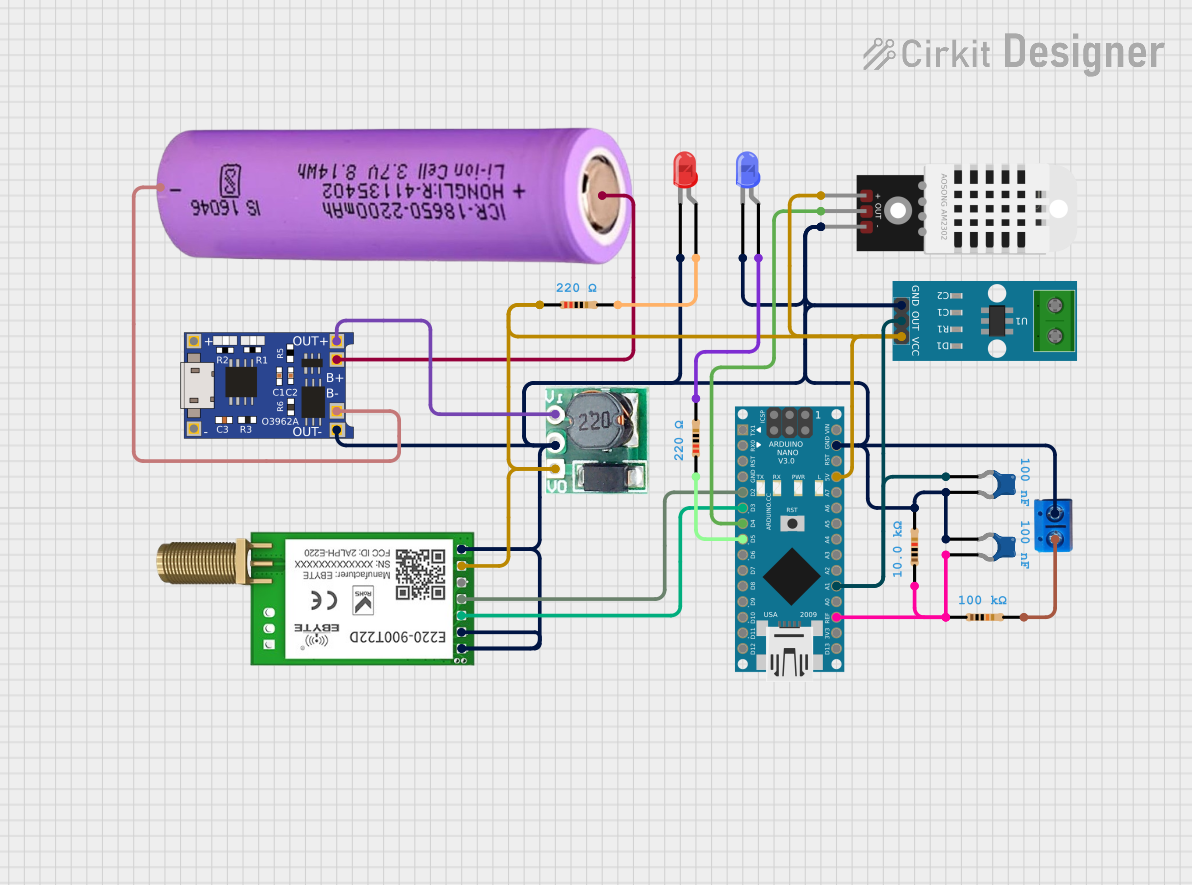
Example: Connecting to an Arduino UNO for Dimming
The LSA-H3P50YB can be controlled using an Arduino UNO to provide a 0–10V dimming signal. Below is an example circuit and code:
Circuit Setup
- Connect the DIM+ pin of the driver to a PWM output pin on the Arduino (e.g., pin 9).
- Connect the DIM- pin of the driver to the Arduino GND.
- Use a low-pass filter (e.g., a 10kΩ resistor and 10µF capacitor) to smooth the PWM signal into an analog voltage.
Arduino Code
// Loncont LSA-H3P50YB Dimming Example
// This code generates a PWM signal to control the brightness of LEDs
// connected to the LSA-H3P50YB LED driver.

const int pwmPin = 9; // PWM output pin connected to DIM+ of the driver
int brightness = 128; // Initial brightness (0-255)

void setup() {
  pinMode(pwmPin, OUTPUT); // Set the PWM pin as an output
}

void loop() {
  analogWrite(pwmPin, brightness); // Write the PWM signal to the driver

  // Example: Gradually increase and decrease brightness
  for (brightness = 0; brightness <= 255; brightness++) {
    analogWrite(pwmPin, brightness); // Increase brightness
    delay(10); // Delay for smooth transition
  }
  for (brightness = 255; brightness >= 0; brightness--) {
    analogWrite(pwmPin, brightness); // Decrease brightness
    delay(10); // Delay for smooth transition
  }
}
Troubleshooting and FAQs
Common Issues and Solutions
LEDs Not Lighting Up
- Cause: Incorrect wiring or insufficient input voltage.
- Solution: Double-check all connections and ensure the input voltage is within the specified range.
Flickering LEDs
- Cause: Unstable dimming signal or incompatible LED load.
- Solution: Use a stable 0–10V dimming signal and verify the LED load matches the driver's specifications.
Driver Overheating
- Cause: Poor ventilation or excessive load.
- Solution: Improve ventilation or reduce the LED load to stay within the driver's output power range.
Dimming Not Working
- Cause: Incorrect dimming signal or wiring.
- Solution: Verify the dimming signal is within the 0–10V range and check the DIM+ and DIM- connections.
FAQs
Q: Can the LSA-H3P50YB be used with DC input?
A: No, the driver is designed for AC input only (90–305 VAC).
Q: What happens if the LED load exceeds the driver's output power?
A: The driver includes over-current protection and will shut down to prevent damage.
Q: Is the driver waterproof?
A: The driver is not inherently waterproof. For outdoor use, ensure it is housed in a waterproof enclosure.
Q: Can I use a microcontroller other than Arduino for dimming?
A: Yes, any microcontroller capable of generating a 0–10V signal or PWM output can be used.