How to Use ESP32 TFT 3.5 CYD: Examples, Pinouts, and Specs

Introduction
The ESP32 TFT 3.5 CYD is a 3.5-inch TFT display module designed to integrate seamlessly with the ESP32 microcontroller. This module enables developers to create graphical outputs and user interfaces for embedded systems. With its vibrant display and touch functionality, it is ideal for applications requiring visual feedback or interactive controls.
Explore Projects Built with ESP32 TFT 3.5 CYD


Explore Projects Built with ESP32 TFT 3.5 CYD
Common Applications and Use Cases
- Smart home control panels
- IoT dashboards and monitoring systems
- Industrial control interfaces
- Educational and hobbyist projects
- Portable gaming devices
Technical Specifications
Key Technical Details
| Parameter | Specification |
|---|---|
| Display Size | 3.5 inches |
| Resolution | 480 x 320 pixels |
| Display Type | TFT LCD |
| Touch Panel | Resistive or Capacitive (varies by model) |
| Controller IC | ILI9488 |
| Interface | SPI |
| Operating Voltage | 3.3V |
| Backlight Voltage | 3.3V |
| Current Consumption | ~100mA (varies with brightness) |
| Dimensions | 85mm x 55mm x 5mm |
Pin Configuration and Descriptions
| Pin Name | Pin Number | Description |
|---|---|---|
| VCC | 1 | Power input (3.3V) |
| GND | 2 | Ground |
| CS | 3 | Chip Select for SPI communication |
| RESET | 4 | Reset pin for the display |
| DC/RS | 5 | Data/Command control pin |
| SDI/MOSI | 6 | SPI Master Out Slave In (data input) |
| SCK | 7 | SPI Clock |
| LED | 8 | Backlight control (connect to 3.3V) |
| T_CLK | 9 | Touch panel SPI clock |
| T_CS | 10 | Touch panel chip select |
| T_DIN | 11 | Touch panel SPI data input |
| T_DO | 12 | Touch panel SPI data output |
| T_IRQ | 13 | Touch panel interrupt signal |
Usage Instructions
How to Use the Component in a Circuit
- Power the Module: Connect the
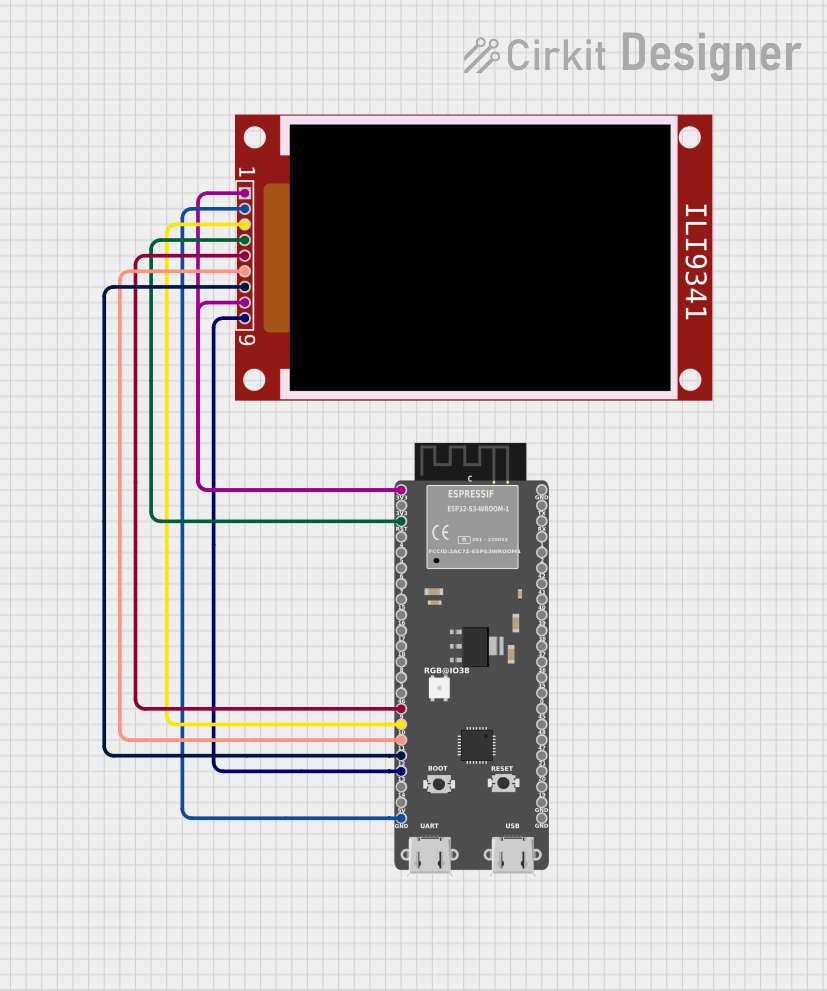
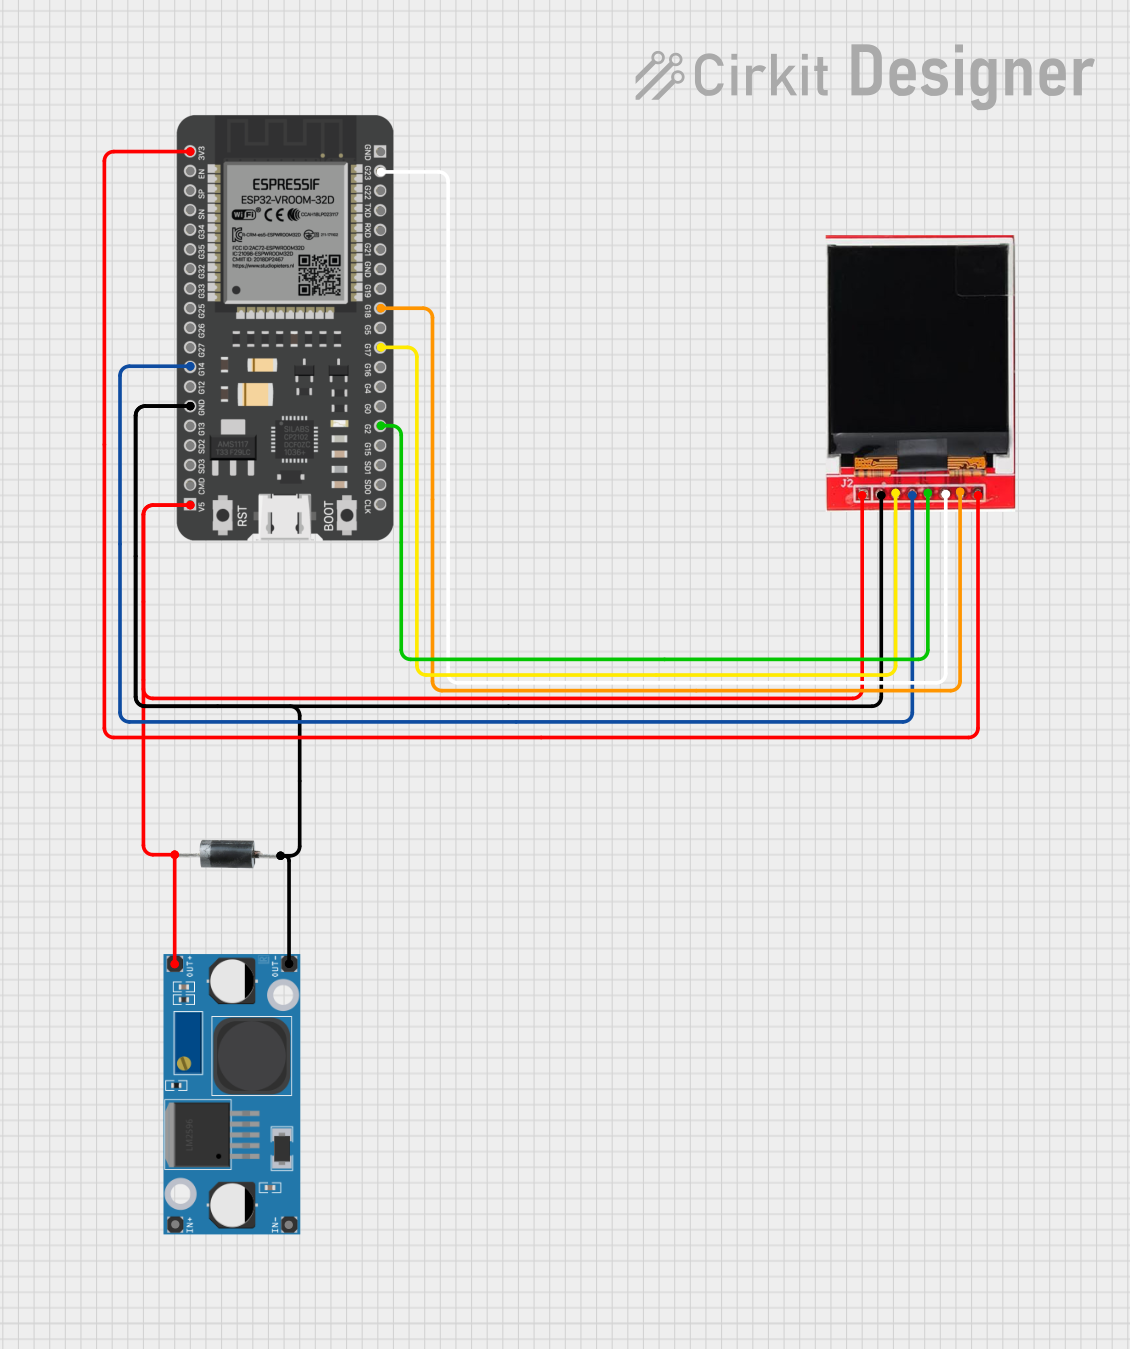
VCCpin to a 3.3V power source and theGNDpin to ground. - Connect SPI Pins:
- Connect
CS,SDI/MOSI,SCK, andDC/RSto the corresponding SPI pins on the ESP32. - Use GPIO pins on the ESP32 for these connections, ensuring they match your code configuration.
- Connect
- Backlight Control: Connect the
LEDpin to 3.3V for constant backlight or to a PWM pin for brightness control. - Touch Functionality: If using the touch panel, connect
T_CLK,T_CS,T_DIN,T_DO, andT_IRQto available GPIO pins on the ESP32.
Important Considerations and Best Practices
- Voltage Levels: Ensure all connections use 3.3V logic levels to avoid damaging the module.
- SPI Speed: Use an SPI clock speed of up to 40MHz for optimal performance.
- Library Support: Use libraries like
TFT_eSPIorAdafruit_GFXfor easier integration with the ESP32. - Touch Calibration: If using the touch panel, calibrate it using the appropriate library functions to ensure accurate touch detection.
Example Code for Arduino IDE
Below is an example of how to initialize and display text on the ESP32 TFT 3.5 CYD using the TFT_eSPI library.
#include <TFT_eSPI.h> // Include the TFT_eSPI library

TFT_eSPI tft = TFT_eSPI(); // Create an instance of the display

void setup() {
  tft.init();               // Initialize the display
  tft.setRotation(1);       // Set display orientation (0-3)
  tft.fillScreen(TFT_BLACK); // Clear the screen with black color

  tft.setTextColor(TFT_WHITE, TFT_BLACK); // Set text color and background
  tft.setTextSize(2);        // Set text size

  tft.setCursor(10, 10);     // Set cursor position
  tft.println("Hello, ESP32!"); // Print text to the display
}

void loop() {
  // Add your code here for dynamic updates
}
Notes:
- Ensure the
User_Setup.hfile in theTFT_eSPIlibrary is configured for the ESP32 and ILI9488 controller. - Match the GPIO pin assignments in the code with your hardware connections.
Troubleshooting and FAQs
Common Issues and Solutions
Display Not Turning On:
- Verify the
VCCandGNDconnections. - Ensure the power supply provides sufficient current (at least 100mA).
- Verify the
No Output on the Screen:
- Check the SPI connections (
CS,SDI/MOSI,SCK,DC/RS). - Confirm the
TFT_eSPIlibrary is correctly configured for the ILI9488 controller.
- Check the SPI connections (
Touch Panel Not Responding:
- Verify the touch panel connections (
T_CLK,T_CS,T_DIN,T_DO,T_IRQ). - Calibrate the touch panel using the library's calibration example.
- Verify the touch panel connections (
Flickering or Artifacts on the Display:
- Reduce the SPI clock speed in the library configuration.
- Ensure proper grounding and minimize noise in the circuit.
FAQs
Q: Can I use a 5V power supply for this module?
A: No, the module operates at 3.3V. Using 5V can damage the display and touch controller.
Q: Which library is recommended for this display?
A: The TFT_eSPI library is highly recommended for its performance and compatibility with the ESP32.
Q: How do I control the backlight brightness?
A: Connect the LED pin to a PWM-capable GPIO pin on the ESP32 and use PWM signals to adjust brightness.
Q: Can I use this module with other microcontrollers?
A: Yes, as long as the microcontroller supports SPI communication and operates at 3.3V logic levels.
Q: Is the touch panel mandatory to use?
A: No, the touch panel is optional. You can use the display without touch functionality if not required.