How to Use VS1053: Examples, Pinouts, and Specs
Introduction
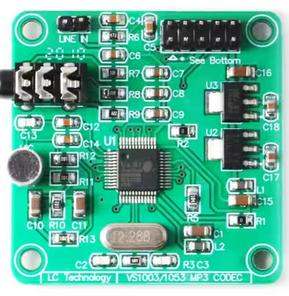
The VS1053 is a versatile audio decoder and encoder chip designed for high-quality audio processing. It supports a wide range of audio formats, including MP3, AAC, WAV, WMA, and Ogg Vorbis, making it an ideal choice for embedded systems requiring audio playback and recording capabilities. The chip integrates a digital-to-analog converter (DAC) and an analog-to-digital converter (ADC), ensuring efficient audio signal processing with minimal external components.
Explore Projects Built with VS1053


Explore Projects Built with VS1053
Common Applications and Use Cases
- MP3 players and audio playback devices
- Voice recorders and audio streaming systems
- Embedded systems requiring audio feedback or sound effects
- Internet radios and portable media players
- Audio processing in IoT devices
Technical Specifications
Key Technical Details
- Supported Audio Formats: MP3, AAC, WAV, WMA, Ogg Vorbis, MIDI
- Supply Voltage: 2.7V to 3.6V
- I/O Voltage: 1.8V to 3.3V
- Current Consumption:
- Playback: ~25 mA (typical)
- Recording: ~30 mA (typical)
- DAC Signal-to-Noise Ratio (SNR): 95 dB
- ADC Resolution: 16-bit
- Communication Interface: SPI (Serial Peripheral Interface)
- Clock Frequency: Up to 12.288 MHz
- Package: LQFP-48 (48-pin)
Pin Configuration and Descriptions
The VS1053 has 48 pins, but the most commonly used pins for basic operation are listed below:
| Pin Name | Pin Number | Description |
|---|---|---|
| VDD | 1, 24, 48 | Positive supply voltage for the core and I/O. |
| GND | 12, 25, 36 | Ground connection. |
| MISO | 7 | SPI Master-In-Slave-Out (data output from VS1053). |
| MOSI | 6 | SPI Master-Out-Slave-In (data input to VS1053). |
| SCK | 5 | SPI clock input. |
| XCS | 4 | Chip select for SPI commands. Active low. |
| XDCS | 3 | Data chip select for SPI data transfer. Active low. |
| DREQ | 2 | Data request pin. Indicates when the chip is ready to receive more data. |
| RESET | 8 | Resets the chip when pulled low. |
| LINE1_L | 33 | Left channel line input for audio recording. |
| LINE1_R | 34 | Right channel line input for audio recording. |
| SPK_L | 37 | Left channel speaker output. |
| SPK_R | 38 | Right channel speaker output. |
| GBUF | 39 | Ground buffer for headphone output. |
| XTALI | 13 | Crystal oscillator input. |
| XTALO | 14 | Crystal oscillator output. |
Usage Instructions
How to Use the VS1053 in a Circuit
- Power Supply: Connect the VDD pins to a 3.3V power source and the GND pins to ground. Use decoupling capacitors (e.g., 0.1 µF) near the power pins to reduce noise.
- SPI Communication: Connect the SPI pins (MISO, MOSI, SCK, XCS, XDCS) to a microcontroller or development board (e.g., Arduino UNO). Ensure proper pull-up or pull-down resistors if required.
- Audio Input/Output:
- For playback, connect the SPK_L and SPK_R pins to speakers or headphones. Use GBUF for the ground reference.
- For recording, connect audio sources to LINE1_L and LINE1_R.
- Clock Source: Attach a 12.288 MHz crystal oscillator to the XTALI and XTALO pins for proper operation.
- Reset: Use the RESET pin to initialize the chip during startup or after a fault.
Important Considerations and Best Practices
- Voltage Levels: Ensure that the I/O voltage levels match the microcontroller's logic levels to avoid damage.
- Decoupling: Use decoupling capacitors close to the power pins to stabilize the power supply.
- DREQ Pin: Monitor the DREQ pin to determine when the chip is ready to receive data. This prevents buffer overflows.
- Audio Quality: Use high-quality capacitors and resistors in the audio signal path to minimize noise and distortion.
- Heat Dissipation: Ensure proper ventilation or heat sinking if the chip operates for extended periods.
Example: Connecting VS1053 to Arduino UNO
Below is an example of how to interface the VS1053 with an Arduino UNO for MP3 playback:
Circuit Connections
| VS1053 Pin | Arduino Pin |
|---|---|
| MISO | 12 |
| MOSI | 11 |
| SCK | 13 |
| XCS | 10 |
| XDCS | 9 |
| DREQ | 8 |
| RESET | 7 |
| VDD | 3.3V |
| GND | GND |
Arduino Code
#include <SPI.h>
#include <Adafruit_VS1053.h>

// Define VS1053 pins
#define VS1053_RESET 7
#define VS1053_CS    10
#define VS1053_DCS   9
#define VS1053_DREQ  8

// Create VS1053 object
Adafruit_VS1053_FilePlayer musicPlayer = Adafruit_VS1053_FilePlayer(
  VS1053_RESET, VS1053_CS, VS1053_DCS, VS1053_DREQ
);

void setup() {
  Serial.begin(9600);
  Serial.println("Initializing VS1053...");

  // Initialize VS1053
  if (!musicPlayer.begin()) {
    Serial.println("VS1053 initialization failed!");
    while (1);
  }
  Serial.println("VS1053 initialized.");

  // Set volume (0 = max, 255 = min)
  musicPlayer.setVolume(20, 20);

  // Start playing an MP3 file from SD card
  if (!musicPlayer.startPlayingFile("/track001.mp3")) {
    Serial.println("Failed to play file!");
  } else {
    Serial.println("Playing track001.mp3...");
  }
}

void loop() {
  // Check if the file is still playing
  if (!musicPlayer.stopped()) {
    Serial.println("Playing...");
    delay(1000);
  } else {
    Serial.println("Playback finished.");
    while (1); // Stop the loop
  }
}
Note: Ensure the SD card contains an MP3 file named
track001.mp3in the root directory. Use the Adafruit VS1053 library for this example.
Troubleshooting and FAQs
Common Issues and Solutions
No Sound Output:
- Verify the speaker or headphone connections to SPK_L, SPK_R, and GBUF.
- Check the volume settings in the code or hardware.
Chip Not Responding:
- Ensure the SPI connections are correct and match the microcontroller's pins.
- Check the RESET pin and ensure it is not held low.
Distorted Audio:
- Use high-quality capacitors in the audio signal path.
- Verify the power supply is stable and free of noise.
Playback Stops Unexpectedly:
- Monitor the DREQ pin to ensure the buffer is not underflowing.
- Check the SD card for file corruption or compatibility issues.
FAQs
Can the VS1053 play audio from a USB drive? No, the VS1053 does not natively support USB drives. Use an external USB-to-SPI interface.
What is the maximum bitrate supported for MP3 playback? The VS1053 supports MP3 bitrates up to 320 kbps.
Can I use the VS1053 with 5V logic? No, the VS1053 operates at 3.3V logic. Use level shifters if interfacing with 5V systems.