Cirkit Designer
Your all-in-one circuit design IDE
Home /
Component Documentation
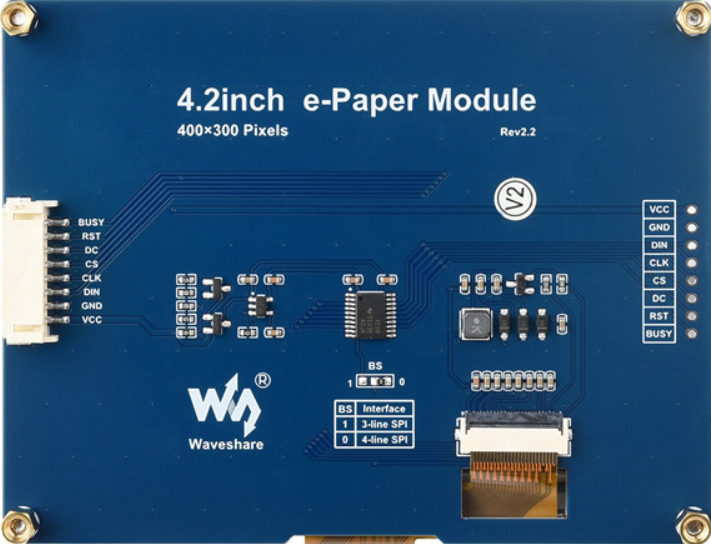
How to Use 4.2in 400x600 E-Ink Paper Display Module: Examples, Pinouts, and Specs
Introduction
The 4.2in 400x600 E-Ink Paper Display Module by Waveshare is a versatile and energy-efficient display solution. E-Ink, or electronic ink, is a type of electronic paper technology that mimics the appearance of ink on paper. This display module is particularly well-suited for applications where readability in various lighting conditions and low power consumption are critical.
Explore Projects Built with 4.2in 400x600 E-Ink Paper Display Module
Arduino-Powered 2.9" Greyscale eInk Display with Checkerboard Pattern
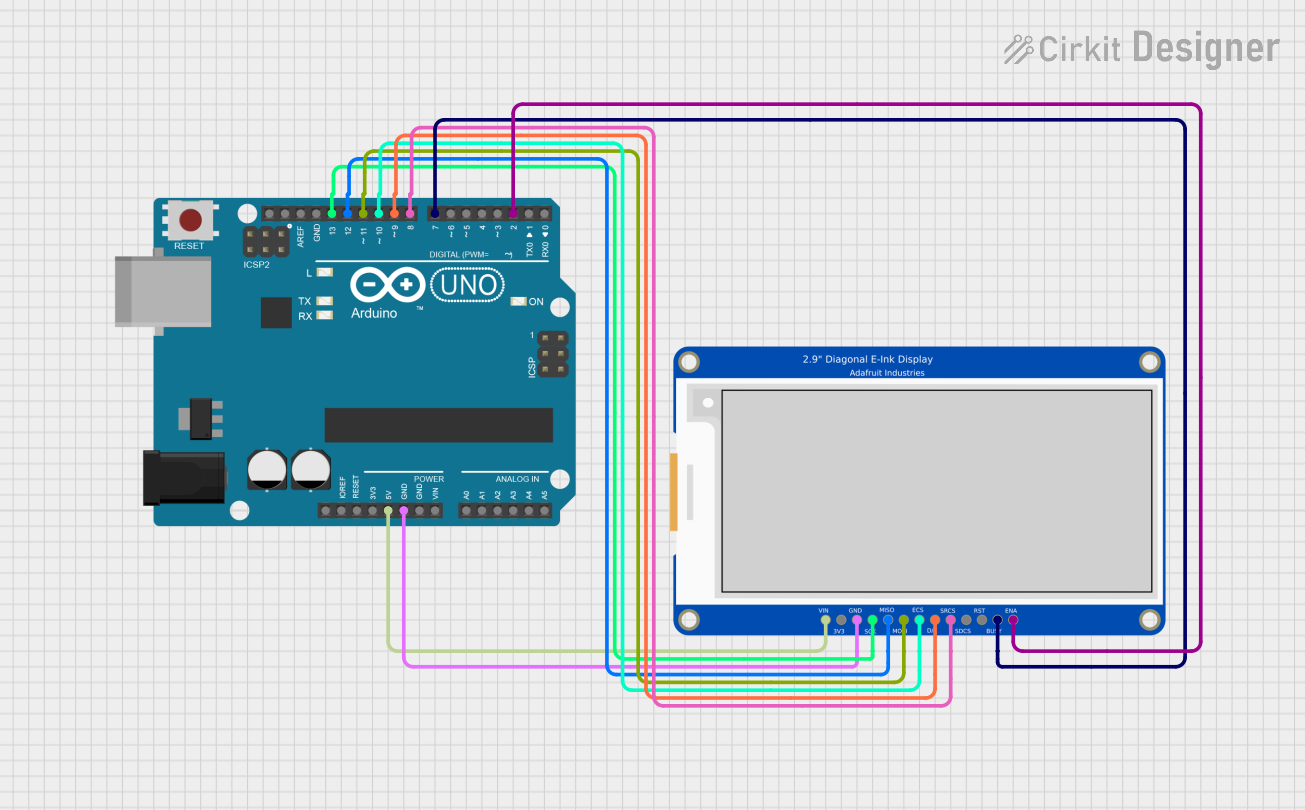
This circuit interfaces an Arduino UNO with a 2.9" Greyscale eInk display, allowing the microcontroller to control the display and render images. The Arduino is programmed to initialize the display, draw a checkerboard pattern, and invert the pattern after a delay, demonstrating the eInk display's ability to hold images without continuous updates.
ESP32-S3 Powered Tri-Color E-Ink Display Demo

This circuit integrates an ESP32-S3 microcontroller with a 2.9" Tri-Color E-Ink display, enabling the microcontroller to control the display for rendering graphics and text. The ESP32-S3 communicates with the display using SPI protocol, allowing for dynamic visual output such as animations and text updates in red, black, and white.
ESP32-Powered 1.3 inch TFT Display Module for Visual Data Output

This circuit connects an ESP32 microcontroller to a 1.3 inch TFT display module (ST7789). The ESP32 provides power and control signals to the display, enabling it to show graphical data.
I2C-Controlled OLED Display with External EEPROM and Interactive Pushbuttons

This is a microcontroller-based interactive device featuring a Wemos D1 Mini, an OLED display, external EEPROM, and an I/O expander. It includes user input buttons and status LEDs, with potential MIDI interface capabilities.
Explore Projects Built with 4.2in 400x600 E-Ink Paper Display Module
Arduino-Powered 2.9" Greyscale eInk Display with Checkerboard Pattern
This circuit interfaces an Arduino UNO with a 2.9" Greyscale eInk display, allowing the microcontroller to control the display and render images. The Arduino is programmed to initialize the display, draw a checkerboard pattern, and invert the pattern after a delay, demonstrating the eInk display's ability to hold images without continuous updates.
ESP32-S3 Powered Tri-Color E-Ink Display Demo
This circuit integrates an ESP32-S3 microcontroller with a 2.9" Tri-Color E-Ink display, enabling the microcontroller to control the display for rendering graphics and text. The ESP32-S3 communicates with the display using SPI protocol, allowing for dynamic visual output such as animations and text updates in red, black, and white.
ESP32-Powered 1.3 inch TFT Display Module for Visual Data Output
This circuit connects an ESP32 microcontroller to a 1.3 inch TFT display module (ST7789). The ESP32 provides power and control signals to the display, enabling it to show graphical data.
I2C-Controlled OLED Display with External EEPROM and Interactive Pushbuttons
This is a microcontroller-based interactive device featuring a Wemos D1 Mini, an OLED display, external EEPROM, and an I/O expander. It includes user input buttons and status LEDs, with potential MIDI interface capabilities.
Common Applications and Use Cases
- E-Readers: Ideal for e-book readers due to its paper-like readability.
- Digital Signage: Perfect for low-power, high-visibility signage.
- Wearable Devices: Suitable for smartwatches and other wearable tech.
- Industrial Instruments: Useful in environments where readability and low power are essential.
- IoT Devices: Great for battery-powered IoT applications.
Technical Specifications
Key Technical Details
| Parameter | Value |
|---|---|
| Display Size | 4.2 inches |
| Resolution | 400x600 pixels |
| Display Colors | Black and White |
| Interface | SPI |
| Operating Voltage | 3.3V |
| Power Consumption | Ultra-low power (refresh only) |
| Refresh Time | ~2 seconds |
| Viewing Angle | >170 degrees |
| Operating Temperature | 0°C to 50°C |
| Storage Temperature | -25°C to 70°C |
Pin Configuration and Descriptions
| Pin No. | Pin Name | Description |
|---|---|---|
| 1 | VCC | Power supply (3.3V) |
| 2 | GND | Ground |
| 3 | DIN | Data input (SPI MOSI) |
| 4 | CLK | Clock input (SPI SCK) |
| 5 | CS | Chip select (SPI CS) |
| 6 | DC | Data/Command control |
| 7 | RST | Reset |
| 8 | BUSY | Busy signal (active low) |
Usage Instructions
How to Use the Component in a Circuit
- Power Supply: Connect the VCC pin to a 3.3V power supply and the GND pin to ground.
- SPI Interface: Connect the DIN, CLK, and CS pins to the corresponding SPI pins on your microcontroller.
- Control Pins: Connect the DC, RST, and BUSY pins to GPIO pins on your microcontroller.
Important Considerations and Best Practices
- Power Consumption: The display only consumes power during refresh. Ensure your power supply can handle the peak current during this time.
- Refresh Rate: The display has a refresh time of approximately 2 seconds. Avoid frequent refreshes to save power.
- Temperature Range: Operate the display within the specified temperature range to avoid damage.
- Handling: E-Ink displays are delicate. Handle with care to avoid physical damage.
Example Code for Arduino UNO
#include <SPI.h>
#include <GxEPD.h>
#include <GxGDEW042T2/GxGDEW042T2.h>
#include <GxIO/GxIO_SPI/GxIO_SPI.h>
#include <GxIO/GxIO.h>

// Pin definitions for the Arduino UNO
#define CS_PIN 10
#define DC_PIN 9
#define RST_PIN 8
#define BUSY_PIN 7

GxIO_Class io(SPI, /*CS=*/ CS_PIN, /*DC=*/ DC_PIN, /*RST=*/ RST_PIN);
GxEPD_Class display(io, /*RST=*/ RST_PIN, /*BUSY=*/ BUSY_PIN);

void setup() {
  // Initialize the display
  display.init();
  // Clear the display
  display.fillScreen(GxEPD_WHITE);
  display.update();
  // Display a message
  display.setCursor(0, 0);
  display.setTextColor(GxEPD_BLACK);
  display.setTextSize(2);
  display.print("Hello, E-Ink!");
  display.update();
}

void loop() {
  // Nothing to do here
}
Troubleshooting and FAQs
Common Issues Users Might Face
Display Not Refreshing:
- Solution: Check the connections, especially the SPI and control pins. Ensure the power supply is stable.
Partial Updates or Ghosting:
- Solution: Perform a full refresh periodically to clear any residual images.
Busy Pin Stuck Low:
- Solution: Ensure the reset pin is correctly connected and the display is properly initialized.
Solutions and Tips for Troubleshooting
- Check Connections: Ensure all pins are correctly connected and there are no loose wires.
- Power Supply: Verify that the power supply can provide sufficient current during refresh.
- Library Compatibility: Ensure you are using compatible libraries for your microcontroller.
By following this documentation, users should be able to effectively integrate and utilize the 4.2in 400x600 E-Ink Paper Display Module in their projects.