Cirkit Designer Logo
Cirkit Designer
Your all-in-one circuit design IDE
Home / 
Component Documentation

How to Use YL-69: Examples, Pinouts, and Specs

Image of YL-69
Cirkit Designer LogoDesign with YL-69 in Cirkit Designer

Introduction

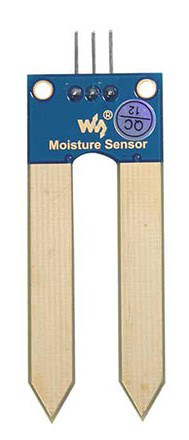
The YL-69 is a soil moisture sensor designed to measure the moisture content in the soil. It is widely used in gardening and agricultural applications to automate watering systems, ensuring that plants receive the right amount of water. The sensor consists of two parts: the soil probe (YL-69) and the control board (YL-38). The soil probe measures the moisture level, while the control board processes the signal and provides an output that can be read by a microcontroller, such as an Arduino.

Explore Projects Built with YL-69

Use Cirkit Designer to design, explore, and prototype these projects online. Some projects support real-time simulation. Click "Open Project" to start designing instantly!
Lilygo 7670e-Based Smart Interface with LCD Display and Keypad
Image of Paower: A project utilizing YL-69 in a practical application
This circuit features a Lilygo 7670e microcontroller interfaced with a 16x2 I2C LCD for display, a 4X4 membrane matrix keypad for input, and an arcade button for additional control. It also includes a 4G antenna and a GPS antenna for communication and location tracking capabilities.
Cirkit Designer LogoOpen Project in Cirkit Designer
ESP32-Based Automated Plant Watering System with Soil Moisture Sensing
Image of Agro-Shield transmitter and water pump motor circuit diagram: A project utilizing YL-69 in a practical application
This is a soil moisture monitoring and water pump control system. It uses an ESP32 microcontroller to read soil moisture levels through a YL-69 sensor and YL-83 LM393 module, and controls a water pump via a 5V relay based on the moisture data. The system is powered by a series-parallel arrangement of 18650 batteries, with a buck converter regulating the voltage.
Cirkit Designer LogoOpen Project in Cirkit Designer
Arduino Nano-Based Multi-Zone Soil Moisture Monitor with OLED Display
Image of Soil Moisture Sensor Analog: A project utilizing YL-69 in a practical application
This circuit is designed to collect environmental data using multiple YL-83 modules with YL-69 sondas for soil moisture, and a KY-015 DHT11 sensor for humidity and temperature, all interfaced with an Arduino Nano. Data from the sensors is processed by the Arduino and displayed on an OLED screen, with power supplied by an MB102 Breadboard Power Supply Module.
Cirkit Designer LogoOpen Project in Cirkit Designer
Battery-Powered Emergency Alert System with NUCLEO-F072RB, SIM800L, and GPS NEO 6M
Image of women safety: A project utilizing YL-69 in a practical application
This circuit is an emergency alert system that uses a NUCLEO-F072RB microcontroller to send SMS alerts and make calls via a SIM800L GSM module, while obtaining location data from a GPS NEO 6M module. The system is powered by a Li-ion battery and includes a TP4056 module for battery charging and protection, with a rocker switch to control power to the microcontroller.
Cirkit Designer LogoOpen Project in Cirkit Designer

Explore Projects Built with YL-69

Use Cirkit Designer to design, explore, and prototype these projects online. Some projects support real-time simulation. Click "Open Project" to start designing instantly!
Image of Paower: A project utilizing YL-69 in a practical application
Lilygo 7670e-Based Smart Interface with LCD Display and Keypad
This circuit features a Lilygo 7670e microcontroller interfaced with a 16x2 I2C LCD for display, a 4X4 membrane matrix keypad for input, and an arcade button for additional control. It also includes a 4G antenna and a GPS antenna for communication and location tracking capabilities.
Cirkit Designer LogoOpen Project in Cirkit Designer
Image of Agro-Shield transmitter and water pump motor circuit diagram: A project utilizing YL-69 in a practical application
ESP32-Based Automated Plant Watering System with Soil Moisture Sensing
This is a soil moisture monitoring and water pump control system. It uses an ESP32 microcontroller to read soil moisture levels through a YL-69 sensor and YL-83 LM393 module, and controls a water pump via a 5V relay based on the moisture data. The system is powered by a series-parallel arrangement of 18650 batteries, with a buck converter regulating the voltage.
Cirkit Designer LogoOpen Project in Cirkit Designer
Image of Soil Moisture Sensor Analog: A project utilizing YL-69 in a practical application
Arduino Nano-Based Multi-Zone Soil Moisture Monitor with OLED Display
This circuit is designed to collect environmental data using multiple YL-83 modules with YL-69 sondas for soil moisture, and a KY-015 DHT11 sensor for humidity and temperature, all interfaced with an Arduino Nano. Data from the sensors is processed by the Arduino and displayed on an OLED screen, with power supplied by an MB102 Breadboard Power Supply Module.
Cirkit Designer LogoOpen Project in Cirkit Designer
Image of women safety: A project utilizing YL-69 in a practical application
Battery-Powered Emergency Alert System with NUCLEO-F072RB, SIM800L, and GPS NEO 6M
This circuit is an emergency alert system that uses a NUCLEO-F072RB microcontroller to send SMS alerts and make calls via a SIM800L GSM module, while obtaining location data from a GPS NEO 6M module. The system is powered by a Li-ion battery and includes a TP4056 module for battery charging and protection, with a rocker switch to control power to the microcontroller.
Cirkit Designer LogoOpen Project in Cirkit Designer

Technical Specifications

Key Technical Details

Parameter Value
Operating Voltage 3.3V - 5V
Output Voltage 0V - 4.2V (Analog)
Current < 20mA
Interface Analog and Digital
Dimensions Probe: 60mm x 20mm
Control Board: 30mm x 15mm

Pin Configuration and Descriptions

YL-69 Soil Probe

Pin Description
1 VCC (Power Supply)
2 GND (Ground)

YL-38 Control Board

Pin Description
VCC Power Supply (3.3V-5V)
GND Ground
A0 Analog Output
D0 Digital Output

Usage Instructions

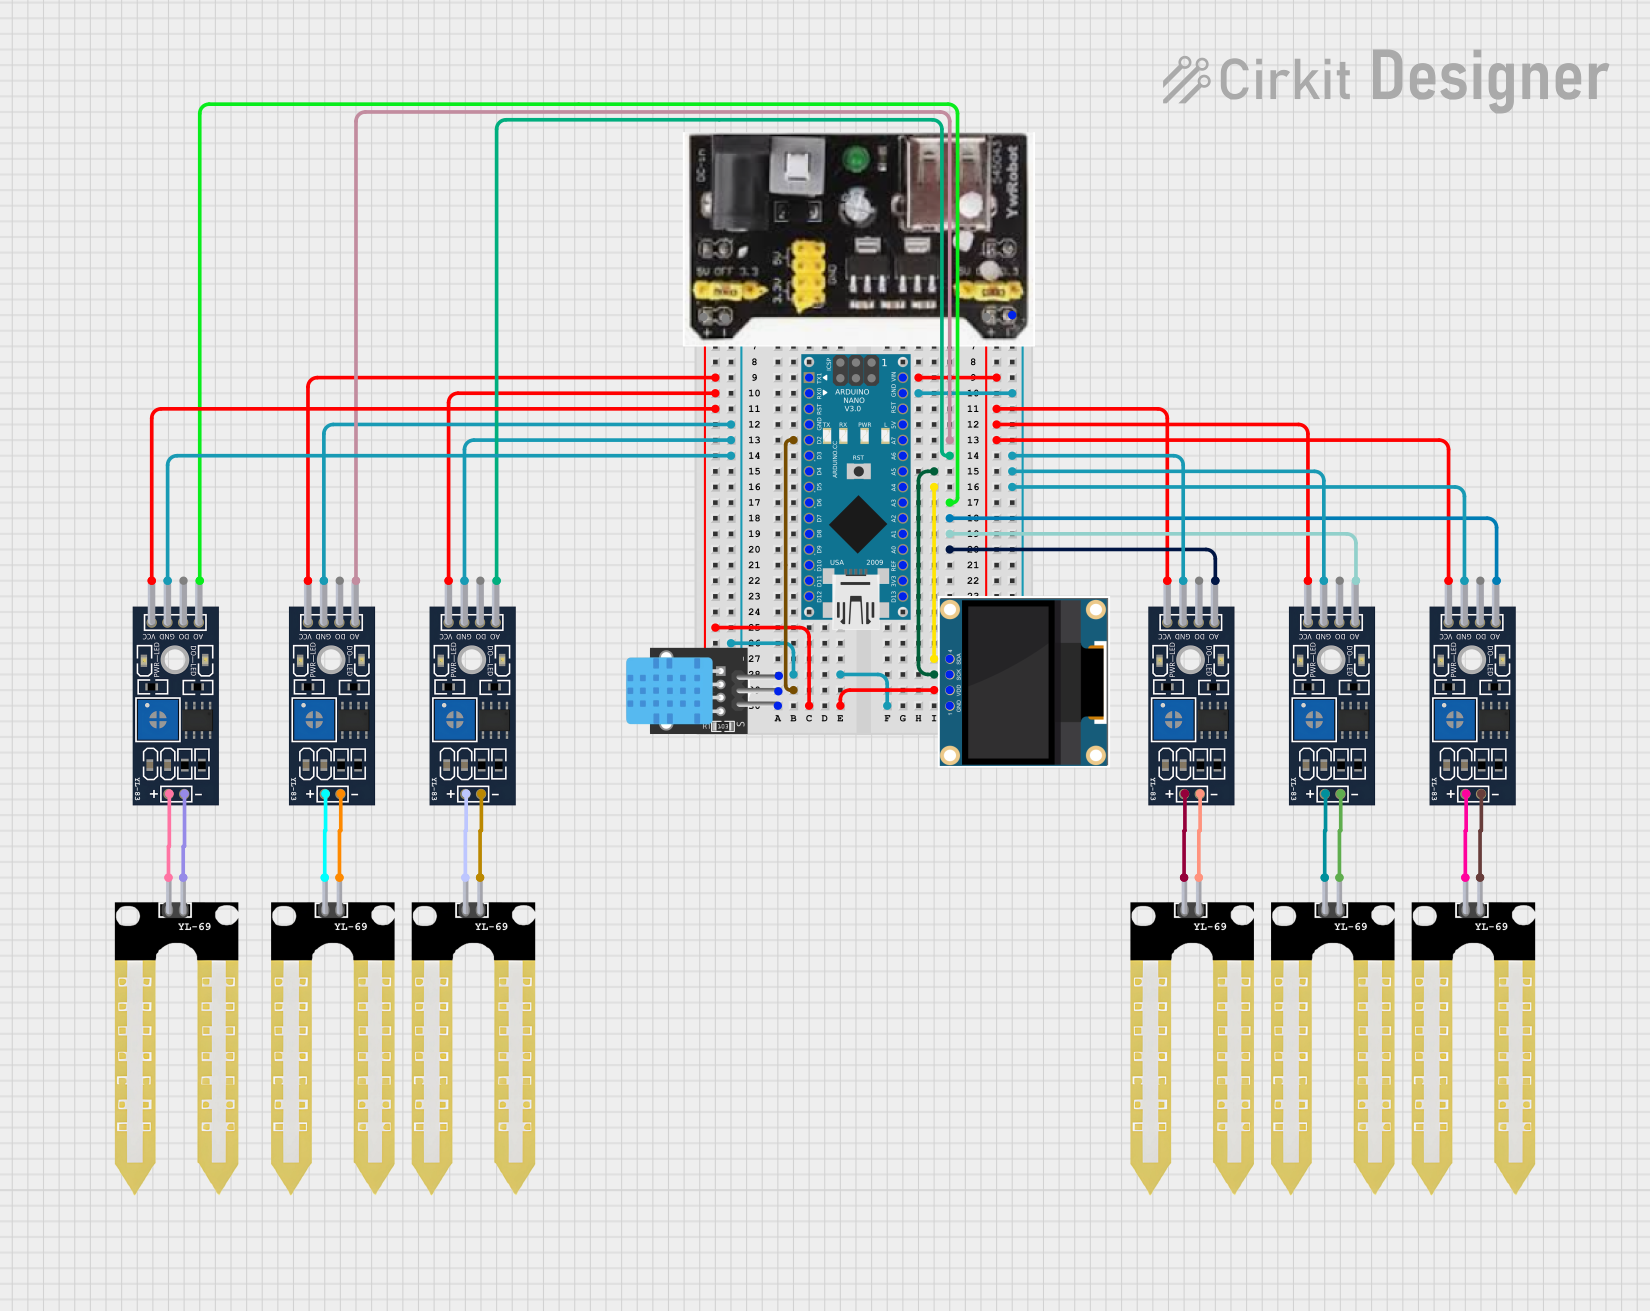
How to Use the Component in a Circuit

  1. Connect the Soil Probe to the Control Board:

    • Connect the VCC pin of the soil probe to the VCC pin of the control board.
    • Connect the GND pin of the soil probe to the GND pin of the control board.
  2. Connect the Control Board to the Arduino:

    • Connect the VCC pin of the control board to the 5V pin on the Arduino.
    • Connect the GND pin of the control board to the GND pin on the Arduino.
    • Connect the A0 pin of the control board to an analog input pin (e.g., A0) on the Arduino.
    • Optionally, connect the D0 pin of the control board to a digital input pin on the Arduino if you want to use the digital output.

Important Considerations and Best Practices

  • Calibration: The sensor may need calibration to provide accurate readings. You can calibrate it by adjusting the potentiometer on the control board.
  • Placement: Ensure the soil probe is placed at the root level of the plants for accurate moisture measurement.
  • Power Supply: Use a stable power supply to avoid fluctuations in sensor readings.
  • Corrosion: The soil probe may corrode over time. Regularly check and replace the probe if necessary.

Example Code for Arduino

// YL-69 Soil Moisture Sensor Example Code
// This code reads the analog value from the YL-69 sensor and prints it to the
// Serial Monitor.

const int sensorPin = A0; // Analog input pin that the sensor is attached to
int sensorValue = 0;      // Variable to store the value coming from the sensor

void setup() {
  Serial.begin(9600); // Initialize serial communication at 9600 bits per second
}

void loop() {
  // Read the analog value from the sensor
  sensorValue = analogRead(sensorPin);
  
  // Print the sensor value to the Serial Monitor
  Serial.print("Soil Moisture Level: ");
  Serial.println(sensorValue);
  
  // Wait for 1 second before taking another reading
  delay(1000);
}

Troubleshooting and FAQs

Common Issues Users Might Face

  1. Inaccurate Readings:

    • Solution: Calibrate the sensor by adjusting the potentiometer on the control board. Ensure the probe is placed correctly in the soil.
  2. No Output:

    • Solution: Check all connections and ensure the sensor is powered correctly. Verify that the sensor is connected to the correct pins on the Arduino.
  3. Corroded Probe:

    • Solution: Regularly inspect the soil probe for corrosion. Replace the probe if necessary.

FAQs

Q: How do I know if the sensor is working correctly? A: You can test the sensor by placing it in dry and wet soil and observing the changes in the analog output value. Dry soil should give a higher value, while wet soil should give a lower value.

Q: Can I use the YL-69 sensor with other microcontrollers? A: Yes, the YL-69 sensor can be used with other microcontrollers that have analog input pins, such as the ESP8266, ESP32, and Raspberry Pi.

Q: How often should I replace the soil probe? A: The frequency of replacement depends on the soil conditions and usage. Regularly inspect the probe for signs of corrosion and replace it as needed.


This documentation provides a comprehensive guide to using the YL-69 soil moisture sensor. Whether you are a beginner or an experienced user, following these instructions will help you effectively integrate the sensor into your projects.