Cirkit Designer Logo
Cirkit Designer
Your all-in-one circuit design IDE
Home / 
Component Documentation

How to Use Mini Stepper Motor (CD/DVD Drive): Examples, Pinouts, and Specs

Image of Mini Stepper Motor (CD/DVD Drive)
Cirkit Designer LogoDesign with Mini Stepper Motor (CD/DVD Drive) in Cirkit Designer

Introduction

The Mini Stepper Motor, commonly found in CD/DVD drives, is a compact and precise motor designed to control the movement of the optical head and the disc. Its ability to make small, accurate steps makes it ideal for applications requiring fine positional control. This motor operates by converting electrical pulses into mechanical motion, making it a popular choice for robotics, automation, and other precision-driven projects.

Explore Projects Built with Mini Stepper Motor (CD/DVD Drive)

Use Cirkit Designer to design, explore, and prototype these projects online. Some projects support real-time simulation. Click "Open Project" to start designing instantly!
Stepper Motor Control Circuit with Integrated Drive and Programmable Power Supply
Image of Stepper Motor & Integrated Drive: A project utilizing Mini Stepper Motor (CD/DVD Drive) in a practical application
This circuit connects an integrated stepper motor drive to a bipolar stepper motor, enabling controlled movement of the motor's shaft in precise increments. The stepper motor drive receives power from a programmable DC power supply, with connections for both ground and voltage supply. There is no embedded code provided, suggesting that the stepper motor drive may be pre-programmed or manually controlled.
Cirkit Designer LogoOpen Project in Cirkit Designer
Arduino-Controlled Stepper and DC Motor with Relay Switching
Image of Conveyor Belt & Capping Motor: A project utilizing Mini Stepper Motor (CD/DVD Drive) in a practical application
This circuit controls a Nema 17 stepper motor using a DRV8825 driver module, with an Arduino UNO microcontroller dictating the step and direction. Additionally, the circuit can switch a DC motor on and off using a relay module controlled by the Arduino. The power supply provides the necessary voltage for the relay and the motor driver, which in turn powers the stepper motor, while the Arduino's firmware defines the motor's stepping behavior and the relay's switching to control the DC motor.
Cirkit Designer LogoOpen Project in Cirkit Designer
Arduino Nano-Based Stepper Motor Controller with SD Card Logging
Image of RPM: A project utilizing Mini Stepper Motor (CD/DVD Drive) in a practical application
This circuit features an Arduino Nano microcontroller interfaced with an SD card module for data storage and a DRV8825 driver to control a bipolar stepper motor. The system is powered by a 12V power supply, which is stepped down to 5V for the Arduino and SD module using a step-down converter.
Cirkit Designer LogoOpen Project in Cirkit Designer
Stepper Motor Control System with TB6600 Driver and DKC-1A Controller
Image of Copy of Copy of PLC-Based Step Motor Speed and Direction Control System: A project utilizing Mini Stepper Motor (CD/DVD Drive) in a practical application
This circuit controls a bipolar stepper motor using a tb6600 micro stepping motor driver and a DKC-1A stepper motor controller. The system is powered by a 24VDC power supply and includes a relay module for additional control functionalities.
Cirkit Designer LogoOpen Project in Cirkit Designer

Explore Projects Built with Mini Stepper Motor (CD/DVD Drive)

Use Cirkit Designer to design, explore, and prototype these projects online. Some projects support real-time simulation. Click "Open Project" to start designing instantly!
Image of Stepper Motor & Integrated Drive: A project utilizing Mini Stepper Motor (CD/DVD Drive) in a practical application
Stepper Motor Control Circuit with Integrated Drive and Programmable Power Supply
This circuit connects an integrated stepper motor drive to a bipolar stepper motor, enabling controlled movement of the motor's shaft in precise increments. The stepper motor drive receives power from a programmable DC power supply, with connections for both ground and voltage supply. There is no embedded code provided, suggesting that the stepper motor drive may be pre-programmed or manually controlled.
Cirkit Designer LogoOpen Project in Cirkit Designer
Image of Conveyor Belt & Capping Motor: A project utilizing Mini Stepper Motor (CD/DVD Drive) in a practical application
Arduino-Controlled Stepper and DC Motor with Relay Switching
This circuit controls a Nema 17 stepper motor using a DRV8825 driver module, with an Arduino UNO microcontroller dictating the step and direction. Additionally, the circuit can switch a DC motor on and off using a relay module controlled by the Arduino. The power supply provides the necessary voltage for the relay and the motor driver, which in turn powers the stepper motor, while the Arduino's firmware defines the motor's stepping behavior and the relay's switching to control the DC motor.
Cirkit Designer LogoOpen Project in Cirkit Designer
Image of RPM: A project utilizing Mini Stepper Motor (CD/DVD Drive) in a practical application
Arduino Nano-Based Stepper Motor Controller with SD Card Logging
This circuit features an Arduino Nano microcontroller interfaced with an SD card module for data storage and a DRV8825 driver to control a bipolar stepper motor. The system is powered by a 12V power supply, which is stepped down to 5V for the Arduino and SD module using a step-down converter.
Cirkit Designer LogoOpen Project in Cirkit Designer
Image of Copy of Copy of PLC-Based Step Motor Speed and Direction Control System: A project utilizing Mini Stepper Motor (CD/DVD Drive) in a practical application
Stepper Motor Control System with TB6600 Driver and DKC-1A Controller
This circuit controls a bipolar stepper motor using a tb6600 micro stepping motor driver and a DKC-1A stepper motor controller. The system is powered by a 24VDC power supply and includes a relay module for additional control functionalities.
Cirkit Designer LogoOpen Project in Cirkit Designer

Common Applications and Use Cases

  • Optical head movement in CD/DVD drives
  • Robotics and small-scale automation
  • 3D printers and CNC machines
  • Camera focus mechanisms
  • Educational and DIY electronics projects

Technical Specifications

Below are the key technical details for the Mini Stepper Motor typically used in CD/DVD drives:

Parameter Value
Motor Type Bipolar or Unipolar Stepper
Step Angle 1.8° to 7.5° per step
Operating Voltage 5V to 12V
Current per Phase 100mA to 500mA
Resistance per Phase 10Ω to 50Ω
Holding Torque 10 to 50 mNm
Number of Phases 2 or 4
Shaft Diameter 1mm to 2mm
Dimensions Typically 20mm x 20mm x 10mm

Pin Configuration and Descriptions

The Mini Stepper Motor typically has 4 or 5 wires, depending on whether it is a bipolar or unipolar motor. Below is the pin configuration:

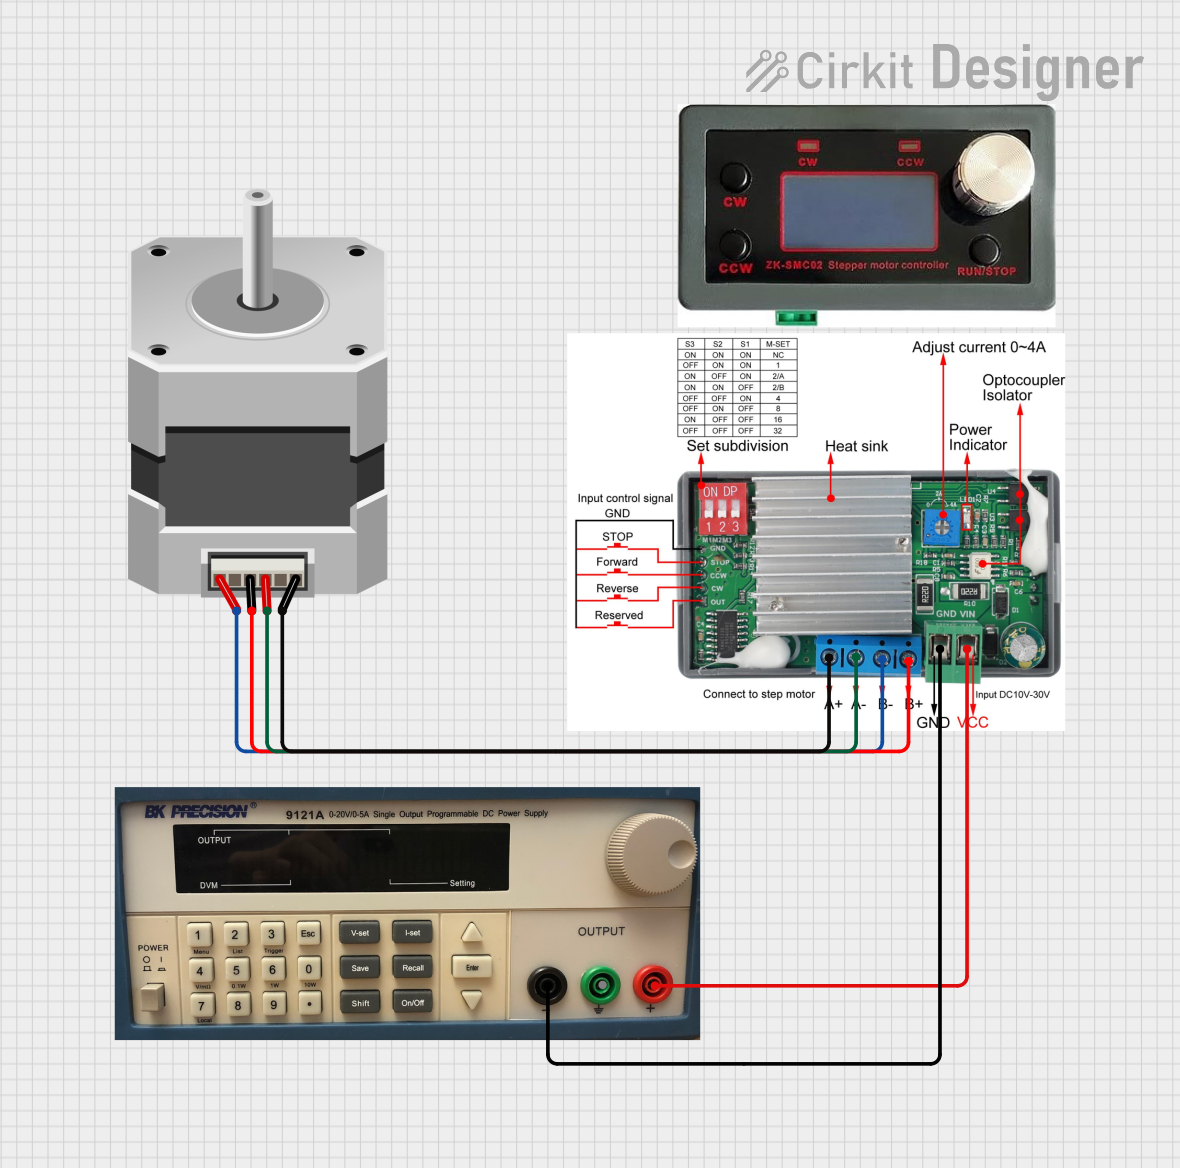
Bipolar Stepper Motor (4 Wires)

Pin Description
A+ Coil A positive terminal
A- Coil A negative terminal
B+ Coil B positive terminal
B- Coil B negative terminal

Unipolar Stepper Motor (5 Wires)

Pin Description
A+ Coil A positive terminal
A- Coil A negative terminal
B+ Coil B positive terminal
B- Coil B negative terminal
COM Common terminal

Usage Instructions

How to Use the Mini Stepper Motor in a Circuit

  1. Identify the Motor Type: Determine whether your motor is bipolar (4 wires) or unipolar (5 wires).
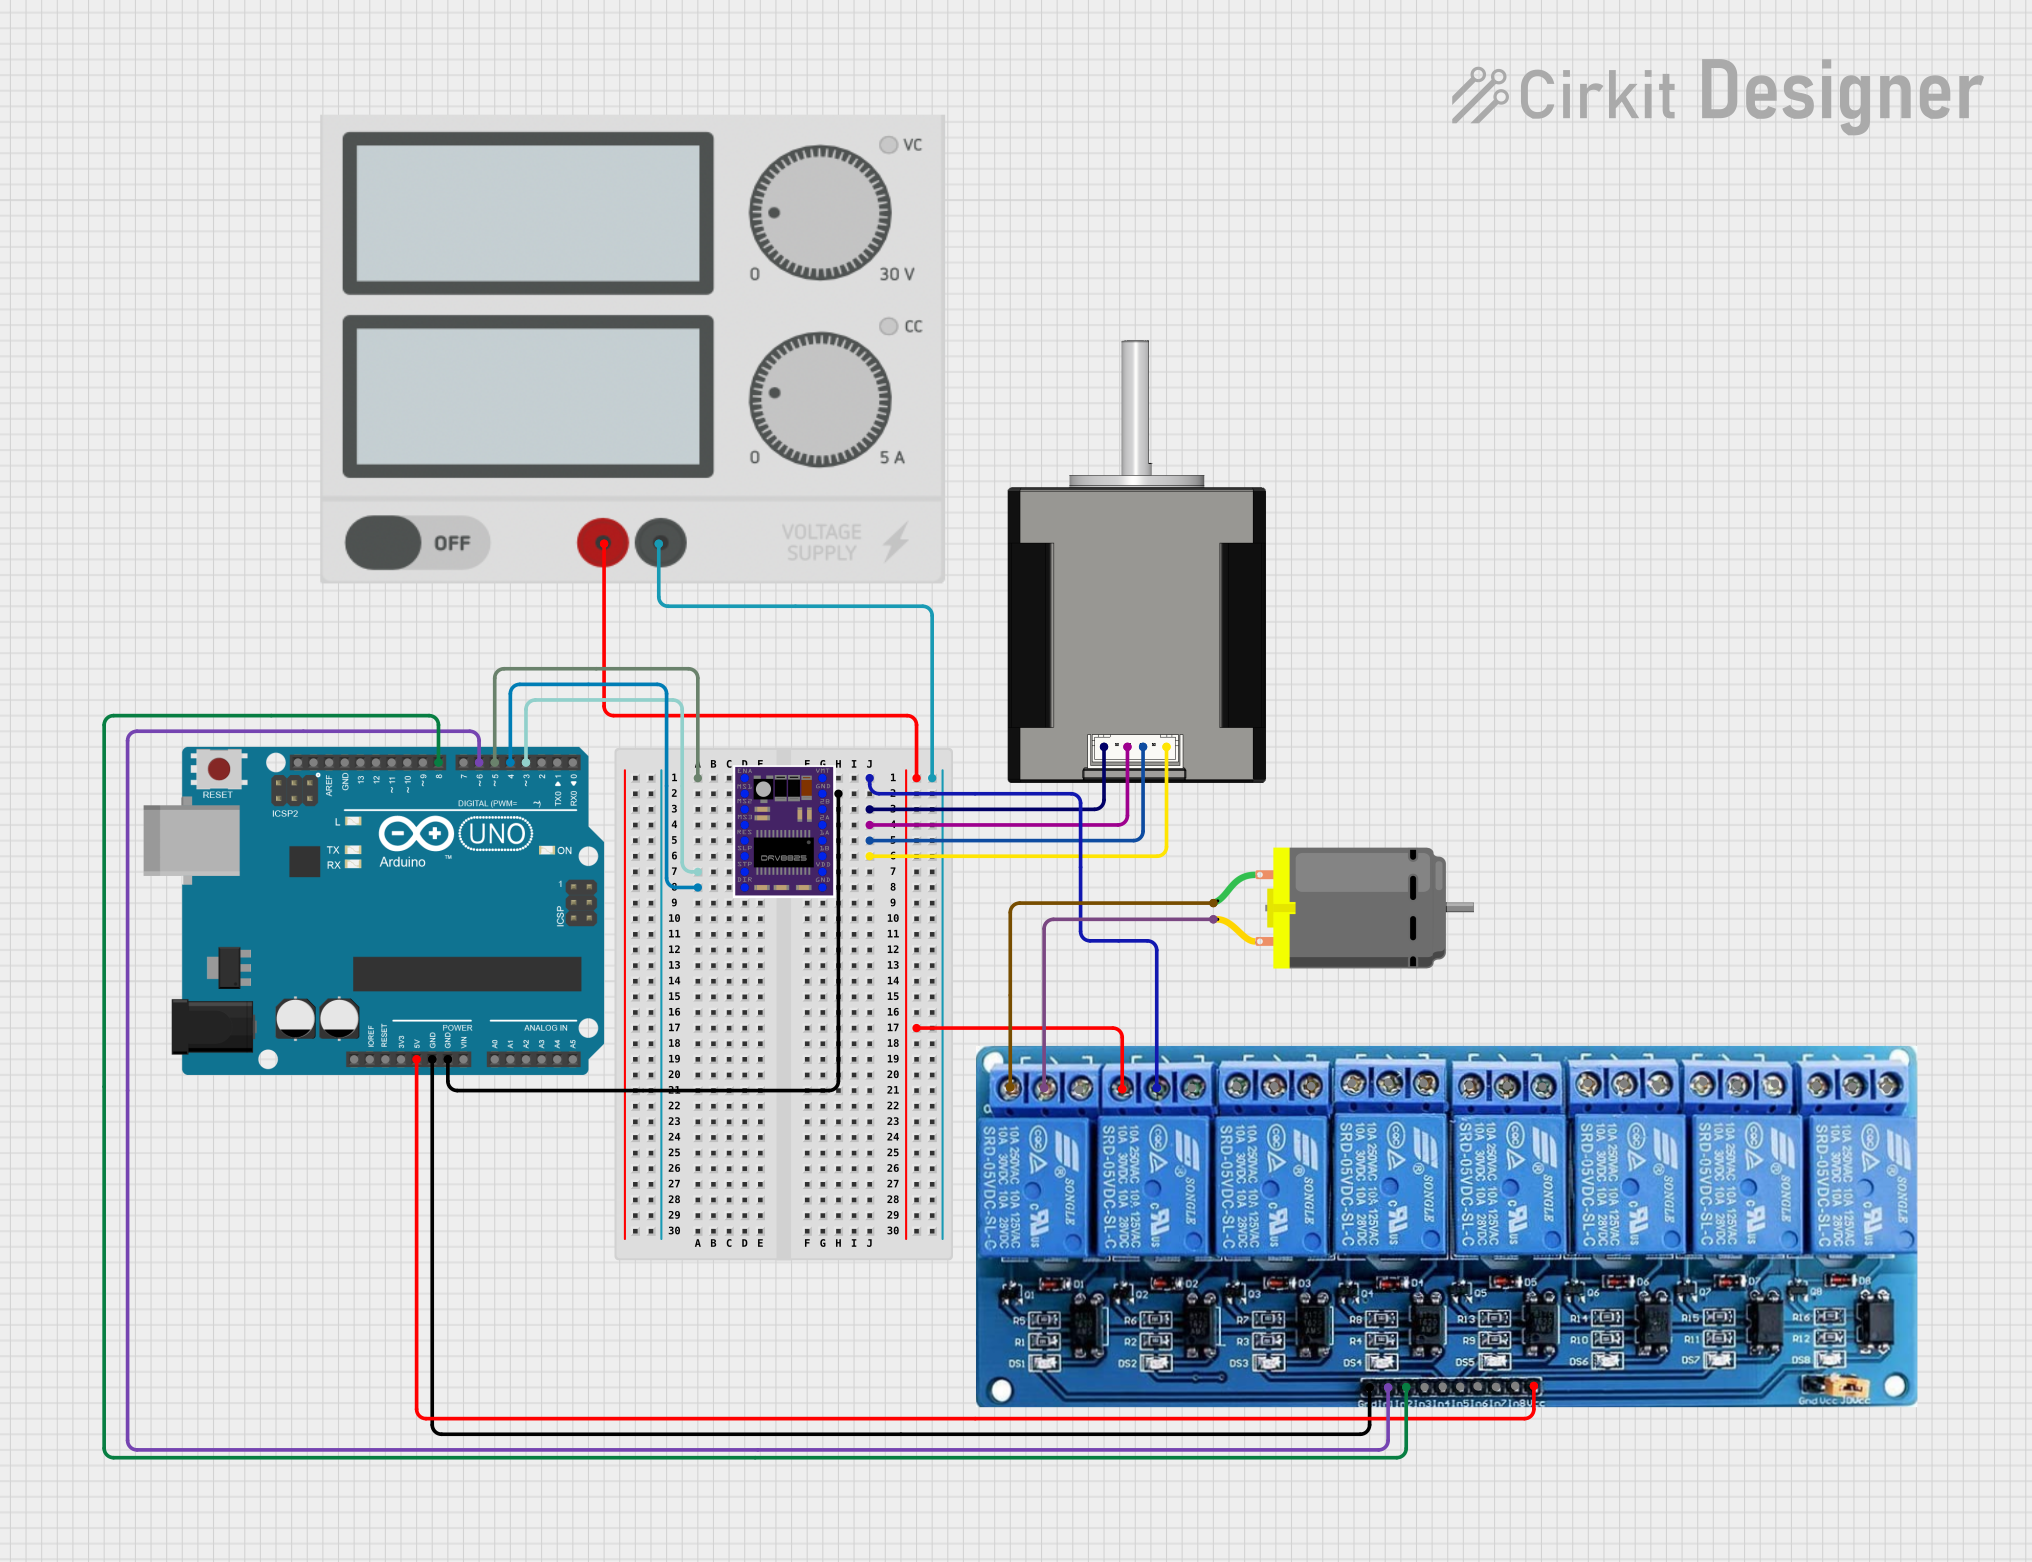
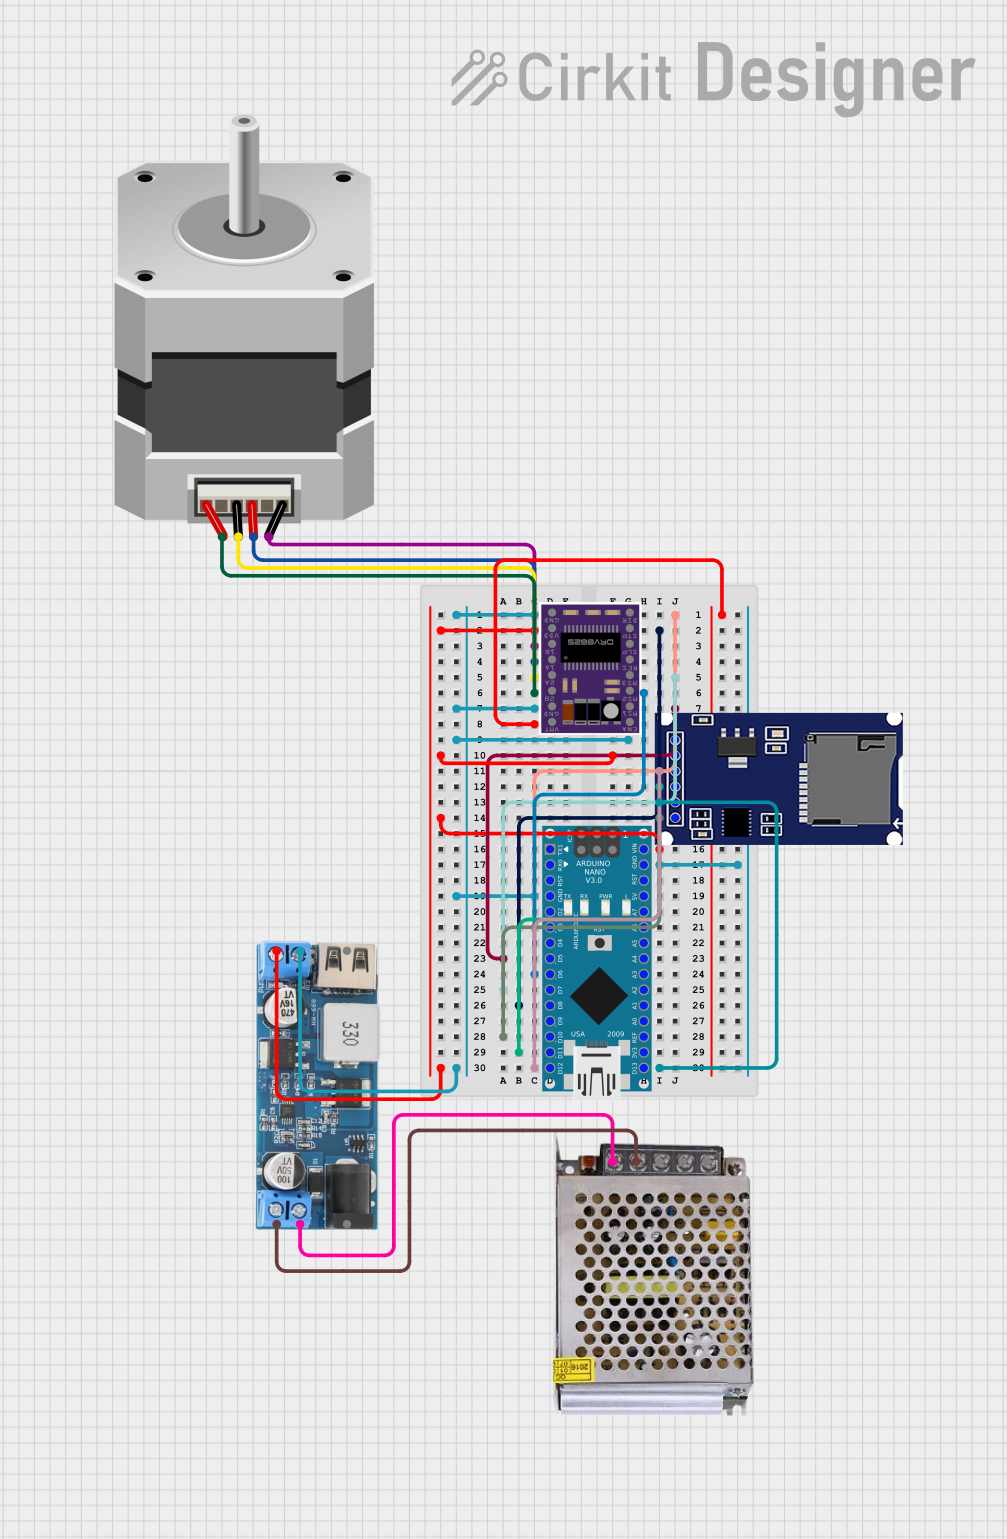
  2. Connect to a Driver Module: Use a stepper motor driver (e.g., ULN2003 for unipolar motors or A4988 for bipolar motors) to control the motor. Directly connecting the motor to a microcontroller is not recommended due to current limitations.
  3. Power Supply: Ensure the motor is powered with the appropriate voltage (typically 5V or 12V) and current as specified in the technical specifications.
  4. Microcontroller Interface: Connect the driver module to a microcontroller (e.g., Arduino UNO) to send step and direction signals.

Important Considerations and Best Practices

  • Current Limiting: Use a driver module with current-limiting features to prevent overheating or damage to the motor.
  • Step Resolution: Adjust the step resolution (full-step, half-step, or microstepping) on the driver module for smoother motion.
  • Power Supply: Use a stable power supply to avoid fluctuations that could affect motor performance.
  • Heat Management: Prolonged operation may cause the motor to heat up. Ensure proper ventilation or cooling if necessary.

Example Code for Arduino UNO

Below is an example of how to control a Mini Stepper Motor using an Arduino UNO and an A4988 driver module:

// Example code to control a Mini Stepper Motor with Arduino UNO
// and an A4988 driver module. Ensure proper wiring before running this code.

#define STEP_PIN 3  // Pin connected to the STEP input of the driver
#define DIR_PIN 4   // Pin connected to the DIR input of the driver

void setup() {
  pinMode(STEP_PIN, OUTPUT); // Set STEP pin as output
  pinMode(DIR_PIN, OUTPUT);  // Set DIR pin as output

  digitalWrite(DIR_PIN, HIGH); // Set initial direction (HIGH = clockwise)
}

void loop() {
  // Rotate the motor one step at a time
  digitalWrite(STEP_PIN, HIGH); // Generate a step pulse
  delayMicroseconds(1000);      // Wait for 1ms (adjust for speed control)
  digitalWrite(STEP_PIN, LOW);  // Reset the step pulse
  delayMicroseconds(1000);      // Wait for 1ms before the next step
}

Troubleshooting and FAQs

Common Issues and Solutions

  1. Motor Not Moving

    • Cause: Incorrect wiring or loose connections.
    • Solution: Double-check the wiring between the motor, driver module, and microcontroller.
  2. Motor Vibrates but Does Not Rotate

    • Cause: Incorrect step sequence or insufficient power supply.
    • Solution: Verify the step sequence in your code and ensure the power supply meets the motor's requirements.
  3. Overheating

    • Cause: Excessive current or prolonged operation.
    • Solution: Use a driver with current-limiting features and allow the motor to cool periodically.
  4. Inconsistent Movement

    • Cause: Fluctuating power supply or incorrect step resolution.
    • Solution: Use a stable power source and adjust the step resolution on the driver module.

FAQs

  • Can I run the motor without a driver module? No, a driver module is necessary to handle the current and voltage requirements of the motor.

  • What is the maximum speed of the motor? The maximum speed depends on the step resolution, power supply, and load. Typically, it ranges from 200 to 1000 steps per second.

  • Can I use this motor for heavy loads? No, the Mini Stepper Motor is designed for lightweight applications and may not perform well under heavy loads.

By following this documentation, you can effectively integrate and troubleshoot the Mini Stepper Motor in your projects.