Cirkit Designer Logo
Cirkit Designer
Your all-in-one circuit design IDE
Home / 
Component Documentation

How to Use Round TFT LCD: Examples, Pinouts, and Specs

Image of Round TFT LCD
Cirkit Designer LogoDesign with Round TFT LCD in Cirkit Designer

Introduction

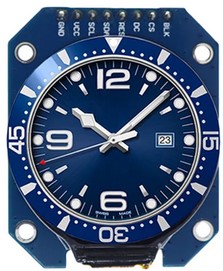
The Round TFT LCD (GC9A01) by Arduinp is a Thin-Film Transistor Liquid Crystal Display designed for rendering high-quality visual information in a unique circular form factor. This display is ideal for wearable devices, smart home applications, and any project where a traditional rectangular screen may not fit the aesthetic or functional requirements.

Explore Projects Built with Round TFT LCD

Use Cirkit Designer to design, explore, and prototype these projects online. Some projects support real-time simulation. Click "Open Project" to start designing instantly!
Arduino Mega 2560 Controlled TFT Touchscreen Interface
Image of Tablero Moto: A project utilizing Round TFT LCD in a practical application
This circuit connects an Arduino Mega 2560 microcontroller to a 3.5-inch 480x320 TFT LCD display. The Arduino provides power, ground, and digital signals to control the display, including data lines for pixel information and control lines for reset, write, and command/data selection. The embedded code initializes the display and configures the Arduino's pins for communication, likely to create a user interface or visual output for a project.
Cirkit Designer LogoOpen Project in Cirkit Designer
RTL8720DN-Based Interactive Button-Controlled TFT Display
Image of coba-coba: A project utilizing Round TFT LCD in a practical application
This circuit features an RTL8720DN microcontroller interfaced with a China ST7735S 160x128 TFT LCD display and four pushbuttons. The microcontroller reads the states of the pushbuttons and displays their statuses on the TFT LCD, providing a visual feedback system for button presses.
Cirkit Designer LogoOpen Project in Cirkit Designer
ESP32-C6 and ST7735S Display: Wi-Fi Controlled TFT Display Module
Image of ESP32-C6sm-ST7735: A project utilizing Round TFT LCD in a practical application
This circuit features an ESP32-C6 microcontroller interfaced with a China ST7735S 160x128 TFT display. The ESP32-C6 controls the display via SPI communication, providing power, ground, and control signals to render graphics and text on the screen.
Cirkit Designer LogoOpen Project in Cirkit Designer
ESP32-S3 and ILI9488 TFT LCD Display for Interactive Graphics
Image of IOT_V1: A project utilizing Round TFT LCD in a practical application
This circuit features an ESP32-S3 microcontroller connected to an ILI9488 TFT LCD display. The ESP32-S3 initializes and controls the display, demonstrating basic graphics and text rendering using the TFT_eSPI library.
Cirkit Designer LogoOpen Project in Cirkit Designer

Explore Projects Built with Round TFT LCD

Use Cirkit Designer to design, explore, and prototype these projects online. Some projects support real-time simulation. Click "Open Project" to start designing instantly!
Image of Tablero Moto: A project utilizing Round TFT LCD in a practical application
Arduino Mega 2560 Controlled TFT Touchscreen Interface
This circuit connects an Arduino Mega 2560 microcontroller to a 3.5-inch 480x320 TFT LCD display. The Arduino provides power, ground, and digital signals to control the display, including data lines for pixel information and control lines for reset, write, and command/data selection. The embedded code initializes the display and configures the Arduino's pins for communication, likely to create a user interface or visual output for a project.
Cirkit Designer LogoOpen Project in Cirkit Designer
Image of coba-coba: A project utilizing Round TFT LCD in a practical application
RTL8720DN-Based Interactive Button-Controlled TFT Display
This circuit features an RTL8720DN microcontroller interfaced with a China ST7735S 160x128 TFT LCD display and four pushbuttons. The microcontroller reads the states of the pushbuttons and displays their statuses on the TFT LCD, providing a visual feedback system for button presses.
Cirkit Designer LogoOpen Project in Cirkit Designer
Image of ESP32-C6sm-ST7735: A project utilizing Round TFT LCD in a practical application
ESP32-C6 and ST7735S Display: Wi-Fi Controlled TFT Display Module
This circuit features an ESP32-C6 microcontroller interfaced with a China ST7735S 160x128 TFT display. The ESP32-C6 controls the display via SPI communication, providing power, ground, and control signals to render graphics and text on the screen.
Cirkit Designer LogoOpen Project in Cirkit Designer
Image of IOT_V1: A project utilizing Round TFT LCD in a practical application
ESP32-S3 and ILI9488 TFT LCD Display for Interactive Graphics
This circuit features an ESP32-S3 microcontroller connected to an ILI9488 TFT LCD display. The ESP32-S3 initializes and controls the display, demonstrating basic graphics and text rendering using the TFT_eSPI library.
Cirkit Designer LogoOpen Project in Cirkit Designer

Common Applications and Use Cases

  • Smartwatches and wearable technology
  • Custom user interfaces for IoT devices
  • Automotive dashboard displays
  • Creative projects requiring a non-traditional display shape

Technical Specifications

Key Technical Details

  • Display Type: Round TFT LCD
  • Resolution: 240 x 240 pixels
  • Display Diameter: 1.28 inches
  • Interface: SPI (Serial Peripheral Interface)
  • Supply Voltage: 3.3V - 5V
  • Logic Level Voltage: 3.3V (5V tolerant)
  • Operating Temperature: -20°C to 70°C

Pin Configuration and Descriptions

Pin Number Pin Name Description
1 VCC Power supply (3.3V - 5V)
2 GND Ground
3 SCL SPI clock signal
4 SDA SPI data signal
5 RES Reset pin (active low)
6 DC Data/Command control pin
7 CS Chip Select (active low)
8 BLK Backlight control (optional PWM)

Usage Instructions

How to Use the Component in a Circuit

  1. Power Connections: Connect the VCC pin to a 3.3V or 5V power supply and the GND pin to the ground.
  2. SPI Interface: Connect SCL and SDA to the corresponding SPI clock and data lines on your microcontroller.
  3. Control Pins: Connect the RES, DC, and CS pins to available digital I/O pins on your microcontroller.
  4. Backlight Control (Optional): Connect the BLK pin to a PWM-capable pin if you wish to control the backlight brightness.

Important Considerations and Best Practices

  • Always ensure that the power supply voltage matches the specifications to prevent damage.
  • Use a level shifter if your microcontroller operates at a different logic level than the display.
  • Avoid exposing the display to extreme temperatures or humidity.
  • When handling the display, take precautions against electrostatic discharge (ESD).

Example Code for Arduino UNO

#include <SPI.h>
#include <Adafruit_GFX.h>
#include <Adafruit_GC9A01.h>

// Pin definitions
#define TFT_CS        10
#define TFT_RST       9
#define TFT_DC        8
#define TFT_BL        6 // Optional: control backlight

Adafruit_GC9A01 tft = Adafruit_GC9A01(TFT_CS, TFT_DC, TFT_RST);

void setup() {
  tft.begin();
  tft.setRotation(2); // Adjust according to your mounting

  // Optional: control backlight
  pinMode(TFT_BL, OUTPUT);
  analogWrite(TFT_BL, 128); // Set half brightness
}

void loop() {
  tft.fillScreen(GC9A01_BLACK);
  tft.setCursor(0, 0);
  tft.setTextColor(GC9A01_WHITE);
  tft.setTextSize(1);
  tft.print("Hello, World!");
  delay(1000);
}

Troubleshooting and FAQs

Common Issues Users Might Face

  • Display not powering on: Check the power connections and ensure the voltage is within the specified range.
  • No image or incorrect colors: Verify that the SPI connections are correct and that the correct pins are defined in your code.
  • Dim or flickering backlight: Ensure that the BLK pin is connected properly and that the PWM signal is within the acceptable range.

Solutions and Tips for Troubleshooting

  • Double-check all connections against the pin configuration table.
  • Use example code to test the display functionality before integrating it into your project.
  • If using PWM for backlight control, start with a lower duty cycle and increase gradually to find the optimal brightness.

FAQs

Q: Can I use this display with a 5V microcontroller? A: Yes, the display is 5V tolerant, but it is recommended to use a level shifter for SPI signals.

Q: How can I invert the display colors? A: Most graphics libraries, like Adafruit_GFX, provide functions to invert colors. Check the library documentation for the specific command.

Q: Is it possible to display images or animations? A: Yes, the display is capable of showing images and animations. You will need to use a library that supports the GC9A01 and convert your images to the appropriate format.

Q: What should I do if the display is not responding? A: Verify all connections, ensure that the correct pins are used in the code, and reset the power to the display. If the issue persists, consult the manufacturer's datasheet and support forums.