Cirkit Designer Logo
Cirkit Designer
Your all-in-one circuit design IDE
Home / 
Component Documentation

How to Use trill touch sensor: Examples, Pinouts, and Specs

Image of trill touch sensor
Cirkit Designer LogoDesign with trill touch sensor in Cirkit Designer

Introduction

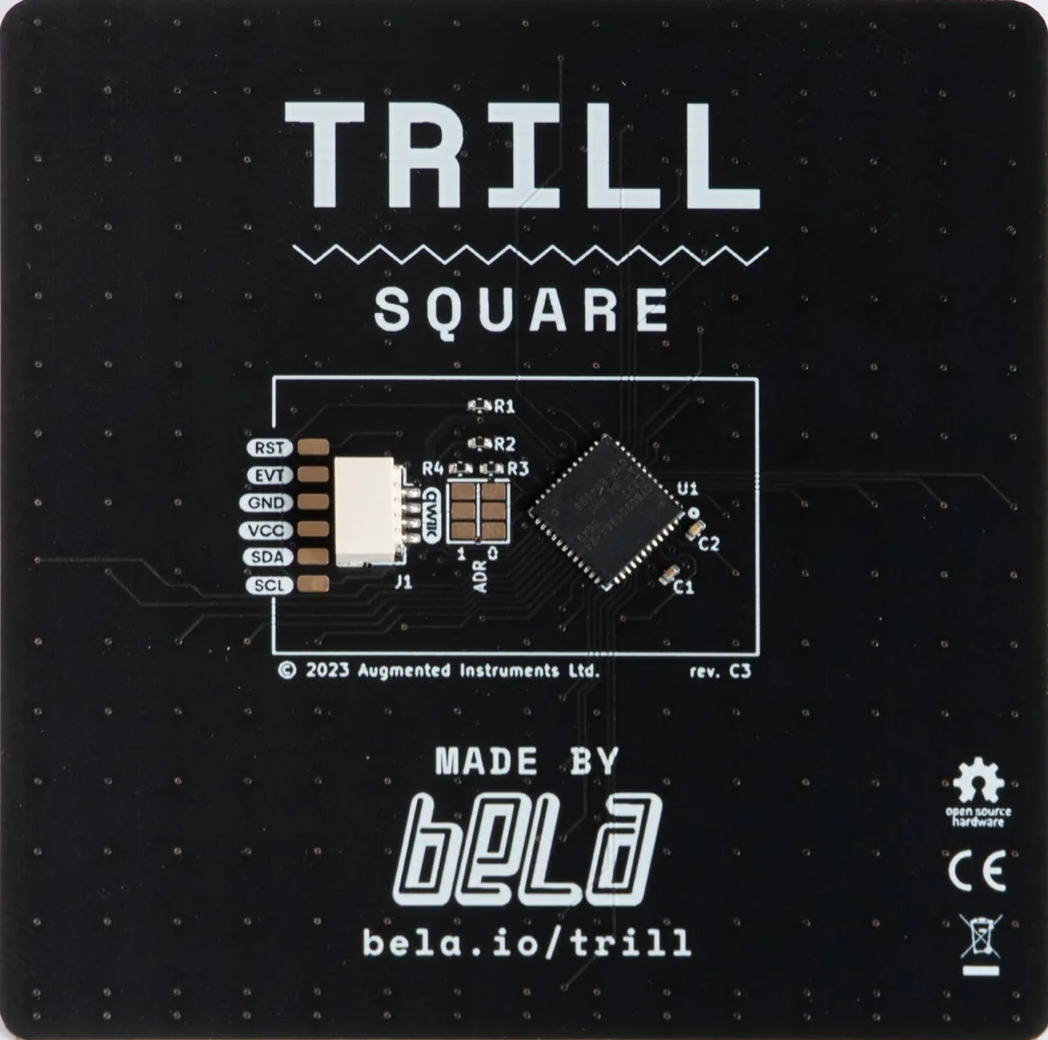
The Trill Touch Sensor is a capacitive touch sensor designed to detect touch and proximity. It is widely used in interactive projects to provide intuitive input through touch gestures. The sensor is highly versatile and can be used in applications such as musical instruments, interactive art installations, and user interfaces for embedded systems. Its ability to detect multiple touch points and proximity makes it a powerful tool for creating responsive and engaging user experiences.

Explore Projects Built with trill touch sensor

Use Cirkit Designer to design, explore, and prototype these projects online. Some projects support real-time simulation. Click "Open Project" to start designing instantly!
Interactive Touch and Motion Sensor System with Bela Board and OLED Display
Image of GIZMO Teaset: A project utilizing trill touch sensor in a practical application
This circuit integrates a Bela Board with various sensors and actuators, including a TRILL CRAFT touch sensor, an ADXXL335 accelerometer, a vibration motor, and a loudspeaker. The Bela Board processes input from the touch sensor and accelerometer, and controls the vibration motor and loudspeaker, while an OLED display provides visual feedback.
Cirkit Designer LogoOpen Project in Cirkit Designer
Capacitive Touch and Ultrasonic Sensor Interface with Adafruit Feather nRF52840 Sense
Image of Senior Design Project: A project utilizing trill touch sensor in a practical application
This circuit features an Adafruit Feather nRF52840 Sense microcontroller connected to an ultrasonic sensor for distance measurement and an Adafruit AT42QT1010 capacitive touch sensor for touch input. The ultrasonic sensor's Trigger and Echo pins are interfaced with the microcontroller's digital pins D6 and D9, respectively, to send and receive ultrasonic signals. Additionally, a pressure-sensitive conductive sheet (Velostat) is connected in series with a 10k Ohm resistor to the microcontroller's analog pin A0, likely forming a pressure sensor.
Cirkit Designer LogoOpen Project in Cirkit Designer
Touch Sensor Activated Buzzer with USB Power
Image of Touch Door Bell: A project utilizing trill touch sensor in a practical application
This circuit consists of a touch sensor, a buzzer, and a USB plug for power. When the touch sensor is activated, it triggers the buzzer to sound, powered by the 5V supply from the USB plug.
Cirkit Designer LogoOpen Project in Cirkit Designer
Arduino Mega 2560 Bluetooth-Controlled Touch-Activated Vibration Motor System
Image of circuitcycle: A project utilizing trill touch sensor in a practical application
This circuit is a touch-activated feedback system that uses an Arduino Mega 2560 to control multiple vibration motors and a buzzer. Touch sensors (TTP233) are used to detect user input, which then triggers the corresponding vibration motor and buzzer via the Arduino. Additionally, an HC-05 Bluetooth module is included for wireless communication.
Cirkit Designer LogoOpen Project in Cirkit Designer

Explore Projects Built with trill touch sensor

Use Cirkit Designer to design, explore, and prototype these projects online. Some projects support real-time simulation. Click "Open Project" to start designing instantly!
Image of GIZMO Teaset: A project utilizing trill touch sensor in a practical application
Interactive Touch and Motion Sensor System with Bela Board and OLED Display
This circuit integrates a Bela Board with various sensors and actuators, including a TRILL CRAFT touch sensor, an ADXXL335 accelerometer, a vibration motor, and a loudspeaker. The Bela Board processes input from the touch sensor and accelerometer, and controls the vibration motor and loudspeaker, while an OLED display provides visual feedback.
Cirkit Designer LogoOpen Project in Cirkit Designer
Image of Senior Design Project: A project utilizing trill touch sensor in a practical application
Capacitive Touch and Ultrasonic Sensor Interface with Adafruit Feather nRF52840 Sense
This circuit features an Adafruit Feather nRF52840 Sense microcontroller connected to an ultrasonic sensor for distance measurement and an Adafruit AT42QT1010 capacitive touch sensor for touch input. The ultrasonic sensor's Trigger and Echo pins are interfaced with the microcontroller's digital pins D6 and D9, respectively, to send and receive ultrasonic signals. Additionally, a pressure-sensitive conductive sheet (Velostat) is connected in series with a 10k Ohm resistor to the microcontroller's analog pin A0, likely forming a pressure sensor.
Cirkit Designer LogoOpen Project in Cirkit Designer
Image of Touch Door Bell: A project utilizing trill touch sensor in a practical application
Touch Sensor Activated Buzzer with USB Power
This circuit consists of a touch sensor, a buzzer, and a USB plug for power. When the touch sensor is activated, it triggers the buzzer to sound, powered by the 5V supply from the USB plug.
Cirkit Designer LogoOpen Project in Cirkit Designer
Image of circuitcycle: A project utilizing trill touch sensor in a practical application
Arduino Mega 2560 Bluetooth-Controlled Touch-Activated Vibration Motor System
This circuit is a touch-activated feedback system that uses an Arduino Mega 2560 to control multiple vibration motors and a buzzer. Touch sensors (TTP233) are used to detect user input, which then triggers the corresponding vibration motor and buzzer via the Arduino. Additionally, an HC-05 Bluetooth module is included for wireless communication.
Cirkit Designer LogoOpen Project in Cirkit Designer

Technical Specifications

  • Operating Voltage: 3.3V (compatible with 5V systems via level shifters)
  • Communication Protocol: I²C
  • Touch Points: Up to 30 (depending on the specific Trill model)
  • Proximity Detection: Supported
  • Dimensions: Varies by model (e.g., Trill Bar, Trill Square, etc.)
  • Power Consumption: Low power, suitable for battery-powered applications
  • I²C Address Range: Configurable via solder jumpers

Pin Configuration and Descriptions

The Trill Touch Sensor typically has the following pinout:

Pin Name Description
VCC Power supply input (3.3V recommended)
GND Ground connection
SDA I²C data line for communication with the microcontroller
SCL I²C clock line for communication with the microcontroller
ADDR Address selection pin (used to set the I²C address via solder jumper)
INT Interrupt pin (optional, used for event-driven applications)

Usage Instructions

How to Use the Trill Touch Sensor in a Circuit

  1. Power the Sensor: Connect the VCC pin to a 3.3V power source and the GND pin to ground.
  2. Connect I²C Lines: Connect the SDA and SCL pins to the corresponding I²C pins on your microcontroller. For Arduino UNO, use A4 for SDA and A5 for SCL.
  3. Set the I²C Address: If using multiple Trill sensors, configure unique I²C addresses by adjusting the solder jumper on the ADDR pin.
  4. Optional Interrupt: If your application requires event-driven touch detection, connect the INT pin to a digital input pin on your microcontroller.

Important Considerations and Best Practices

  • Voltage Compatibility: The Trill sensor operates at 3.3V. If using a 5V microcontroller (e.g., Arduino UNO), use level shifters to avoid damaging the sensor.
  • I²C Pull-Up Resistors: Ensure that pull-up resistors (typically 4.7kΩ) are present on the SDA and SCL lines if not already included in your setup.
  • Placement: Avoid placing the sensor near high-frequency noise sources or conductive materials that may interfere with touch detection.
  • Calibration: Some applications may require calibration to optimize touch sensitivity and accuracy.

Example Code for Arduino UNO

Below is an example of how to use the Trill Touch Sensor with an Arduino UNO:

#include <Wire.h>
#include <Adafruit_Trill.h> // Include the Trill library

Adafruit_Trill trill; // Create a Trill object

void setup() {
  Serial.begin(9600); // Initialize serial communication for debugging
  Wire.begin();       // Initialize I²C communication

  // Initialize the Trill sensor
  if (!trill.begin()) {
    Serial.println("Failed to initialize Trill sensor!");
    while (1); // Halt execution if initialization fails
  }
  Serial.println("Trill sensor initialized successfully.");
}

void loop() {
  // Read touch data from the Trill sensor
  if (trill.read()) {
    Serial.println("Failed to read from Trill sensor!");
    return; // Skip the rest of the loop if read fails
  }

  // Print touch position and size if a touch is detected
  if (trill.numTouches() > 0) {
    for (int i = 0; i < trill.numTouches(); i++) {
      Serial.print("Touch ");
      Serial.print(i);
      Serial.print(": Position = ");
      Serial.print(trill.touchLocation(i));
      Serial.print(", Size = ");
      Serial.println(trill.touchSize(i));
    }
  } else {
    Serial.println("No touch detected.");
  }

  delay(50); // Add a small delay to avoid flooding the serial monitor
}

Troubleshooting and FAQs

Common Issues

  1. Sensor Not Responding:

    • Cause: Incorrect wiring or I²C address mismatch.
    • Solution: Double-check the wiring and ensure the I²C address matches the configuration in your code.
  2. Inconsistent Touch Detection:

    • Cause: Electrical noise or improper grounding.
    • Solution: Ensure proper grounding and avoid placing the sensor near noisy components.
  3. No Data on Serial Monitor:

    • Cause: Incorrect baud rate or failed initialization.
    • Solution: Verify that the baud rate in the Serial Monitor matches the Serial.begin() value in the code.

FAQs

  • Can I use multiple Trill sensors in one project? Yes, you can use multiple sensors by configuring unique I²C addresses for each sensor.

  • Is the Trill sensor compatible with Raspberry Pi? Yes, the Trill sensor can be used with Raspberry Pi via the I²C interface.

  • How do I clean the sensor surface? Use a soft, lint-free cloth slightly dampened with water or isopropyl alcohol. Avoid abrasive materials.

By following this documentation, you can effectively integrate the Trill Touch Sensor into your projects and troubleshoot common issues with ease.