How to Use Do solara: Examples, Pinouts, and Specs
Introduction
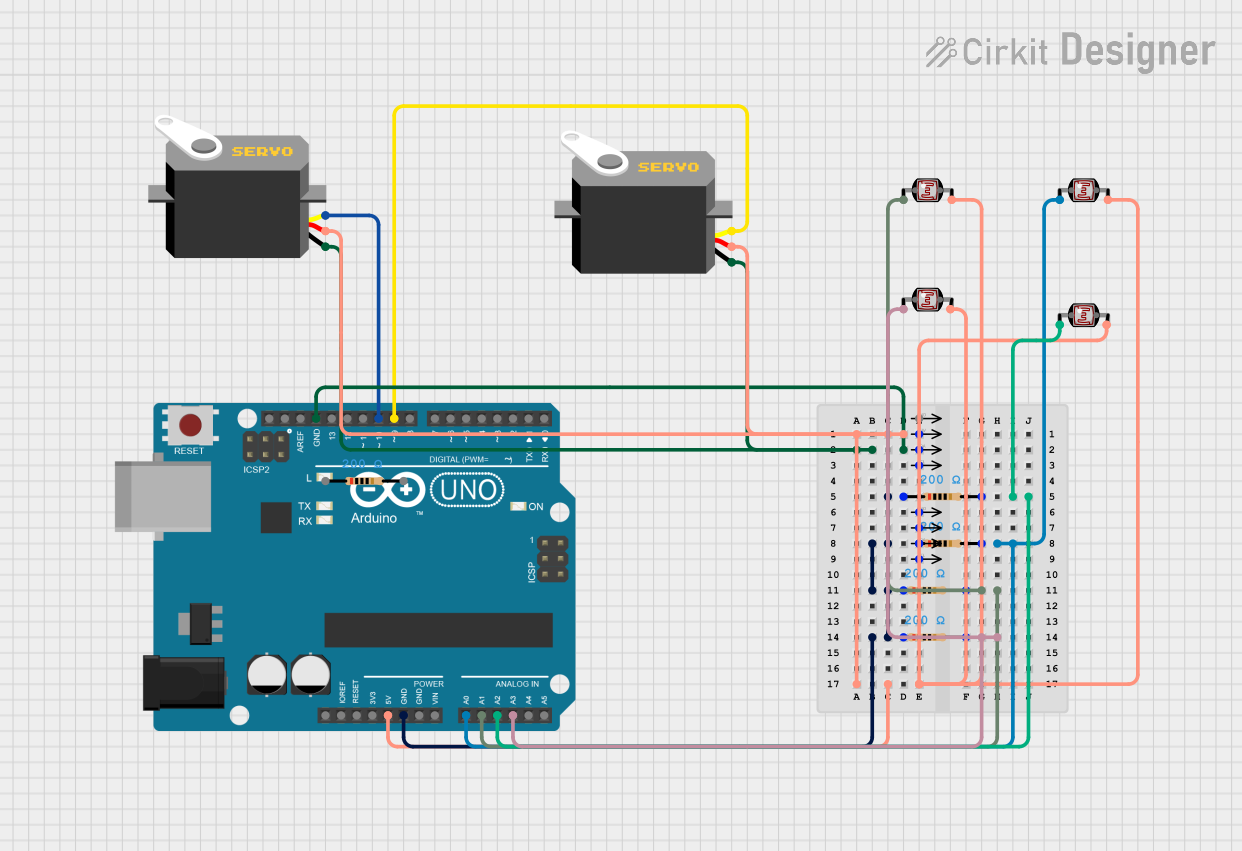
The Do Solara is a photovoltaic (PV) solar panel designed to convert sunlight into electrical energy through the photovoltaic effect. This component is essential for a wide range of applications, including off-grid power systems, solar-powered chargers, renewable energy educational projects, and as a clean energy source for IoT devices. Its ease of use and environmental benefits make it a popular choice for hobbyists and professionals alike.
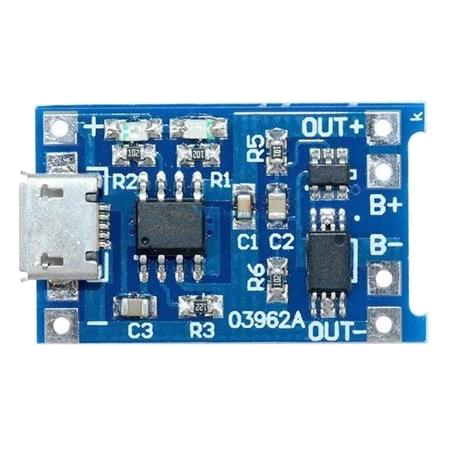
Explore Projects Built with Do solara

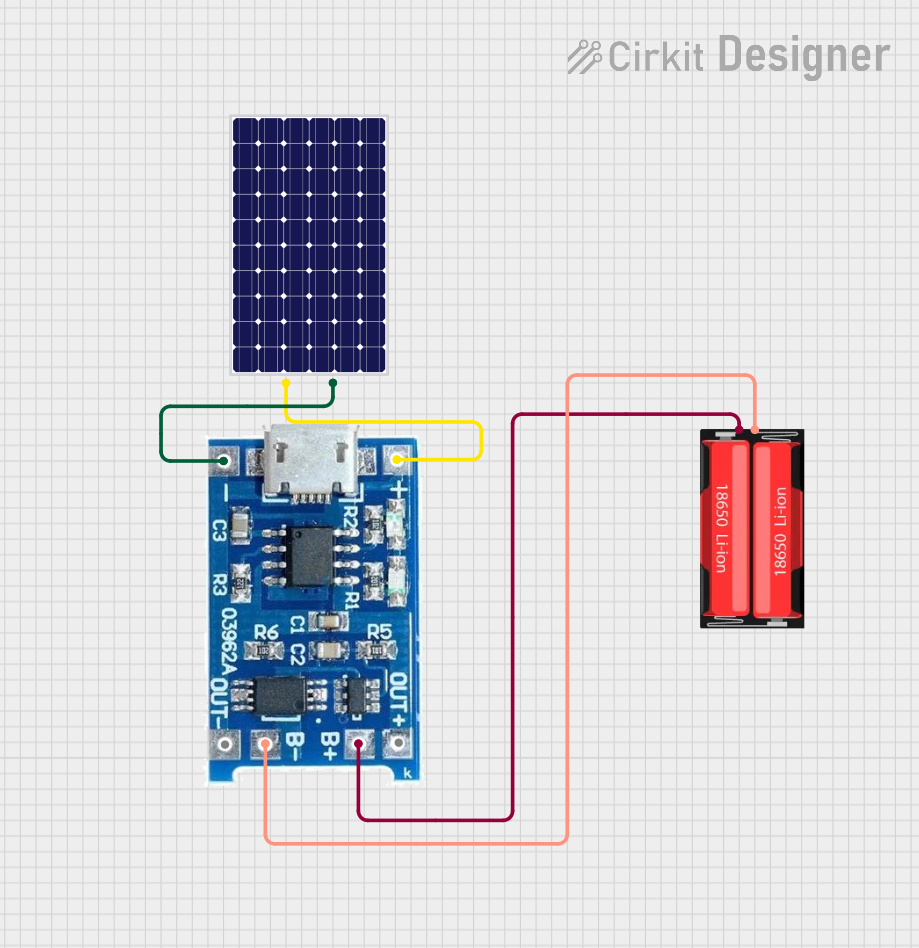
Explore Projects Built with Do solara
Technical Specifications
General Specifications
- Nominal Power: XX W
- Operating Voltage: XX V
- Operating Current: XX A
- Open-Circuit Voltage (Voc): XX V
- Short-Circuit Current (Isc): XX A
- Maximum System Voltage: XX V
- Cell Efficiency: XX%
- Operating Temperature Range: -XX to +XX°C
- Dimensions: XX mm x XX mm x XX mm
- Weight: XX g
Electrical Characteristics
| Parameter | Symbol | Min | Typ | Max | Unit |
|---|---|---|---|---|---|
| Maximum Power (Pmax) | Pmax | XX | W | ||
| Operating Voltage (Vmpp) | Vmpp | XX | V | ||
| Operating Current (Impp) | Impp | XX | A | ||
| Open-Circuit Voltage | Voc | XX | V | ||
| Short-Circuit Current | Isc | XX | A |
Note: The above table is an example. Replace XX with the actual values for the Do Solara solar panel.
Usage Instructions
Connecting to a Circuit
- Mounting: Secure the Do Solara panel in a location with maximum sunlight exposure.
- Wiring: Connect the positive and negative terminals of the panel to your circuit, ensuring proper polarity.
- Load Matching: To maximize efficiency, match the electrical characteristics of the panel to the load.
- Regulation: Use a charge controller to protect batteries from overcharging.
Best Practices
- Orientation: Position the panel to face true south (in the northern hemisphere) or true north (in the southern hemisphere) and tilt it according to your latitude for optimal sun exposure.
- Cleaning: Keep the surface of the panel clean to ensure maximum light absorption.
- Monitoring: Regularly check the voltage and current output to ensure the panel operates within its specified parameters.
Troubleshooting and FAQs
Common Issues
- Reduced Power Output: Often caused by shading, dirt, or improper orientation. Ensure the panel is clean and correctly positioned.
- No Power Output: Check for loose connections or damage to the panel. Verify that the panel is exposed to sufficient sunlight.
FAQs
Q: Can the Do Solara charge a 12V battery? A: Yes, but ensure you use a charge controller to prevent overcharging the battery.
Q: Is the Do Solara waterproof? A: Typically, solar panels are weather-resistant, but check the manufacturer's specifications for details on waterproof ratings.
Q: How do I know if the Do Solara is working correctly? A: Measure the voltage and current in full sunlight. The values should be close to the Vmpp and Impp specifications.
Example Arduino UNO Connection
The following is an example of how to connect the Do Solara to an Arduino UNO for a simple solar-powered LED project.
// Define the LED pin and the analog input pin for the solar panel
const int ledPin = 13; // LED connected to digital pin 13
const int solarPin = A0; // Solar panel connected to analog pin A0

void setup() {
  pinMode(ledPin, OUTPUT); // Set the LED pin as an output
  Serial.begin(9600); // Start serial communication at 9600 baud
}

void loop() {
  int solarValue = analogRead(solarPin); // Read the value from the solar panel
  Serial.print("Solar Panel Voltage: ");
  Serial.println(solarValue * (5.0 / 1023.0)); // Convert to voltage and print

  // If the solar panel voltage is above a certain threshold, turn on the LED
  if (solarValue > 400) { // Threshold value, adjust as needed
    digitalWrite(ledPin, HIGH);
  } else {
    digitalWrite(ledPin, LOW);
  }

  delay(1000); // Wait for a second before reading again
}
Note: The threshold value in the code is arbitrary and should be adjusted based on the actual operating voltage of the Do Solara solar panel.
Remember to adjust the analog reading conversion to reflect the actual operating voltage of the Do Solara panel. The example assumes a 5V reference voltage for the Arduino UNO. If the panel's voltage exceeds the Arduino's maximum voltage, use a voltage divider or an appropriate level shifter.