How to Use EB-L630SU: Examples, Pinouts, and Specs
Introduction
The EB-L630SU is a high-performance laser projector manufactured by Epson. Designed for large venues, it delivers bright and vivid images with a resolution of 1920x1200 pixels (WUXGA). This projector is equipped with advanced connectivity options, including HDMI and HDBaseT, and supports a wide range of content formats. Its compact design, combined with a long-lasting laser light source, makes it an excellent choice for professional presentations, events, and digital signage.
Explore Projects Built with EB-L630SU


Explore Projects Built with EB-L630SU
Common Applications and Use Cases
- Corporate presentations in large conference rooms
- Educational lectures in auditoriums or classrooms
- Digital signage in retail or public spaces
- Projection mapping for events and exhibitions
- Houses of worship for sermons and multimedia displays
Technical Specifications
Key Technical Details
| Specification | Value |
|---|---|
| Resolution | 1920x1200 pixels (WUXGA) |
| Brightness | 6,000 lumens |
| Light Source | Laser (20,000-hour lifespan) |
| Contrast Ratio | 2,500,000:1 |
| Connectivity Options | HDMI, HDBaseT, VGA, USB |
| Keystone Correction | ±30° horizontal, ±50° vertical |
| Projection Distance | 1.35m to 7.69m (approx.) |
| Aspect Ratio | 16:10 |
| Power Consumption | 350W (typical) |
| Dimensions (W x D x H) | 440mm x 304mm x 120mm |
| Weight | 8.5 kg |
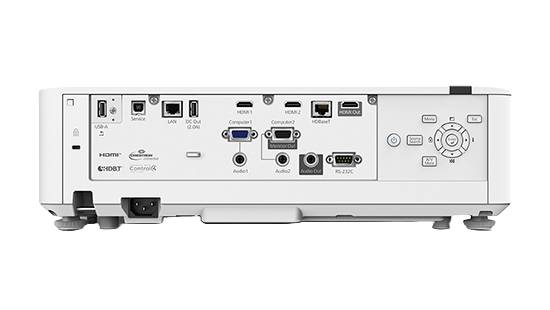
Pin Configuration and Descriptions
The EB-L630SU does not have traditional "pins" like an electronic IC but features multiple input/output ports for connectivity. Below is a table describing the key ports:
| Port Name | Description |
|---|---|
| HDMI | High-definition multimedia interface for video and audio input. |
| HDBaseT | Supports long-distance transmission of video, audio, and control signals. |
| VGA | Analog video input for legacy devices. |
| USB-A | For connecting USB storage devices to display content directly. |
| USB-B | For PC control or firmware updates. |
| LAN (RJ-45) | Network connection for remote management and content streaming. |
| Audio In/Out | 3.5mm jacks for external audio input and output. |
| RS-232C | Serial port for control and automation systems. |
Usage Instructions
How to Use the EB-L630SU in a Setup
Positioning the Projector:
- Place the projector on a stable surface or mount it using a compatible ceiling mount.
- Ensure the projection distance is within the supported range (1.35m to 7.69m).
Connecting Input Devices:
- Use an HDMI cable to connect a laptop, media player, or other video source.
- For long-distance connections, use the HDBaseT port with a compatible transmitter.
- Connect USB storage devices to the USB-A port to display images or videos directly.
Powering On:
- Plug the projector into a power outlet using the provided power cable.
- Press the power button on the projector or remote control to turn it on.
Adjusting the Image:
- Use the zoom and focus rings to adjust the image size and clarity.
- Correct any distortion using the keystone correction feature (accessible via the menu).
Accessing the Menu:
- Press the "Menu" button on the remote control or projector to access settings.
- Navigate through options to adjust brightness, contrast, input source, and other parameters.
Network Configuration (Optional):
- Connect the projector to a network using the LAN port.
- Use Epson's software tools for remote management and content streaming.
Important Considerations and Best Practices
- Ventilation: Ensure proper airflow around the projector to prevent overheating.
- Ambient Light: For optimal image quality, use the projector in a dimly lit environment.
- Firmware Updates: Regularly check for firmware updates on Epson's website to access new features and improvements.
- Cable Management: Use cable ties or organizers to keep cables neat and prevent tripping hazards.
Arduino Integration
The EB-L630SU is not directly compatible with Arduino microcontrollers. However, you can use an Arduino to control the projector via the RS-232C port. Below is an example of Arduino code to send a power-on command to the projector:
#include <SoftwareSerial.h>

// Define RX and TX pins for RS-232 communication
SoftwareSerial projectorSerial(10, 11); // RX = pin 10, TX = pin 11

void setup() {
  // Initialize serial communication with the projector
  projectorSerial.begin(9600); // Baud rate for RS-232 communication
  delay(1000); // Wait for the projector to initialize

  // Send the power-on command to the projector
  projectorSerial.print("\x21\x89\x01\x50\x57\x52\x0D");
  // Command format: ESC/VP21 protocol (hexadecimal bytes)
  // "\x21\x89\x01\x50\x57\x52\x0D" = Power On command
}

void loop() {
  // No continuous actions required in this example
}
Note: Refer to the EB-L630SU's user manual for the complete RS-232 command set.
Troubleshooting and FAQs
Common Issues and Solutions
| Issue | Possible Cause | Solution |
|---|---|---|
| No image displayed | Incorrect input source selected | Check the input source and select the correct one via the menu. |
| Blurry image | Improper focus or projection distance | Adjust the focus ring and ensure the projector is within the supported range. |
| Overheating | Blocked ventilation or high ambient temp | Ensure proper airflow and avoid placing the projector in enclosed spaces. |
| Remote control not working | Dead batteries or obstructed signal | Replace the batteries and ensure there is a clear line of sight to the projector. |
| No sound output | Audio cable not connected or muted | Check the audio cable connection and ensure the volume is not muted. |
FAQs
Can the EB-L630SU be used outdoors?
- While the projector can be used outdoors, it should be protected from direct sunlight, rain, and extreme temperatures.
What is the maximum supported resolution?
- The EB-L630SU supports up to 1920x1200 pixels (WUXGA).
How do I clean the projector?
- Use a soft, dry cloth to clean the exterior. For the lens, use a lens cleaning solution and a microfiber cloth.
Can I control the projector remotely?
- Yes, the projector can be controlled remotely via the LAN port or RS-232C interface.
What is the warranty period?
- Warranty terms vary by region. Refer to Epson's official website or contact customer support for details.