Cirkit Designer Logo
Cirkit Designer
Your all-in-one circuit design IDE
Home / 
Component Documentation

How to Use Grove Speaker: Examples, Pinouts, and Specs

Image of Grove Speaker
Cirkit Designer LogoDesign with Grove Speaker in Cirkit Designer

Introduction

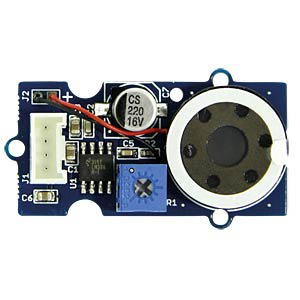
The Grove Speaker (Manufacturer Part ID: 107020001) is a compact audio output device designed by SEEED Arduino for use with Grove-compatible systems. It enables sound playback in a variety of electronic projects, making it ideal for applications such as alarms, notifications, simple music playback, and interactive systems. Its plug-and-play design ensures easy integration into projects, even for beginners.

Explore Projects Built with Grove Speaker

Use Cirkit Designer to design, explore, and prototype these projects online. Some projects support real-time simulation. Click "Open Project" to start designing instantly!
Arduino UNO Melody Player with Piezo Speaker
Image of Arduino UNO With Piezo Buzzer - Play a Melody: A project utilizing Grove Speaker in a practical application
This circuit consists of an Arduino UNO microcontroller connected to a piezo speaker. The Arduino is programmed to play a predefined melody through the speaker upon startup, using digital pin 8 for the speaker signal and GND for the return path. The melody and its timing are defined in the embedded code, which utilizes an array of note frequencies and durations.
Cirkit Designer LogoOpen Project in Cirkit Designer
Arduino Nano Controlled PAM8403 Audio Amplifier with Voice Synthesis
Image of Talking-Volt-meter-Using-Arduino: A project utilizing Grove Speaker in a practical application
This circuit is designed to drive a loudspeaker using an Arduino Nano and a PAM8403 audio amplifier. The Arduino Nano is programmed to generate voice signals using the Talkie library, which are then fed into the PAM8403 amplifier's right channel input. A resistor is connected to the ground and input pins of the PAM8403, likely for noise reduction or signal conditioning.
Cirkit Designer LogoOpen Project in Cirkit Designer
Arduino UNO Bluetooth-Controlled Speaker
Image of Bluetooth Speaker: A project utilizing Grove Speaker in a practical application
This circuit is designed to function as a Bluetooth-controlled speaker system using an Arduino UNO as the central controller. The Arduino is connected to a Bluetooth Mate Gold module for wireless communication and a speaker for audio output. The Arduino's digital pins D0 and D1 are used for RX and TX communication with the Bluetooth module, while pin D9 is configured to drive the speaker.
Cirkit Designer LogoOpen Project in Cirkit Designer
ESP32-Based Voice Assistant with Battery-Powered Microphone and Speaker
Image of Minor: A project utilizing Grove Speaker in a practical application
This circuit is a voice-controlled system that uses an ESP32 microcontroller to process audio input from a microphone, send the data to a Gemini API for speech-to-text conversion, and output responses through a speaker. It includes an IR sensor for additional input, an LED for status indication, and a battery with a charging module for power management.
Cirkit Designer LogoOpen Project in Cirkit Designer

Explore Projects Built with Grove Speaker

Use Cirkit Designer to design, explore, and prototype these projects online. Some projects support real-time simulation. Click "Open Project" to start designing instantly!
Image of Arduino UNO With Piezo Buzzer - Play a Melody: A project utilizing Grove Speaker in a practical application
Arduino UNO Melody Player with Piezo Speaker
This circuit consists of an Arduino UNO microcontroller connected to a piezo speaker. The Arduino is programmed to play a predefined melody through the speaker upon startup, using digital pin 8 for the speaker signal and GND for the return path. The melody and its timing are defined in the embedded code, which utilizes an array of note frequencies and durations.
Cirkit Designer LogoOpen Project in Cirkit Designer
Image of Talking-Volt-meter-Using-Arduino: A project utilizing Grove Speaker in a practical application
Arduino Nano Controlled PAM8403 Audio Amplifier with Voice Synthesis
This circuit is designed to drive a loudspeaker using an Arduino Nano and a PAM8403 audio amplifier. The Arduino Nano is programmed to generate voice signals using the Talkie library, which are then fed into the PAM8403 amplifier's right channel input. A resistor is connected to the ground and input pins of the PAM8403, likely for noise reduction or signal conditioning.
Cirkit Designer LogoOpen Project in Cirkit Designer
Image of Bluetooth Speaker: A project utilizing Grove Speaker in a practical application
Arduino UNO Bluetooth-Controlled Speaker
This circuit is designed to function as a Bluetooth-controlled speaker system using an Arduino UNO as the central controller. The Arduino is connected to a Bluetooth Mate Gold module for wireless communication and a speaker for audio output. The Arduino's digital pins D0 and D1 are used for RX and TX communication with the Bluetooth module, while pin D9 is configured to drive the speaker.
Cirkit Designer LogoOpen Project in Cirkit Designer
Image of Minor: A project utilizing Grove Speaker in a practical application
ESP32-Based Voice Assistant with Battery-Powered Microphone and Speaker
This circuit is a voice-controlled system that uses an ESP32 microcontroller to process audio input from a microphone, send the data to a Gemini API for speech-to-text conversion, and output responses through a speaker. It includes an IR sensor for additional input, an LED for status indication, and a battery with a charging module for power management.
Cirkit Designer LogoOpen Project in Cirkit Designer

Common Applications

  • Audio feedback for electronic devices
  • Alarm and notification systems
  • Simple music or tone generation
  • Interactive projects and games
  • Educational and prototyping purposes

Technical Specifications

The Grove Speaker is designed to deliver reliable audio output with minimal setup. Below are its key technical details:

Parameter Value
Operating Voltage 3.3V to 5V
Operating Current ≤ 40mA
Output Power 0.5W
Frequency Range 400Hz to 4kHz
Interface Grove 4-pin (Digital)
Dimensions 40mm x 20mm x 15mm
Weight 9g

Pin Configuration and Descriptions

The Grove Speaker uses a standard 4-pin Grove connector. The pinout is as follows:

Pin Name Description
1 VCC Power supply (3.3V to 5V)
2 GND Ground
3 NC Not connected
4 SIG Signal input (digital signal for sound generation)

Usage Instructions

The Grove Speaker is straightforward to use and can be connected to a microcontroller, such as an Arduino UNO, via the Grove interface. Below are the steps to use the component effectively:

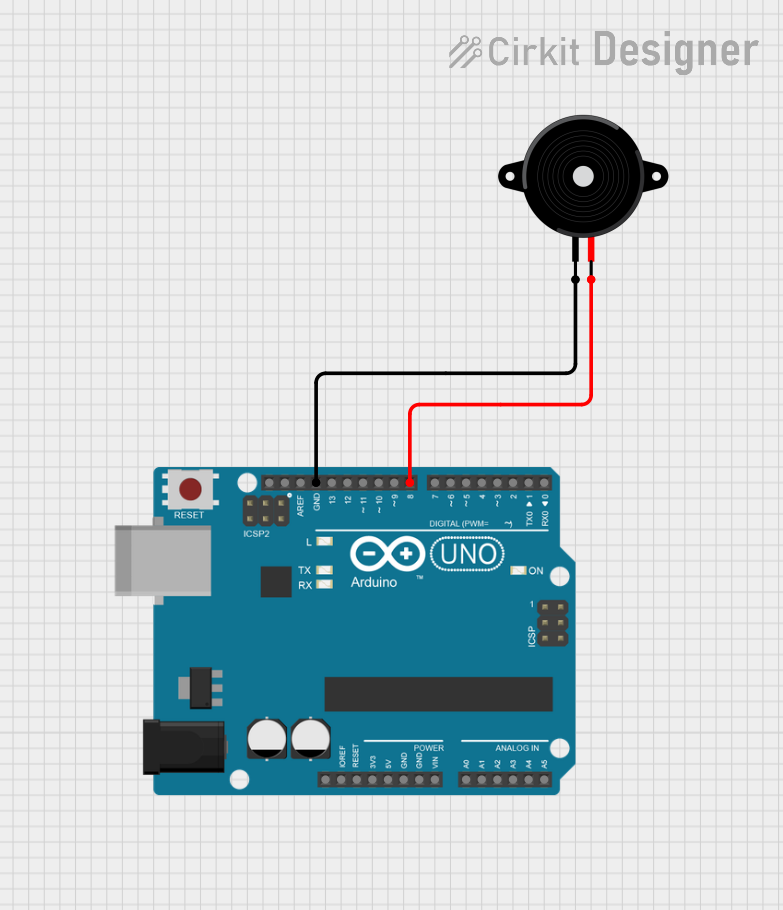
Connecting the Grove Speaker

  1. Connect the Grove Speaker to a Grove Base Shield using a Grove cable.
  2. Attach the Base Shield to your Arduino UNO or compatible microcontroller.
  3. Plug the Grove Speaker into a digital I/O port (e.g., D8).

Generating Sound

The Grove Speaker produces sound by receiving a digital signal. You can use the Arduino tone() function to generate specific frequencies.

Example Code for Arduino UNO

// Example: Generate a simple tone using the Grove Speaker
// Connect the Grove Speaker to digital pin D8 on the Arduino UNO

#define SPEAKER_PIN 8  // Define the pin connected to the Grove Speaker

void setup() {
  // No setup required for the tone() function
}

void loop() {
  tone(SPEAKER_PIN, 1000, 500);  // Play a 1kHz tone for 500ms
  delay(1000);                   // Wait for 1 second
  tone(SPEAKER_PIN, 1500, 500);  // Play a 1.5kHz tone for 500ms
  delay(1000);                   // Wait for 1 second
}

Important Considerations

  • Power Supply: Ensure the power supply voltage is within the 3.3V to 5V range to avoid damaging the speaker.
  • Signal Input: The speaker is designed for digital signals. Avoid applying analog signals directly.
  • Volume Control: The volume is fixed and cannot be adjusted directly on the speaker. To control volume, adjust the signal's duty cycle or amplitude programmatically.

Troubleshooting and FAQs

Common Issues and Solutions

Issue Possible Cause Solution
No sound output Incorrect wiring or loose connection Verify the Grove cable and port connections.
Incorrect pin assignment in code Ensure the correct digital pin is defined.
Insufficient power supply Check the power source and ensure 3.3V to 5V.
Distorted or weak sound Signal frequency out of range Use frequencies within the 400Hz to 4kHz range.
Power supply voltage too low Ensure the power supply is stable and sufficient.
Speaker stops working intermittently Overheating due to prolonged use Allow the speaker to cool down before reuse.

FAQs

  1. Can I use the Grove Speaker with a Raspberry Pi?

    • Yes, the Grove Speaker can be used with a Raspberry Pi. However, you may need to use a Grove HAT or manually connect the pins to the GPIO.
  2. What is the maximum volume of the speaker?

    • The speaker has a fixed output power of 0.5W. The volume cannot be adjusted directly but can be controlled programmatically by modifying the signal.
  3. Can the Grove Speaker play complex audio files?

    • No, the Grove Speaker is designed for simple tone generation and cannot play complex audio files like MP3 or WAV.
  4. Is the Grove Speaker compatible with 3.3V systems?

    • Yes, the Grove Speaker works with both 3.3V and 5V systems, making it compatible with a wide range of microcontrollers.

By following this documentation, you can effectively integrate the Grove Speaker into your projects and troubleshoot any issues that arise.