Cirkit Designer Logo
Cirkit Designer
Your all-in-one circuit design IDE
Home / 
Component Documentation

How to Use Adafruit Grayscale 1.5in 128x128 OLED Graphic Display: Examples, Pinouts, and Specs

Image of Adafruit Grayscale 1.5in 128x128 OLED Graphic Display
Cirkit Designer LogoDesign with Adafruit Grayscale 1.5in 128x128 OLED Graphic Display in Cirkit Designer

Introduction

The Adafruit Grayscale 1.5in 128x128 OLED Graphic Display is a compact and versatile monochrome display module. With a resolution of 128x128 pixels, it offers high contrast and excellent visibility under various lighting conditions. This display is perfect for projects that require a small yet clear interface to show text, graphics, or custom user interfaces.

Explore Projects Built with Adafruit Grayscale 1.5in 128x128 OLED Graphic Display

Use Cirkit Designer to design, explore, and prototype these projects online. Some projects support real-time simulation. Click "Open Project" to start designing instantly!
Arduino Nano Controlled OLED Display Interface
Image of Chandru: A project utilizing Adafruit Grayscale 1.5in 128x128 OLED Graphic Display in a practical application
This circuit connects an Arduino Nano to an OLED 128x64 I2C Monochrome Display. The Arduino provides power to the OLED display and communicates with it via the I2C protocol, using its A4 and A5 pins as SDA and SCK lines, respectively. The embedded code initializes the display and draws a single pixel on it, which suggests that the circuit is designed for visual output, possibly for a user interface or data visualization.
Cirkit Designer LogoOpen Project in Cirkit Designer
Arduino 101 OLED Display Animation Project
Image of wokwi animater test: A project utilizing Adafruit Grayscale 1.5in 128x128 OLED Graphic Display in a practical application
This circuit consists of an Arduino 101 microcontroller connected to a 0.96" OLED display via I2C communication. The Arduino runs a program that initializes the OLED and continuously displays an animated sequence of frames on the screen.
Cirkit Designer LogoOpen Project in Cirkit Designer
ESP32 Devkit V1 and OLED Display Bitmap Viewer
Image of Esp32_monochromeimage: A project utilizing Adafruit Grayscale 1.5in 128x128 OLED Graphic Display in a practical application
This circuit consists of an ESP32 Devkit V1 microcontroller connected to a 1.3" OLED display via I2C communication. The ESP32 initializes the OLED display and renders a predefined bitmap image on it.
Cirkit Designer LogoOpen Project in Cirkit Designer
Arduino UNO Controlled OLED Display with 9V Battery and Step-Down Converter
Image of digik: A project utilizing Adafruit Grayscale 1.5in 128x128 OLED Graphic Display in a practical application
This circuit features an Arduino UNO connected to a 128x64 OLED display via I2C communication lines (SDA and SCL), with the Arduino providing control signals to the display. A 9V battery powers the circuit through a 12v to 5v step-down power converter, which supplies a regulated 5V to both the Arduino and the OLED display. The embedded code on the Arduino is configured to blink an onboard LED with a 1-second interval.
Cirkit Designer LogoOpen Project in Cirkit Designer

Explore Projects Built with Adafruit Grayscale 1.5in 128x128 OLED Graphic Display

Use Cirkit Designer to design, explore, and prototype these projects online. Some projects support real-time simulation. Click "Open Project" to start designing instantly!
Image of Chandru: A project utilizing Adafruit Grayscale 1.5in 128x128 OLED Graphic Display in a practical application
Arduino Nano Controlled OLED Display Interface
This circuit connects an Arduino Nano to an OLED 128x64 I2C Monochrome Display. The Arduino provides power to the OLED display and communicates with it via the I2C protocol, using its A4 and A5 pins as SDA and SCK lines, respectively. The embedded code initializes the display and draws a single pixel on it, which suggests that the circuit is designed for visual output, possibly for a user interface or data visualization.
Cirkit Designer LogoOpen Project in Cirkit Designer
Image of wokwi animater test: A project utilizing Adafruit Grayscale 1.5in 128x128 OLED Graphic Display in a practical application
Arduino 101 OLED Display Animation Project
This circuit consists of an Arduino 101 microcontroller connected to a 0.96" OLED display via I2C communication. The Arduino runs a program that initializes the OLED and continuously displays an animated sequence of frames on the screen.
Cirkit Designer LogoOpen Project in Cirkit Designer
Image of Esp32_monochromeimage: A project utilizing Adafruit Grayscale 1.5in 128x128 OLED Graphic Display in a practical application
ESP32 Devkit V1 and OLED Display Bitmap Viewer
This circuit consists of an ESP32 Devkit V1 microcontroller connected to a 1.3" OLED display via I2C communication. The ESP32 initializes the OLED display and renders a predefined bitmap image on it.
Cirkit Designer LogoOpen Project in Cirkit Designer
Image of digik: A project utilizing Adafruit Grayscale 1.5in 128x128 OLED Graphic Display in a practical application
Arduino UNO Controlled OLED Display with 9V Battery and Step-Down Converter
This circuit features an Arduino UNO connected to a 128x64 OLED display via I2C communication lines (SDA and SCL), with the Arduino providing control signals to the display. A 9V battery powers the circuit through a 12v to 5v step-down power converter, which supplies a regulated 5V to both the Arduino and the OLED display. The embedded code on the Arduino is configured to blink an onboard LED with a 1-second interval.
Cirkit Designer LogoOpen Project in Cirkit Designer

Common Applications and Use Cases

  • Wearable devices
  • Portable instruments
  • User interfaces for small-scale projects
  • Data visualization for sensors
  • DIY gaming consoles

Technical Specifications

Key Technical Details

  • Display Type: OLED, Grayscale
  • Resolution: 128x128 pixels
  • Color Depth: 16 levels of gray
  • Communication: I2C/SPI
  • Operating Voltage: 3.3V - 5V
  • Active Display Area: 1.5 inches diagonal

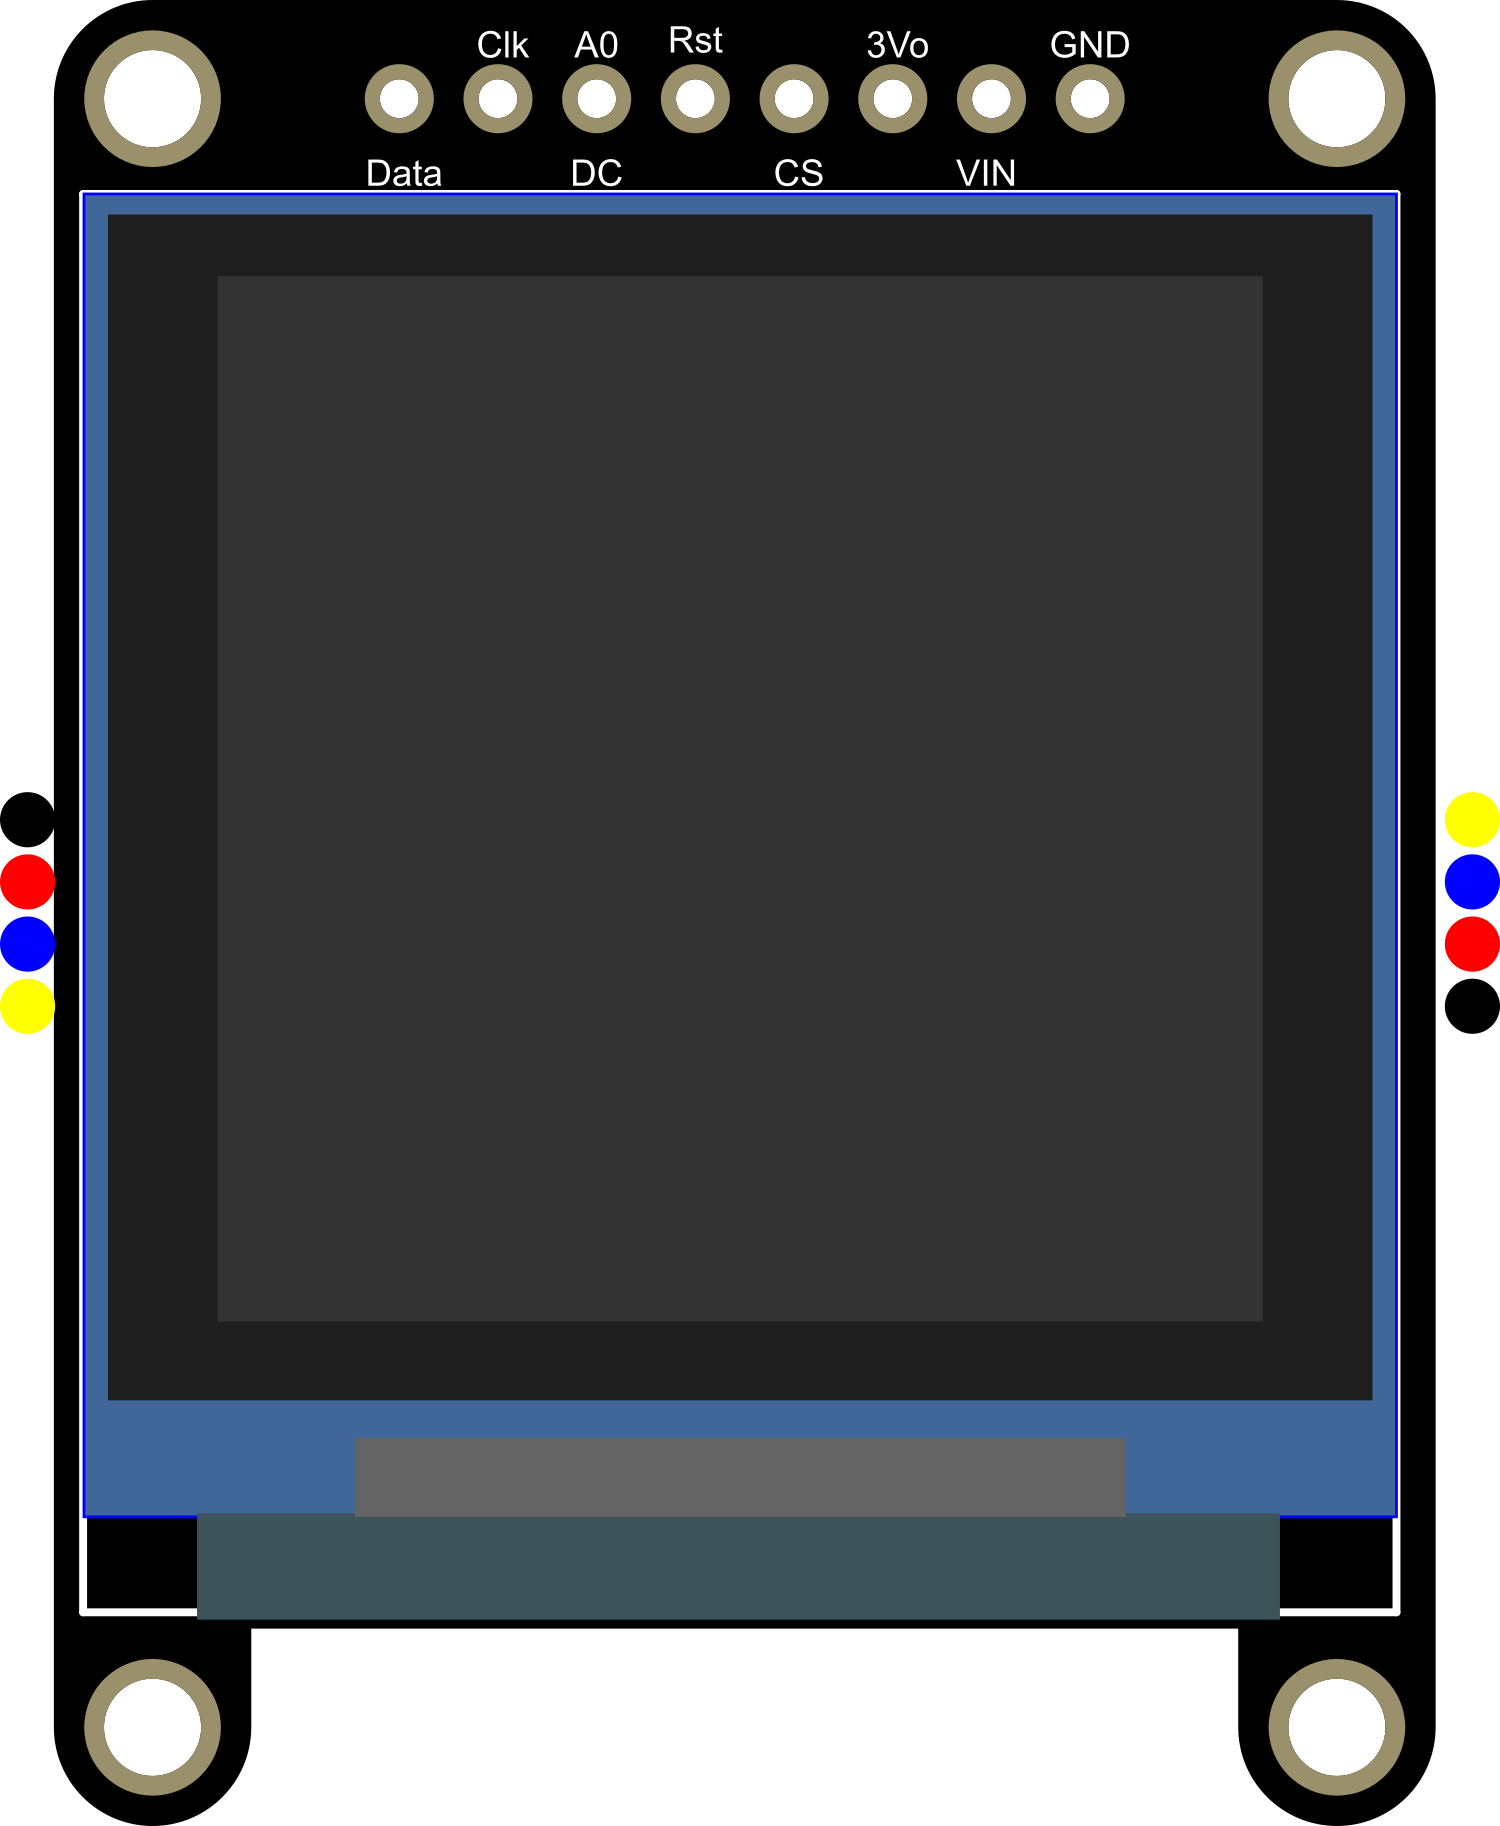
Pin Configuration and Descriptions

Pin Number Name Description
1 GND Ground connection
2 VCC Power supply (3.3V - 5V)
3 SCL Serial Clock Line for I2C/SPI
4 SDA Serial Data Line for I2C or MOSI for SPI
5 RES Reset pin
6 DC Data/Command control pin for SPI
7 CS Chip Select for SPI

Usage Instructions

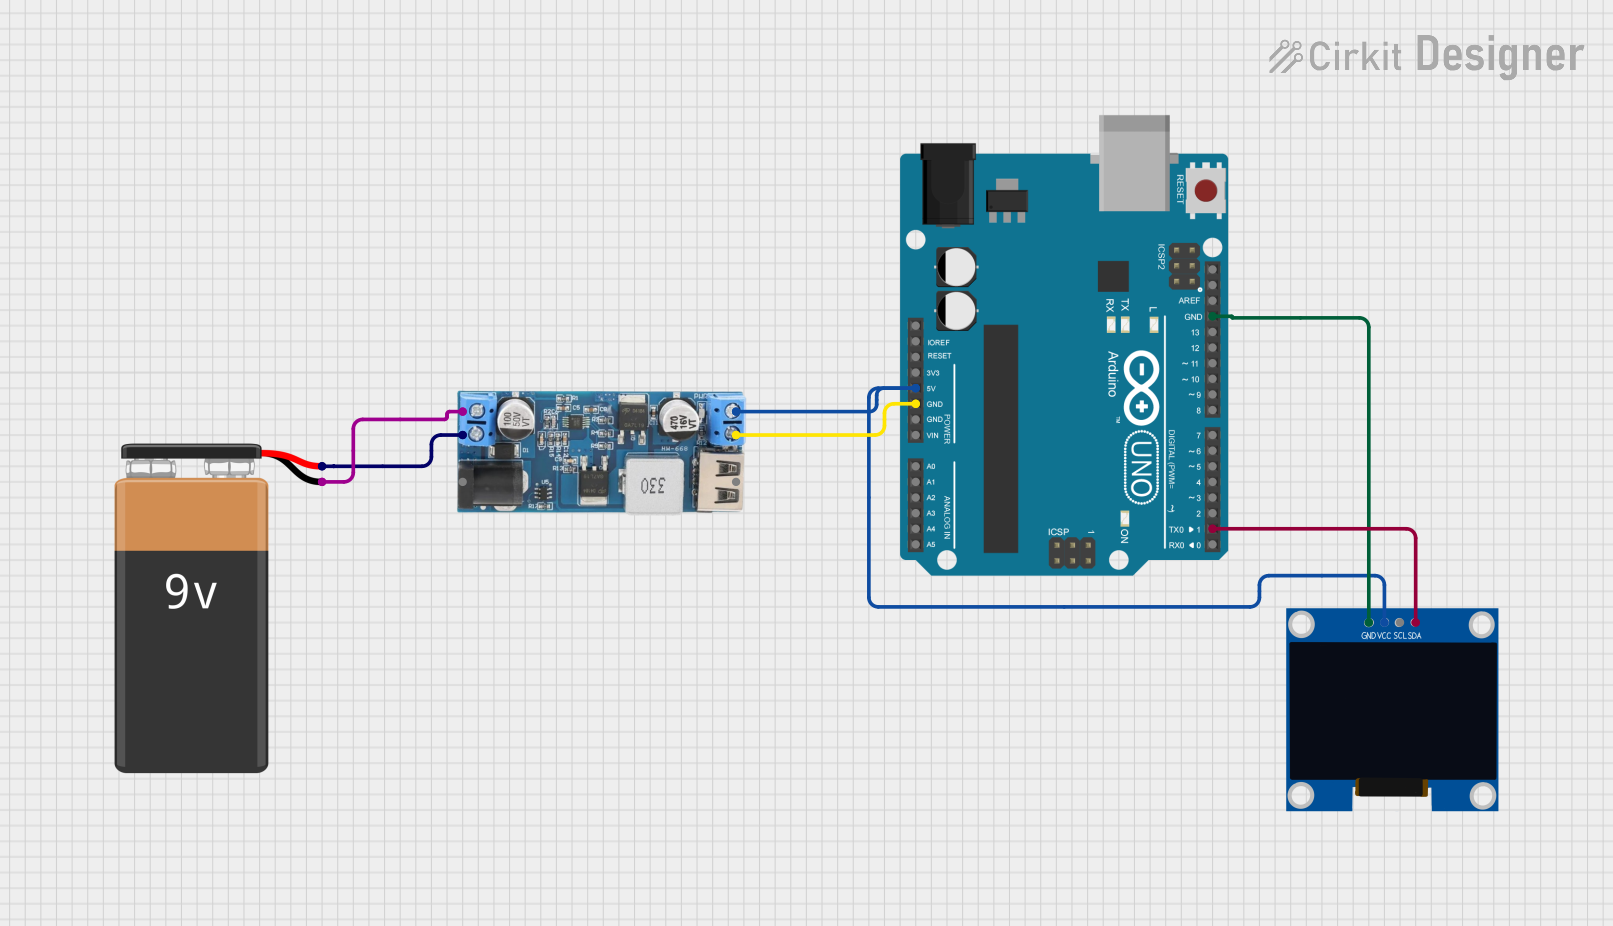
How to Use the Component in a Circuit

  1. Power Connections: Connect the VCC pin to a 3.3V or 5V power supply and the GND pin to the ground.

  2. Data Connections: For I2C communication, connect the SCL and SDA pins to the corresponding SCL and SDA pins on your microcontroller. For SPI communication, connect SCL to SCK, SDA to MOSI, DC to a digital pin for data/command selection, CS to a digital pin for chip selection, and RES to a digital pin for resetting the display.

  3. Initialization: Before sending data to the display, initialize it using the appropriate library and set the communication protocol (I2C/SPI).

Important Considerations and Best Practices

  • Use level shifters if connecting to a 5V microcontroller to protect the display's 3.3V logic.
  • Avoid exposing the display to direct sunlight for extended periods to prevent damage.
  • When using SPI, ensure that the CS, DC, and RES pins are correctly set up in your code.

Example Code for Arduino UNO

#include <Adafruit_GFX.h>
#include <Adafruit_SSD1327.h>  // Include the SSD1327 grayscale OLED driver library

#define SCREEN_WIDTH 128
#define SCREEN_HEIGHT 128  // OLED display width and height, in pixels
#define OLED_RESET    -1   // Reset pin # (or -1 if sharing Arduino reset pin)
#define SCREEN_ADDRESS 0x3D // I2C address for the display

Adafruit_SSD1327 display(SCREEN_WIDTH, SCREEN_HEIGHT, &Wire, OLED_RESET);

void setup() {
  // Initialize with the I2C addr 0x3D (for the 128x128)
  if(!display.begin(SSD1327_I2C_ADDRESS, OLED_RESET)) {
    Serial.println(F("SSD1327 allocation failed"));
    for(;;);
  }
  display.display();  // Show initial display buffer contents on the screen
  delay(2000);       // Pause for 2 seconds
  display.clearDisplay();
  display.setTextSize(1);      // Normal 1:1 pixel scale
  display.setTextColor(SSD1327_WHITE); // Draw white text
  display.setCursor(0, 0);     // Start at top-left corner
  display.print(F("Hello, world!"));
  display.display();
}

void loop() {
  // There's no need to update the display continuously in this example
  // The text "Hello, world!" will remain on the screen
}

Troubleshooting and FAQs

Common Issues Users Might Face

  • Display Not Powering On: Check the power connections and ensure the voltage is within the specified range.
  • No Data on Display: Verify that the I2C/SPI connections are correct and that the correct communication protocol is selected in the code.
  • Garbled or Incomplete Graphics: Ensure that the display buffer is correctly initialized and that the display is not being updated too rapidly.

Solutions and Tips for Troubleshooting

  • Double-check wiring, especially the power and ground connections.
  • Use the example code as a starting point to ensure that the display is working correctly.
  • Consult the Adafruit SSD1327 library documentation for advanced functions and troubleshooting tips.

FAQs

Q: Can the display be used with both 3.3V and 5V logic? A: Yes, but level shifting is recommended when using 5V logic.

Q: Is the display sunlight-readable? A: The OLED display is visible in sunlight, but prolonged exposure to direct sunlight should be avoided.

Q: How can I display images on the OLED? A: Convert your images to a bitmap array and use the display library's drawing functions to render the image on the screen.