How to Use 120V AC Power Cable: Examples, Pinouts, and Specs
Introduction
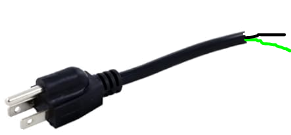
The 120V AC Power Cable is a robust and reliable cable designed to carry alternating current (AC) at a standard voltage of 120 volts. It is commonly used to connect electrical devices, appliances, and equipment to a power source, ensuring a stable and safe power supply. These cables are essential in residential, commercial, and industrial settings, where they serve as a critical link between devices and electrical outlets.
Explore Projects Built with 120V AC Power Cable


Explore Projects Built with 120V AC Power Cable
Common Applications and Use Cases
- Powering household appliances such as lamps, televisions, and kitchen devices.
- Connecting office equipment like computers, printers, and monitors.
- Supplying power to industrial tools and machinery.
- Temporary power connections for events or outdoor equipment.
Technical Specifications
Key Technical Details
| Parameter | Specification |
|---|---|
| Voltage Rating | 120V AC |
| Current Rating | Typically 10A to 15A (varies by model) |
| Frequency | 50Hz or 60Hz |
| Cable Type | 2-prong or 3-prong (grounded) |
| Insulation Material | PVC or rubber |
| Connector Type | NEMA 1-15P (2-prong) or NEMA 5-15P (3-prong) |
| Cable Length | Varies (commonly 3ft, 6ft, 10ft, etc.) |
| Operating Temperature | -20°C to 60°C |
| Safety Certifications | UL, CSA, or equivalent |
Pin Configuration and Descriptions
For 2-Prong (NEMA 1-15P) Cables:
| Pin Number | Name | Description |
|---|---|---|
| 1 | Hot (Live) | Carries the current to the device. |
| 2 | Neutral | Returns the current to the source. |
For 3-Prong (NEMA 5-15P) Cables:
| Pin Number | Name | Description |
|---|---|---|
| 1 | Hot (Live) | Carries the current to the device. |
| 2 | Neutral | Returns the current to the source. |
| 3 | Ground | Provides a safety path for excess current. |
Usage Instructions
How to Use the Component in a Circuit
- Inspect the Cable: Before use, check the cable for any visible damage, such as cuts, frayed wires, or exposed conductors. Do not use a damaged cable.
- Connect to the Device: Plug the female end of the cable into the device's power input port.
- Connect to the Power Source: Insert the male end of the cable into a standard 120V AC wall outlet.
- Power On the Device: Turn on the connected device to ensure proper operation.
Important Considerations and Best Practices
- Safety First: Always ensure the cable is unplugged before inspecting or handling it.
- Avoid Overloading: Do not exceed the cable's current rating (e.g., 15A). Overloading can cause overheating and potential fire hazards.
- Use Grounded Cables When Necessary: For devices with metal enclosures or higher power requirements, always use a 3-prong grounded cable.
- Protect from Damage: Avoid pinching, bending, or placing heavy objects on the cable to prevent internal wire damage.
- Outdoor Use: If using the cable outdoors, ensure it is rated for outdoor use and protected from water exposure.
Example: Connecting to an Arduino UNO
While the 120V AC Power Cable itself is not directly connected to an Arduino UNO, it can be used to power devices like AC-to-DC adapters or power supplies that provide the necessary DC voltage for the Arduino. Below is an example of how to use an AC adapter with an Arduino UNO:
// Example: Blinking an LED with Arduino UNO powered via an AC adapter

// Define the pin for the LED
const int ledPin = 13;

void setup() {
  pinMode(ledPin, OUTPUT); // Set the LED pin as an output
}

void loop() {
  digitalWrite(ledPin, HIGH); // Turn the LED on
  delay(1000);                // Wait for 1 second
  digitalWrite(ledPin, LOW);  // Turn the LED off
  delay(1000);                // Wait for 1 second
}
Note: Ensure the AC adapter provides a regulated 5V or 9V DC output compatible with the Arduino UNO's power input.
Troubleshooting and FAQs
Common Issues Users Might Face
Cable Does Not Power the Device:
- Cause: Loose connection or damaged cable.
- Solution: Ensure both ends of the cable are securely connected. Inspect the cable for damage and replace it if necessary.
Device Trips Circuit Breaker:
- Cause: Overloaded circuit or short circuit in the device.
- Solution: Check the device's power requirements and ensure they do not exceed the circuit's capacity. Inspect the device for internal faults.
Cable Feels Hot During Use:
- Cause: Overloading or poor ventilation.
- Solution: Verify the device's current draw does not exceed the cable's rating. Ensure the cable is not coiled or covered during use.
Ground Pin Missing or Broken:
- Cause: Physical damage to the plug.
- Solution: Replace the cable immediately. Do not use a cable with a missing or damaged ground pin.
Solutions and Tips for Troubleshooting
- Always use a multimeter to test the continuity of the cable if you suspect internal damage.
- For outdoor or wet environments, use cables with weatherproof insulation and connectors.
- If the cable frequently disconnects, consider using a cable with locking connectors or strain relief features.
By following these guidelines and best practices, you can ensure the safe and effective use of the 120V AC Power Cable in your applications.