Cirkit Designer Logo
Cirkit Designer
Your all-in-one circuit design IDE
Home / 
Component Documentation

How to Use Adafruit Neo Trinkey: Examples, Pinouts, and Specs

Image of Adafruit Neo Trinkey
Cirkit Designer LogoDesign with Adafruit Neo Trinkey in Cirkit Designer

Introduction

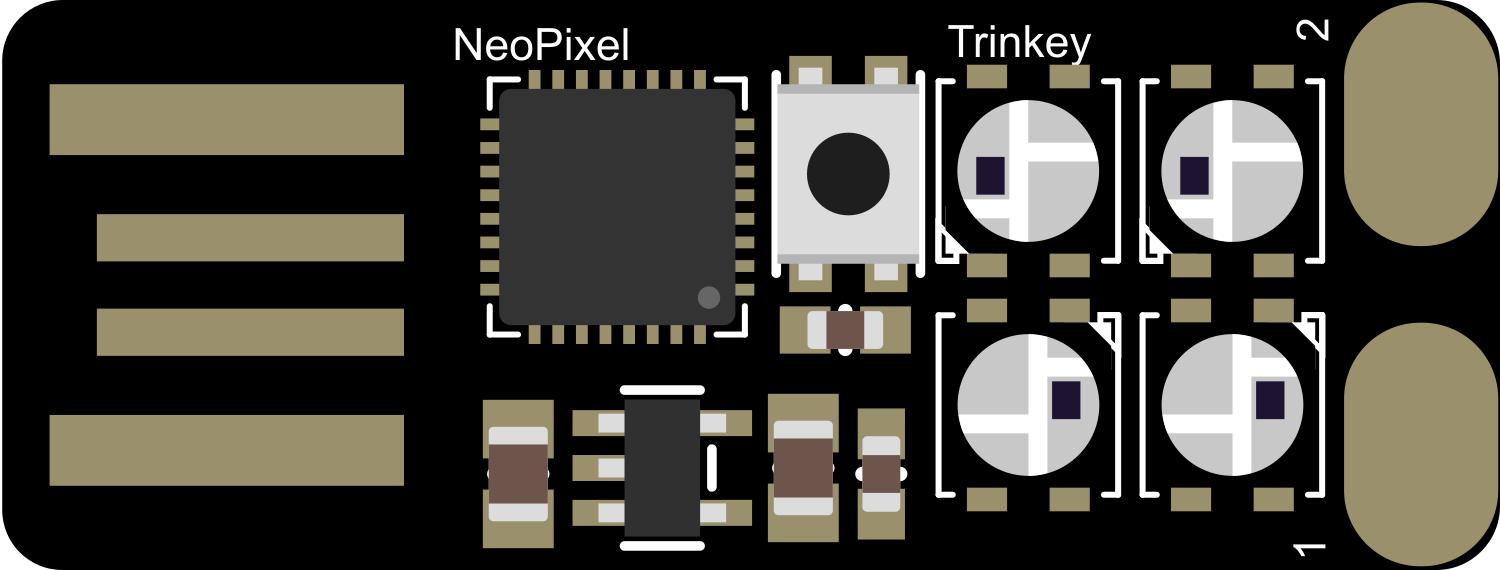
The Adafruit Neo Trinkey is a small form-factor development board designed for quick and easy projects. Based on the ATSAMD21 microcontroller, it is equipped with four RGB NeoPixel LEDs and a capacitive touch button. The board is designed to plug directly into a USB port for programming and power, making it an ideal choice for creating custom USB devices, lightweight decorations, or for educational purposes to teach programming and electronics.

Explore Projects Built with Adafruit Neo Trinkey

Use Cirkit Designer to design, explore, and prototype these projects online. Some projects support real-time simulation. Click "Open Project" to start designing instantly!
Battery-Powered Arduino UNO Smart Light with NeoPixel and ADXL345
Image of Cubagick: A project utilizing Adafruit Neo Trinkey in a practical application
This circuit is a battery-powered system featuring an Arduino UNO that controls an Adafruit NeoPixel Stick and interfaces with an ADXL345 accelerometer and an ILI9341 TFT display. The TP4056 module charges a 18650 battery, which powers the system through a DC-DC converter. The Arduino code drives the NeoPixel Stick to display a red light sequence.
Cirkit Designer LogoOpen Project in Cirkit Designer
Battery-Powered Adafruit Flora RGB NeoPixel Light Show
Image of FloraTest: A project utilizing Adafruit Neo Trinkey in a practical application
This circuit consists of an Adafruit Flora v3 microcontroller connected to a Breadboard-friendly RGB Smart NeoPixel and powered by a 3xAAA battery pack. The microcontroller runs code to control the NeoPixel, displaying various colors and patterns.
Cirkit Designer LogoOpen Project in Cirkit Designer
Arduino-Controlled NeoPixel LED Display with Voltage Regulation
Image of KK project: A project utilizing Adafruit Neo Trinkey in a practical application
This circuit features an Arduino 101 controlling multiple individually addressable Adafruit NeoPixel LED rings, with power regulation and decoupling provided by 7805 voltage regulators and electrolytic capacitors, all powered by a 12V battery.
Cirkit Designer LogoOpen Project in Cirkit Designer
Battery-Powered Smart Light with Proximity Sensor and OLED Display using Adafruit QT Py RP2040
Image of lab: A project utilizing Adafruit Neo Trinkey in a practical application
This circuit is a portable, battery-powered system featuring an Adafruit QT Py RP2040 microcontroller that interfaces with an OLED display, a proximity sensor, an accelerometer, and an RGB LED strip. The system is powered by a lithium-ion battery with a step-up boost converter to provide 5V for the LED strip, and it includes a toggle switch for power control. The microcontroller communicates with the sensors and display via I2C.
Cirkit Designer LogoOpen Project in Cirkit Designer

Explore Projects Built with Adafruit Neo Trinkey

Use Cirkit Designer to design, explore, and prototype these projects online. Some projects support real-time simulation. Click "Open Project" to start designing instantly!
Image of Cubagick: A project utilizing Adafruit Neo Trinkey in a practical application
Battery-Powered Arduino UNO Smart Light with NeoPixel and ADXL345
This circuit is a battery-powered system featuring an Arduino UNO that controls an Adafruit NeoPixel Stick and interfaces with an ADXL345 accelerometer and an ILI9341 TFT display. The TP4056 module charges a 18650 battery, which powers the system through a DC-DC converter. The Arduino code drives the NeoPixel Stick to display a red light sequence.
Cirkit Designer LogoOpen Project in Cirkit Designer
Image of FloraTest: A project utilizing Adafruit Neo Trinkey in a practical application
Battery-Powered Adafruit Flora RGB NeoPixel Light Show
This circuit consists of an Adafruit Flora v3 microcontroller connected to a Breadboard-friendly RGB Smart NeoPixel and powered by a 3xAAA battery pack. The microcontroller runs code to control the NeoPixel, displaying various colors and patterns.
Cirkit Designer LogoOpen Project in Cirkit Designer
Image of KK project: A project utilizing Adafruit Neo Trinkey in a practical application
Arduino-Controlled NeoPixel LED Display with Voltage Regulation
This circuit features an Arduino 101 controlling multiple individually addressable Adafruit NeoPixel LED rings, with power regulation and decoupling provided by 7805 voltage regulators and electrolytic capacitors, all powered by a 12V battery.
Cirkit Designer LogoOpen Project in Cirkit Designer
Image of lab: A project utilizing Adafruit Neo Trinkey in a practical application
Battery-Powered Smart Light with Proximity Sensor and OLED Display using Adafruit QT Py RP2040
This circuit is a portable, battery-powered system featuring an Adafruit QT Py RP2040 microcontroller that interfaces with an OLED display, a proximity sensor, an accelerometer, and an RGB LED strip. The system is powered by a lithium-ion battery with a step-up boost converter to provide 5V for the LED strip, and it includes a toggle switch for power control. The microcontroller communicates with the sensors and display via I2C.
Cirkit Designer LogoOpen Project in Cirkit Designer

Common Applications and Use Cases

  • Custom USB devices (e.g., volume control, keyboard shortcuts)
  • Wearable electronics and cosplay props
  • Educational tools for learning programming and electronics
  • Quick prototyping of light-based projects

Technical Specifications

Key Technical Details

  • Microcontroller: ATSAMD21E18 32-bit ARM Cortex-M0+
  • Operating Voltage: 3.3V
  • Input Voltage (recommended): 5V (from USB)
  • Digital I/O Pins: 4 (multiplexed with NeoPixel LEDs and touch input)
  • Onboard LEDs: 4 x NeoPixel RGB LEDs
  • Connectivity: USB Type-A connector
  • Flash Memory: 256KB
  • SRAM: 32KB
  • Clock Speed: 48 MHz

Pin Configuration and Descriptions

Pin Number Function Description
1 NeoPixel Data In Controls the NeoPixel LEDs
2 Capacitive Touch Senses touch input
3 GND Ground connection
4 USB Data- USB Data minus
5 USB Data+ USB Data plus
6 USB Power Power from USB (5V)
7 Reset Resets the microcontroller

Usage Instructions

How to Use the Component in a Circuit

  1. Connecting to a Computer:

    • Plug the Adafruit Neo Trinkey directly into a USB port on your computer.
    • Ensure that the USB port provides sufficient power for the board and connected peripherals.
  2. Programming:

    • Use the Arduino IDE or other compatible software to write and upload code to the board.
    • Select the appropriate board and port from the tools menu in the Arduino IDE.
  3. Interacting with NeoPixels:

    • Use the Adafruit NeoPixel library to control the onboard LEDs.
    • The NeoPixel data pin is connected to digital pin 1 of the ATSAMD21.
  4. Using the Capacitive Touch:

    • The capacitive touch input can be read using the touchRead() function in your code.
    • It is connected to digital pin 2 of the ATSAMD21.

Important Considerations and Best Practices

  • Power Limits: Do not exceed the recommended voltage and current specifications.
  • ESD Precautions: Handle the board with care to avoid electrostatic discharge damage.
  • USB Port Strain: Avoid applying excessive force to the board when plugged in to prevent damage to the USB port.
  • Library Compatibility: Ensure you have the latest Adafruit NeoPixel library installed for LED control.

Example Code for Arduino UNO

#include <Adafruit_NeoPixel.h>

#define PIN 1
#define NUMPIXELS 4

Adafruit_NeoPixel pixels(NUMPIXELS, PIN, NEO_GRB + NEO_KHZ800);

void setup() {
  pixels.begin(); // Initialize the NeoPixel library.
}

void loop() {
  for(int i=0; i<NUMPIXELS; i++) {
    pixels.setPixelColor(i, pixels.Color(150, 0, 0)); // Moderately bright red color.
    pixels.show(); // This sends the updated pixel color to the hardware.
    delay(500); // Delay for half a second.
    pixels.setPixelColor(i, pixels.Color(0,0,0)); // Turn off the pixel.
    pixels.show();
    delay(500);
  }
}

Troubleshooting and FAQs

Common Issues

  • NeoPixels not lighting up: Ensure that the NeoPixel library is correctly included and that the pin number is set to 1.
  • Board not recognized by computer: Check the USB cable and port. Try a different cable or port if necessary.
  • Touch input not responsive: Make sure your finger is in close proximity to the touch pad and that the board is properly powered.

Solutions and Tips for Troubleshooting

  • LED Issues: Verify the color values and pixel indices in your code. Check for any loose connections if using external NeoPixels.
  • Connectivity Issues: Restart the Arduino IDE and reconnect the board. Ensure the correct drivers are installed.
  • Code Errors: Double-check your code for syntax errors or incorrect function calls. Use serial debugging to help identify issues.

FAQs

Q: Can I use the Neo Trinkey with a battery? A: The Neo Trinkey is designed to be powered via USB. Using a battery would require additional circuitry.

Q: How do I update the firmware on the Neo Trinkey? A: Firmware updates can be done through the Arduino IDE or other compatible flash tools, following Adafruit's guides.

Q: Is the Neo Trinkey compatible with CircuitPython? A: Yes, the Neo Trinkey is compatible with CircuitPython, and Adafruit provides resources for using CircuitPython with the board.