Cirkit Designer Logo
Cirkit Designer
Your all-in-one circuit design IDE
Home / 
Component Documentation

How to Use Snake Eyes Bonnet: Examples, Pinouts, and Specs

Image of Snake Eyes Bonnet
Cirkit Designer LogoDesign with Snake Eyes Bonnet in Cirkit Designer

Introduction

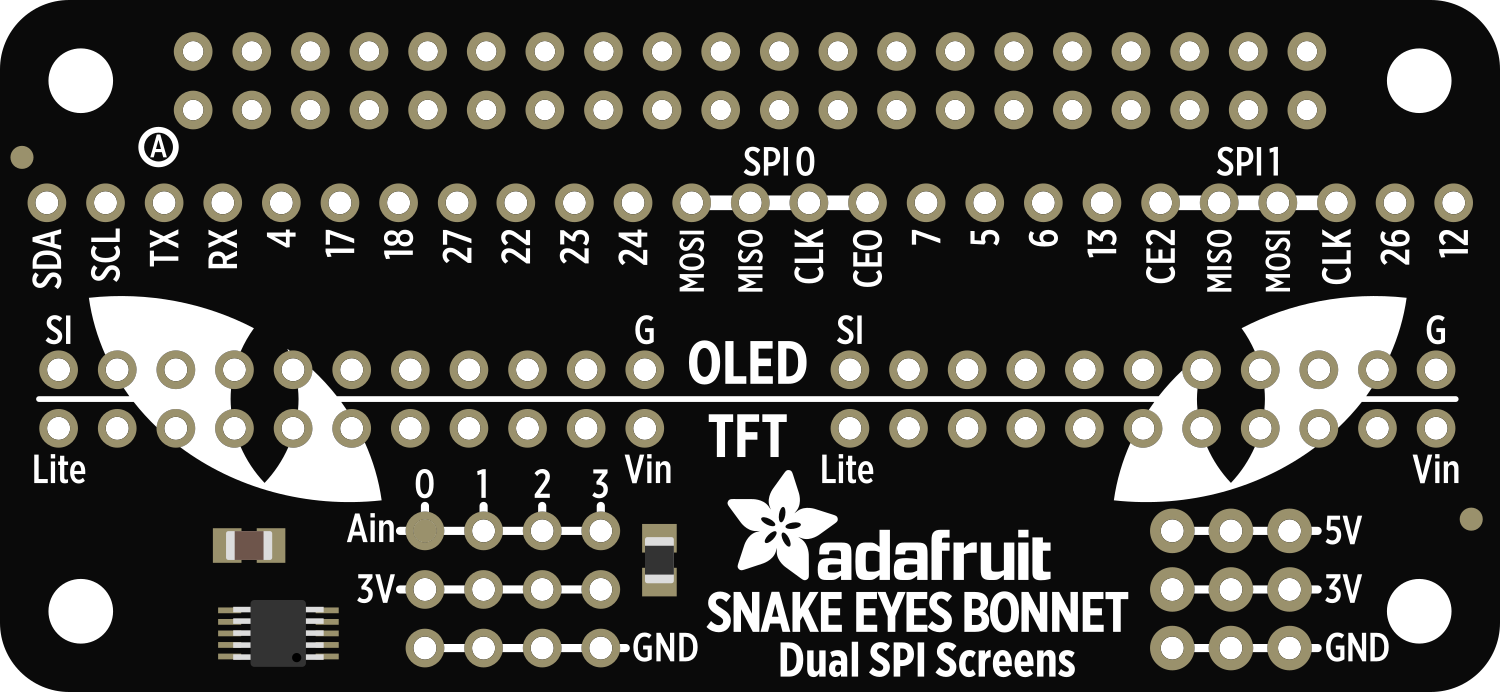
The Snake Eyes Bonnet is an add-on circuit board designed for the Raspberry Pi, offering a suite of features that enhance the capabilities of the Raspberry Pi for various projects. It is equipped with a dual-core microcontroller, a display interface for driving screens, user interface buttons, and multiple input/output options. This bonnet is particularly useful for creating custom gaming devices, interactive art installations, or any project that requires additional user interfaces and display elements.

Explore Projects Built with Snake Eyes Bonnet

Use Cirkit Designer to design, explore, and prototype these projects online. Some projects support real-time simulation. Click "Open Project" to start designing instantly!
Arduino UNO Gesture-Controlled Snake Game with OLED Display
Image of Arduino: A project utilizing Snake Eyes Bonnet in a practical application
This circuit is a gesture-controlled snake game using an Arduino UNO, a PAJ7620 gesture recognition sensor, and a 0.96" OLED display. The Arduino UNO processes gesture inputs from the PAJ7620 sensor to control the snake's movement, and the game is displayed on the OLED screen.
Cirkit Designer LogoOpen Project in Cirkit Designer
Raspberry Pi 4B-Based Multi-Sensor Interface Hub with GPS and GSM
Image of Rocket: A project utilizing Snake Eyes Bonnet in a practical application
This circuit features a Raspberry Pi 4B interfaced with an IMX296 color global shutter camera, a Neo 6M GPS module, an Adafruit BMP388 barometric pressure sensor, an MPU-6050 accelerometer/gyroscope, and a Sim800l GSM module for cellular connectivity. Power management is handled by an MT3608 boost converter, which steps up the voltage from a Lipo battery, with a resettable fuse PTC and a 1N4007 diode for protection. The Adafruit Perma-Proto HAT is used for organizing connections and interfacing the sensors and modules with the Raspberry Pi via I2C and GPIO pins.
Cirkit Designer LogoOpen Project in Cirkit Designer
Arduino UNO and ESP32-CAM Animal Deterrence System with GSM Alerts
Image of PROJECT: A project utilizing Snake Eyes Bonnet in a practical application
This circuit is an animal deterrence system that uses an Arduino UNO to interface with a PIR sensor, an ultrasonic sensor, a GSM module, and a buzzer. The system detects animals using the sensors, triggers an alarm via the buzzer, and sends an SMS alert through the GSM module. Additionally, an ESP32-CAM captures images when an animal is detected and sends them to a predefined server or saves them to an SD card.
Cirkit Designer LogoOpen Project in Cirkit Designer
Wi-Fi Controlled Smart Target System with ESP8266 and NeoPixel Ring
Image of ETT: A project utilizing Snake Eyes Bonnet in a practical application
This circuit is a smart target system that uses an ESP8266 NodeMCU to control an Adafruit NeoPixel Ring, a piezo buzzer, and sensors (vibration and sound) to detect hits. The system connects to a Wi-Fi network and communicates with a server to report hit events and receive configuration updates, utilizing an RS-485 module for additional communication capabilities.
Cirkit Designer LogoOpen Project in Cirkit Designer

Explore Projects Built with Snake Eyes Bonnet

Use Cirkit Designer to design, explore, and prototype these projects online. Some projects support real-time simulation. Click "Open Project" to start designing instantly!
Image of Arduino: A project utilizing Snake Eyes Bonnet in a practical application
Arduino UNO Gesture-Controlled Snake Game with OLED Display
This circuit is a gesture-controlled snake game using an Arduino UNO, a PAJ7620 gesture recognition sensor, and a 0.96" OLED display. The Arduino UNO processes gesture inputs from the PAJ7620 sensor to control the snake's movement, and the game is displayed on the OLED screen.
Cirkit Designer LogoOpen Project in Cirkit Designer
Image of Rocket: A project utilizing Snake Eyes Bonnet in a practical application
Raspberry Pi 4B-Based Multi-Sensor Interface Hub with GPS and GSM
This circuit features a Raspberry Pi 4B interfaced with an IMX296 color global shutter camera, a Neo 6M GPS module, an Adafruit BMP388 barometric pressure sensor, an MPU-6050 accelerometer/gyroscope, and a Sim800l GSM module for cellular connectivity. Power management is handled by an MT3608 boost converter, which steps up the voltage from a Lipo battery, with a resettable fuse PTC and a 1N4007 diode for protection. The Adafruit Perma-Proto HAT is used for organizing connections and interfacing the sensors and modules with the Raspberry Pi via I2C and GPIO pins.
Cirkit Designer LogoOpen Project in Cirkit Designer
Image of PROJECT: A project utilizing Snake Eyes Bonnet in a practical application
Arduino UNO and ESP32-CAM Animal Deterrence System with GSM Alerts
This circuit is an animal deterrence system that uses an Arduino UNO to interface with a PIR sensor, an ultrasonic sensor, a GSM module, and a buzzer. The system detects animals using the sensors, triggers an alarm via the buzzer, and sends an SMS alert through the GSM module. Additionally, an ESP32-CAM captures images when an animal is detected and sends them to a predefined server or saves them to an SD card.
Cirkit Designer LogoOpen Project in Cirkit Designer
Image of ETT: A project utilizing Snake Eyes Bonnet in a practical application
Wi-Fi Controlled Smart Target System with ESP8266 and NeoPixel Ring
This circuit is a smart target system that uses an ESP8266 NodeMCU to control an Adafruit NeoPixel Ring, a piezo buzzer, and sensors (vibration and sound) to detect hits. The system connects to a Wi-Fi network and communicates with a server to report hit events and receive configuration updates, utilizing an RS-485 module for additional communication capabilities.
Cirkit Designer LogoOpen Project in Cirkit Designer

Common Applications and Use Cases

  • Portable gaming consoles
  • Interactive art installations
  • Educational tools for learning electronics and programming
  • DIY projects requiring user input and display output

Technical Specifications

Key Technical Details

  • Microcontroller: Dual-core ARM Cortex-M0+
  • Display Interface: Supports TFT LCD displays
  • User Interface: Integrated buttons for user input
  • I/O Interfaces: GPIO pins for additional peripherals
  • Compatibility: Designed for Raspberry Pi Zero, 2, 3, 4 models
  • Operating Voltage: 3.3V logic levels

Pin Configuration and Descriptions

Pin Number Description Notes
1 3.3V Power Power supply for the bonnet
2 5V Power Power supply from Raspberry Pi
3 GPIO2 (SDA) I2C Data
4 5V Power Power supply from Raspberry Pi
5 GPIO3 (SCL) I2C Clock
6 Ground Ground connection
... ... ...
N GPIOX General Purpose I/O pin X

Note: This table is not exhaustive and only includes a selection of pins for illustration purposes.

Usage Instructions

How to Use the Snake Eyes Bonnet in a Circuit

  1. Mounting the Bonnet: Carefully align the GPIO header of the Snake Eyes Bonnet with the GPIO pins on the Raspberry Pi and press down to connect.
  2. Connecting a Display: Attach a compatible TFT LCD display to the display interface provided on the bonnet.
  3. Powering the System: Ensure that the Raspberry Pi is powered through its micro USB port, which will also power the bonnet.
  4. Programming: Use the Raspberry Pi's operating system to program the microcontroller and utilize the bonnet's features.

Important Considerations and Best Practices

  • Always power off the Raspberry Pi before attaching or detaching the Snake Eyes Bonnet to prevent damage.
  • Be mindful of electrostatic discharge; handle the bonnet by its edges and avoid touching the circuitry.
  • Ensure that any connected displays are compatible with the bonnet's display interface specifications.
  • When programming, consider the power requirements of any peripherals attached to the GPIO pins.

Troubleshooting and FAQs

Common Issues

  • Display Not Working: Check the display connections and ensure the display is compatible with the bonnet's interface.
  • Unresponsive Buttons: Verify the button connections and ensure they are not obstructed or damaged.
  • Microcontroller Programming Issues: Ensure that the correct drivers and software are installed on the Raspberry Pi.

Solutions and Tips for Troubleshooting

  • Double-check all connections and ensure that the bonnet is properly seated on the Raspberry Pi GPIO header.
  • Restart the Raspberry Pi to reset the state of the GPIO pins and the microcontroller.
  • Consult the Raspberry Pi and Snake Eyes Bonnet forums for community support and advice.

FAQs

Q: Can the Snake Eyes Bonnet be used with any Raspberry Pi model? A: The bonnet is designed to be compatible with Raspberry Pi Zero, 2, 3, and 4 models. It may not be compatible with older models due to differences in GPIO headers.

Q: Do I need to install any special software to use the bonnet? A: You may need to install drivers or software libraries specific to the peripherals you are using with the bonnet. Check the manufacturer's documentation for details.

Q: How do I program the dual-core microcontroller on the bonnet? A: You can program the microcontroller using the Raspberry Pi's operating system and development tools. Specific instructions will depend on the programming language and environment you choose.

Example Code for Raspberry Pi

Below is an example Python script for initializing the Snake Eyes Bonnet with the Raspberry Pi. This script assumes you have the necessary libraries installed.

import RPi.GPIO as GPIO
import time

Setup GPIO pins

GPIO.setmode(GPIO.BCM) GPIO.setup(17, GPIO.OUT) # Example pin for output

try: while True: # Blink an LED connected to pin 17 GPIO.output(17, GPIO.HIGH) time.sleep(1) GPIO.output(17, GPIO.LOW) time.sleep(1) except KeyboardInterrupt: # Clean up GPIO on CTRL+C exit GPIO.cleanup()

Clean up GPIO on normal exit

GPIO.cleanup()


*Note: This code is for illustrative purposes and may require modifications to work with specific peripherals connected to the Snake Eyes Bonnet.*

Remember to consult the official Raspberry Pi documentation and the Snake Eyes Bonnet manufacturer's resources for more detailed programming instructions and examples.