Cirkit Designer Logo
Cirkit Designer
Your all-in-one circuit design IDE
Home / 
Component Documentation

How to Use S8-0053 Infrared CO2: Examples, Pinouts, and Specs

Image of S8-0053 Infrared CO2
Cirkit Designer LogoDesign with S8-0053 Infrared CO2 in Cirkit Designer

Introduction

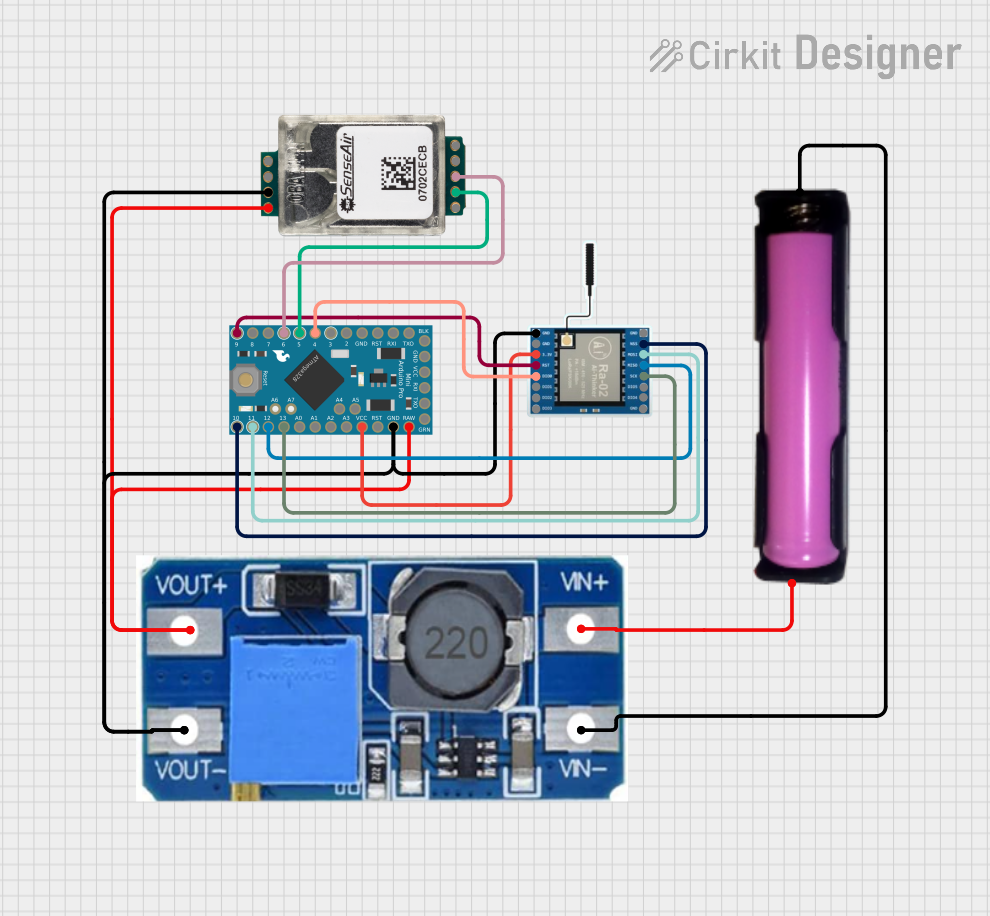
The S8-0053 Infrared CO2 sensor is designed to measure carbon dioxide (CO2) levels in the air using advanced infrared (NDIR) technology. This sensor provides accurate and reliable readings, making it ideal for a wide range of applications, including:

  • Environmental monitoring
  • HVAC (Heating, Ventilation, and Air Conditioning) systems
  • Indoor air quality assessment
  • Greenhouse monitoring
  • Industrial safety systems

Its compact design, low power consumption, and high precision make it a versatile choice for both commercial and industrial use.

Explore Projects Built with S8-0053 Infrared CO2

Use Cirkit Designer to design, explore, and prototype these projects online. Some projects support real-time simulation. Click "Open Project" to start designing instantly!
Arduino UNO Based Air Quality and Fire Detection System with RGB Indicator and Alarm
Image of GAS SENSOR detector: A project utilizing S8-0053 Infrared CO2 in a practical application
This circuit features an Arduino UNO microcontroller interfaced with an MQ135 gas sensor for CO2 detection, a KY-026 flame sensor for fire detection, a buzzer for alarms, and an RGB LED to visually indicate CO2 levels. A 16x2 LCD displays CO2 concentration and fire alerts, while potentiometers control LCD contrast. The embedded code manages sensor readings, activates the buzzer based on predefined thresholds, and adjusts the RGB LED color in response to CO2 levels.
Cirkit Designer LogoOpen Project in Cirkit Designer
Arduino UNO Based Multi-Gas Detector
Image of AIRMS: A project utilizing S8-0053 Infrared CO2 in a practical application
This circuit is designed for environmental monitoring, featuring an Arduino UNO microcontroller interfaced with three different gas sensors: MQ-7 for carbon monoxide (CO) detection, MQ131 for ozone (O3) measurement, and MQ-135 for general air quality assessment. The sensors are powered by the Arduino's 5V output and their analog signals are read through the Arduino's analog input pins A0, A1, and A2 respectively. The embedded code reads the analog values from the sensors and outputs the readings via the serial interface, allowing for real-time monitoring of the gases.
Cirkit Designer LogoOpen Project in Cirkit Designer
ESP32-Powered Environmental Monitoring System with SCD30, MQ-136, and Methane Sensors
Image of Biogas : A project utilizing S8-0053 Infrared CO2 in a practical application
This circuit is designed for environmental monitoring, utilizing an ESP32 microcontroller to collect data from various sensors including an MQ-136 for H2S detection, an SCD30 for CO2 and humidity measurement, and an SJH-100A for methane detection. The collected data is processed and can be integrated with Home Assistant for real-time monitoring and analysis.
Cirkit Designer LogoOpen Project in Cirkit Designer
Arduino Pro Mini Based CO2 Monitoring System with LoRa Wireless Transmission
Image of Caboma : A project utilizing S8-0053 Infrared CO2 in a practical application
This circuit is designed for CO2 monitoring and wireless data transmission. It uses an Arduino Pro Mini to read CO2 levels from a SenseAir S8 CO2 sensor and transmit the data via a LoRa Ra-02 SX1278 module. A step-up boost power converter is used to adjust the voltage for the Arduino and sensor, powered by an 18650 battery.
Cirkit Designer LogoOpen Project in Cirkit Designer

Explore Projects Built with S8-0053 Infrared CO2

Use Cirkit Designer to design, explore, and prototype these projects online. Some projects support real-time simulation. Click "Open Project" to start designing instantly!
Image of GAS SENSOR detector: A project utilizing S8-0053 Infrared CO2 in a practical application
Arduino UNO Based Air Quality and Fire Detection System with RGB Indicator and Alarm
This circuit features an Arduino UNO microcontroller interfaced with an MQ135 gas sensor for CO2 detection, a KY-026 flame sensor for fire detection, a buzzer for alarms, and an RGB LED to visually indicate CO2 levels. A 16x2 LCD displays CO2 concentration and fire alerts, while potentiometers control LCD contrast. The embedded code manages sensor readings, activates the buzzer based on predefined thresholds, and adjusts the RGB LED color in response to CO2 levels.
Cirkit Designer LogoOpen Project in Cirkit Designer
Image of AIRMS: A project utilizing S8-0053 Infrared CO2 in a practical application
Arduino UNO Based Multi-Gas Detector
This circuit is designed for environmental monitoring, featuring an Arduino UNO microcontroller interfaced with three different gas sensors: MQ-7 for carbon monoxide (CO) detection, MQ131 for ozone (O3) measurement, and MQ-135 for general air quality assessment. The sensors are powered by the Arduino's 5V output and their analog signals are read through the Arduino's analog input pins A0, A1, and A2 respectively. The embedded code reads the analog values from the sensors and outputs the readings via the serial interface, allowing for real-time monitoring of the gases.
Cirkit Designer LogoOpen Project in Cirkit Designer
Image of Biogas : A project utilizing S8-0053 Infrared CO2 in a practical application
ESP32-Powered Environmental Monitoring System with SCD30, MQ-136, and Methane Sensors
This circuit is designed for environmental monitoring, utilizing an ESP32 microcontroller to collect data from various sensors including an MQ-136 for H2S detection, an SCD30 for CO2 and humidity measurement, and an SJH-100A for methane detection. The collected data is processed and can be integrated with Home Assistant for real-time monitoring and analysis.
Cirkit Designer LogoOpen Project in Cirkit Designer
Image of Caboma : A project utilizing S8-0053 Infrared CO2 in a practical application
Arduino Pro Mini Based CO2 Monitoring System with LoRa Wireless Transmission
This circuit is designed for CO2 monitoring and wireless data transmission. It uses an Arduino Pro Mini to read CO2 levels from a SenseAir S8 CO2 sensor and transmit the data via a LoRa Ra-02 SX1278 module. A step-up boost power converter is used to adjust the voltage for the Arduino and sensor, powered by an 18650 battery.
Cirkit Designer LogoOpen Project in Cirkit Designer

Technical Specifications

Below are the key technical details of the S8-0053 Infrared CO2 sensor:

Parameter Value
Measurement Range 0 - 2000 ppm (parts per million)
Accuracy ±30 ppm ±3% of reading
Operating Voltage 4.5V - 5.5V
Power Consumption < 300 mW
Output Signal UART (3.3V TTL)
Warm-Up Time < 1 minute
Response Time < 30 seconds
Operating Temperature 0°C to 50°C
Operating Humidity 0% - 95% RH (non-condensing)
Dimensions 33 mm x 20 mm x 9 mm

Pin Configuration and Descriptions

The S8-0053 sensor has a 4-pin interface. The pinout is as follows:

Pin Name Description
1 VCC Power supply input (4.5V - 5.5V)
2 GND Ground connection
3 TXD UART Transmit (3.3V TTL logic level)
4 RXD UART Receive (3.3V TTL logic level)

Usage Instructions

How to Use the S8-0053 in a Circuit

  1. Power Supply: Connect the VCC pin to a 5V power source and the GND pin to ground.
  2. UART Communication: Use the TXD and RXD pins to communicate with a microcontroller or computer. Ensure the UART logic level is 3.3V to avoid damaging the sensor.
  3. Warm-Up Time: Allow the sensor to warm up for at least 1 minute after powering it on to ensure accurate readings.
  4. Data Reading: The sensor outputs CO2 concentration data via UART in ppm. Use a microcontroller or serial interface to read and process the data.

Important Considerations and Best Practices

  • Avoid Condensation: The sensor is designed for non-condensing environments. Prolonged exposure to high humidity may affect its performance.
  • Ventilation: Ensure proper airflow around the sensor for accurate measurements.
  • Calibration: The sensor is factory-calibrated, but periodic calibration may be required for long-term accuracy.
  • Voltage Levels: Use a level shifter if interfacing with a 5V logic microcontroller to prevent damage to the sensor's UART pins.

Example: Connecting to an Arduino UNO

The following example demonstrates how to connect and read data from the S8-0053 sensor using an Arduino UNO.

Wiring Diagram

S8-0053 Pin Arduino UNO Pin
VCC 5V
GND GND
TXD Pin 10 (RX)
RXD Pin 11 (TX)

Arduino Code

#include <SoftwareSerial.h>

// Define RX and TX pins for software serial communication
SoftwareSerial co2Serial(10, 11); // RX = Pin 10, TX = Pin 11

void setup() {
  Serial.begin(9600); // Initialize hardware serial for debugging
  co2Serial.begin(9600); // Initialize software serial for CO2 sensor

  Serial.println("S8-0053 CO2 Sensor Test");
}

void loop() {
  if (co2Serial.available()) {
    // Read data from the CO2 sensor
    String co2Data = "";
    while (co2Serial.available()) {
      char c = co2Serial.read();
      co2Data += c;
    }

    // Print the received data to the serial monitor
    Serial.println("CO2 Data: " + co2Data);
  }

  delay(1000); // Wait 1 second before reading again
}

Troubleshooting and FAQs

Common Issues and Solutions

  1. No Data Output:

    • Cause: Incorrect wiring or UART baud rate mismatch.
    • Solution: Double-check the wiring and ensure the baud rate is set to 9600.
  2. Inaccurate Readings:

    • Cause: Insufficient warm-up time or poor ventilation.
    • Solution: Allow the sensor to warm up for at least 1 minute and ensure proper airflow.
  3. Sensor Not Responding:

    • Cause: Voltage mismatch or damaged sensor.
    • Solution: Verify the power supply voltage (4.5V - 5.5V) and check for physical damage.

FAQs

Q: Can the S8-0053 sensor measure CO2 levels above 2000 ppm?
A: No, the sensor is designed to measure CO2 concentrations within the range of 0 - 2000 ppm. For higher ranges, consider using a different sensor model.

Q: How often should the sensor be calibrated?
A: The sensor is factory-calibrated, but for long-term accuracy, calibration every 6-12 months is recommended, especially in critical applications.

Q: Can I use the sensor outdoors?
A: The sensor is not waterproof and should be used in non-condensing environments. If used outdoors, ensure it is protected from moisture and extreme conditions.

Q: Is the sensor compatible with 5V logic microcontrollers?
A: The sensor uses 3.3V UART logic. Use a level shifter when interfacing with 5V logic microcontrollers like the Arduino UNO.