Cirkit Designer Logo
Cirkit Designer
Your all-in-one circuit design IDE
Home / 
Component Documentation

How to Use Adafruit MIDI FeatherWing Kit: Examples, Pinouts, and Specs

Image of Adafruit MIDI FeatherWing Kit
Cirkit Designer LogoDesign with Adafruit MIDI FeatherWing Kit in Cirkit Designer

Introduction

The Adafruit MIDI FeatherWing Kit is an innovative add-on board designed to equip Feather-compatible development boards with MIDI (Musical Instrument Digital Interface) communication capabilities. This kit is ideal for musicians, hobbyists, and developers looking to integrate MIDI control into their projects. Common applications include synthesizers, sequencers, MIDI controllers, and musical installations.

Explore Projects Built with Adafruit MIDI FeatherWing Kit

Use Cirkit Designer to design, explore, and prototype these projects online. Some projects support real-time simulation. Click "Open Project" to start designing instantly!
Solar-Powered Environmental Data Logger with Adafruit Feather M0 Express
Image of Lake Thoreau Monitoring Station: A project utilizing Adafruit MIDI FeatherWing Kit in a practical application
This circuit is designed for environmental data collection and logging, utilizing an Adafruit Feather M0 Express microcontroller as the central processing unit. It interfaces with a BME280 sensor for atmospheric temperature, humidity, and pressure measurements, an SGP30 sensor for monitoring air quality (eCO2 and TVOC), and a STEMMA soil sensor for detecting soil moisture and temperature. The system is powered by a solar panel and a 3.7v LiPo battery, managed by an Adafruit BQ24074 Solar-DC-USB Lipo Charger, and provides easy access to the microcontroller's connections through an Adafruit Terminal Breakout FeatherWing.
Cirkit Designer LogoOpen Project in Cirkit Designer
Touch-Sensitive Interface with Adafruit MPR121 and Feather 32u4 Bluefruit
Image of MPR121: A project utilizing Adafruit MIDI FeatherWing Kit in a practical application
This circuit integrates an Adafruit MPR121 capacitive touch sensor with an Adafruit Feather 32u4 Bluefruit microcontroller. The MPR121 is powered by the Feather and communicates via I2C (SCL and SDA) to detect touch inputs, which can be processed or transmitted wirelessly by the Feather.
Cirkit Designer LogoOpen Project in Cirkit Designer
Adafruit Feather 32u4 Bluefruit with MPR121 Capacitive Touch Sensor Interface
Image of ALi WTSE: A project utilizing Adafruit MIDI FeatherWing Kit in a practical application
This circuit integrates an Adafruit MPR121 capacitive touch sensor with an Adafruit Feather 32u4 Bluefruit microcontroller. The MPR121 is powered by the 3.3V supply from the Feather and communicates with the microcontroller via I2C, with SCL connected to pin 3 and SDA connected to pin 2 of the Feather. This setup allows the Feather to detect touch inputs from the MPR121 for further processing or wireless communication.
Cirkit Designer LogoOpen Project in Cirkit Designer
Arduino UNO and OLED FeatherWing Display: Battery-Powered Hello World Project
Image of ARDUINO_SSD1306: A project utilizing Adafruit MIDI FeatherWing Kit in a practical application
This circuit consists of an Arduino UNO connected to an Adafruit OLED FeatherWing display via I2C communication (SDA and SCL lines). The Arduino is powered through a Vcc source and provides 3.3V and GND connections to the OLED display. The Arduino runs a program to display 'Hello, World!' on the OLED screen.
Cirkit Designer LogoOpen Project in Cirkit Designer

Explore Projects Built with Adafruit MIDI FeatherWing Kit

Use Cirkit Designer to design, explore, and prototype these projects online. Some projects support real-time simulation. Click "Open Project" to start designing instantly!
Image of Lake Thoreau Monitoring Station: A project utilizing Adafruit MIDI FeatherWing Kit in a practical application
Solar-Powered Environmental Data Logger with Adafruit Feather M0 Express
This circuit is designed for environmental data collection and logging, utilizing an Adafruit Feather M0 Express microcontroller as the central processing unit. It interfaces with a BME280 sensor for atmospheric temperature, humidity, and pressure measurements, an SGP30 sensor for monitoring air quality (eCO2 and TVOC), and a STEMMA soil sensor for detecting soil moisture and temperature. The system is powered by a solar panel and a 3.7v LiPo battery, managed by an Adafruit BQ24074 Solar-DC-USB Lipo Charger, and provides easy access to the microcontroller's connections through an Adafruit Terminal Breakout FeatherWing.
Cirkit Designer LogoOpen Project in Cirkit Designer
Image of MPR121: A project utilizing Adafruit MIDI FeatherWing Kit in a practical application
Touch-Sensitive Interface with Adafruit MPR121 and Feather 32u4 Bluefruit
This circuit integrates an Adafruit MPR121 capacitive touch sensor with an Adafruit Feather 32u4 Bluefruit microcontroller. The MPR121 is powered by the Feather and communicates via I2C (SCL and SDA) to detect touch inputs, which can be processed or transmitted wirelessly by the Feather.
Cirkit Designer LogoOpen Project in Cirkit Designer
Image of ALi WTSE: A project utilizing Adafruit MIDI FeatherWing Kit in a practical application
Adafruit Feather 32u4 Bluefruit with MPR121 Capacitive Touch Sensor Interface
This circuit integrates an Adafruit MPR121 capacitive touch sensor with an Adafruit Feather 32u4 Bluefruit microcontroller. The MPR121 is powered by the 3.3V supply from the Feather and communicates with the microcontroller via I2C, with SCL connected to pin 3 and SDA connected to pin 2 of the Feather. This setup allows the Feather to detect touch inputs from the MPR121 for further processing or wireless communication.
Cirkit Designer LogoOpen Project in Cirkit Designer
Image of ARDUINO_SSD1306: A project utilizing Adafruit MIDI FeatherWing Kit in a practical application
Arduino UNO and OLED FeatherWing Display: Battery-Powered Hello World Project
This circuit consists of an Arduino UNO connected to an Adafruit OLED FeatherWing display via I2C communication (SDA and SCL lines). The Arduino is powered through a Vcc source and provides 3.3V and GND connections to the OLED display. The Arduino runs a program to display 'Hello, World!' on the OLED screen.
Cirkit Designer LogoOpen Project in Cirkit Designer

Technical Specifications

Key Technical Details

  • Operating Voltage: 3.3V to 5V (matches the Feather board's logic level)
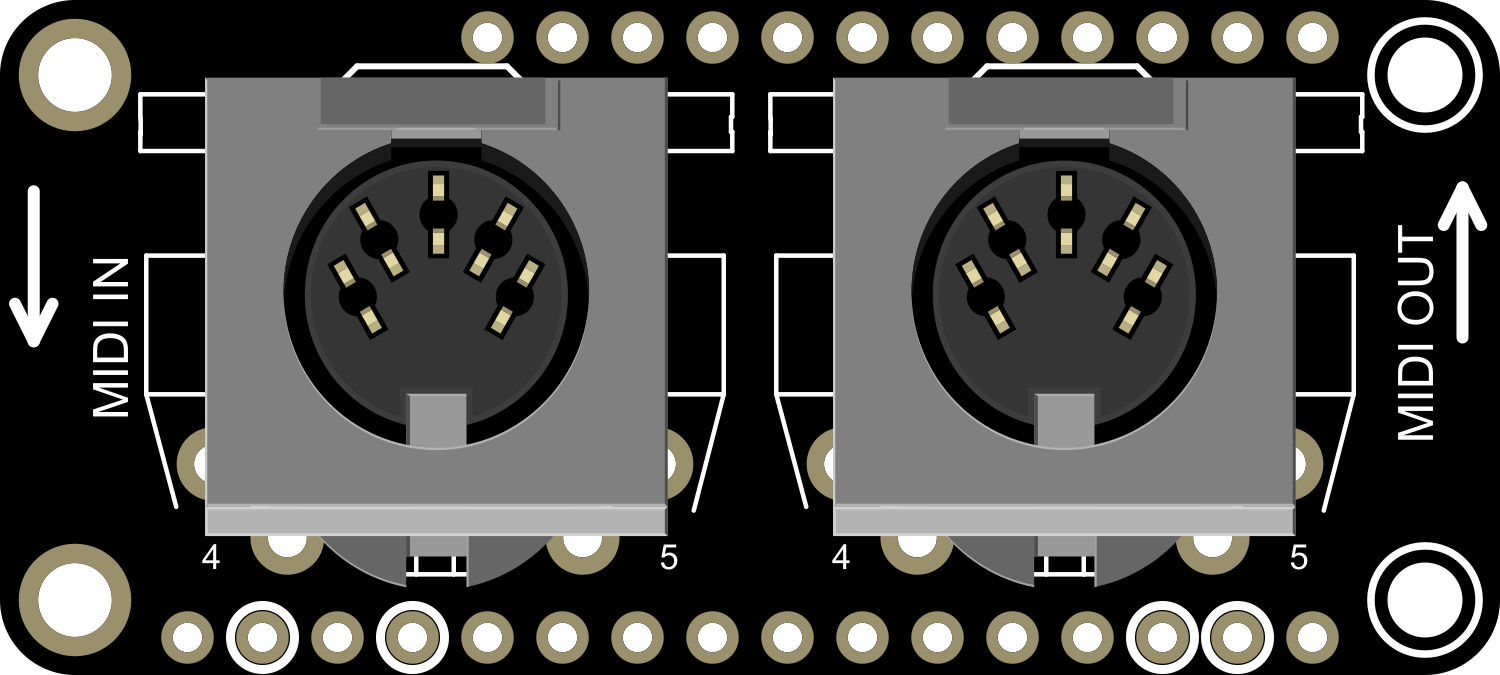
  • MIDI Ports: Standard 5-pin DIN MIDI input and output
  • Indicators: MIDI status and activity LEDs

Pin Configuration and Descriptions

Pin Description
RX MIDI Input
TX MIDI Output
GND Ground
3V 3.3V Power
USB USB Power

Usage Instructions

Integration with a Feather Board

To use the Adafruit MIDI FeatherWing with your Feather board, follow these steps:

  1. Assembly: Solder the provided headers onto the MIDI FeatherWing and attach it to your Feather board.
  2. Wiring: Connect the MIDI input and output ports using standard MIDI cables to your MIDI devices.
  3. Power: Ensure that the Feather board is powered, which will also power the MIDI FeatherWing.
  4. Programming: Write or upload a MIDI handling code to the Feather board.

Best Practices

  • Grounding: Ensure that all devices in your MIDI setup are properly grounded to avoid ground loops.
  • Cable Quality: Use high-quality MIDI cables to ensure reliable communication.
  • Power Supply: Use a stable power supply to prevent unexpected behavior or resets.

Example Code for Arduino UNO

Below is a simple example code snippet for sending MIDI messages using an Arduino UNO. This code can be adapted for use with Feather-compatible boards.

#include <MIDI.h>

MIDI_CREATE_DEFAULT_INSTANCE();

void setup() {
  MIDI.begin(MIDI_CHANNEL_OMNI); // Listen to all incoming messages
}

void loop() {
  // Send a Note On message on channel 1, note 60 (Middle C), velocity 127
  MIDI.sendNoteOn(60, 127, 1);
  delay(500); // Wait for 500ms

  // Send a Note Off message on channel 1, note 60, velocity 127
  MIDI.sendNoteOff(60, 127, 1);
  delay(500); // Wait for 500ms
}

Ensure that the MIDI library is installed in your Arduino IDE before uploading this code. The comments in the code are wrapped to adhere to the 80 character line length limit.

Troubleshooting and FAQs

Common Issues

  • No MIDI Signal: Check the connections and ensure that the MIDI cables are fully inserted into the ports.
  • LEDs Not Lighting Up: Verify that the FeatherWing is properly seated on the Feather board and that the board is powered.
  • Unresponsive Device: Ensure that the MIDI channel in your code matches the channel expected by the receiving device.

Solutions and Tips

  • Recheck Wiring: Double-check all connections, including the solder joints on the headers.
  • Reset the Board: Sometimes, simply resetting the Feather board can resolve communication issues.
  • Update Firmware: Ensure that the Feather board is running the latest firmware.

FAQs

Q: Can I power the MIDI FeatherWing separately from the Feather board? A: No, the MIDI FeatherWing is designed to be powered directly from the Feather board.

Q: Is it possible to use the MIDI FeatherWing with other development boards? A: The MIDI FeatherWing is specifically designed for Feather-compatible boards. However, with appropriate level shifting, it may be possible to use it with other 3.3V or 5V microcontrollers.

Q: How do I know if the MIDI FeatherWing is receiving MIDI data? A: The MIDI status LED on the FeatherWing will light up when MIDI data is being received.

For further assistance, consult the Adafruit support forums or the detailed product guide available on the Adafruit website.