Cirkit Designer Logo
Cirkit Designer
Your all-in-one circuit design IDE
Home / 
Component Documentation

How to Use Adafruit Ethernet FeatherWing: Examples, Pinouts, and Specs

Image of Adafruit Ethernet FeatherWing
Cirkit Designer LogoDesign with Adafruit Ethernet FeatherWing in Cirkit Designer

Introduction

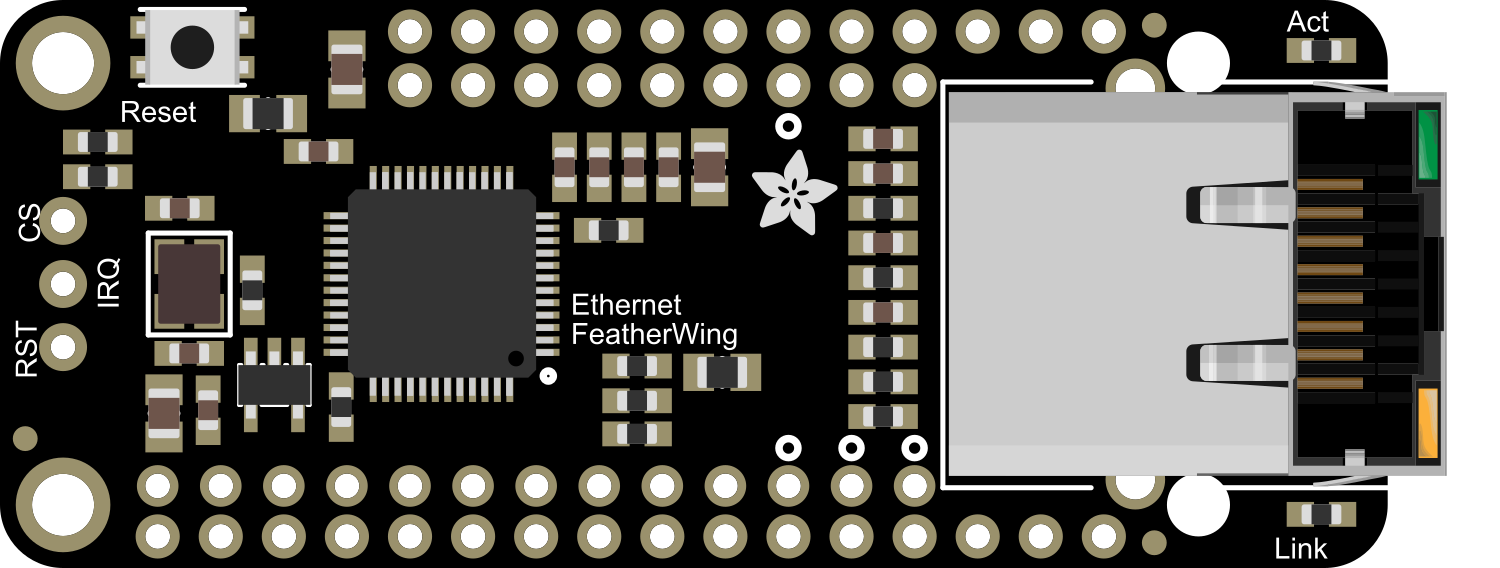
The Adafruit Ethernet FeatherWing is an expansion board that grants Ethernet networking capabilities to Feather-compatible microcontroller boards. It integrates a WIZnet W5500 Ethernet controller, which is a reliable and efficient chip for networked communication. The board also includes an RJ45 Ethernet connector and a MicroSD card slot, which can be used for logging data or serving files over the network. This makes the Ethernet FeatherWing an excellent choice for Internet of Things (IoT) projects, home automation, and any application where wired network connectivity is preferable to wireless.

Explore Projects Built with Adafruit Ethernet FeatherWing

Use Cirkit Designer to design, explore, and prototype these projects online. Some projects support real-time simulation. Click "Open Project" to start designing instantly!
Arduino UNO and OLED FeatherWing Display: Battery-Powered Hello World Project
Image of ARDUINO_SSD1306: A project utilizing Adafruit Ethernet FeatherWing in a practical application
This circuit consists of an Arduino UNO connected to an Adafruit OLED FeatherWing display via I2C communication (SDA and SCL lines). The Arduino is powered through a Vcc source and provides 3.3V and GND connections to the OLED display. The Arduino runs a program to display 'Hello, World!' on the OLED screen.
Cirkit Designer LogoOpen Project in Cirkit Designer
ESP32-Based Vibration Feedback System with Quad Alphanumeric Display and ADXL343 Accelerometer
Image of EC444 - Quest 3: A project utilizing Adafruit Ethernet FeatherWing in a practical application
This circuit features an Adafruit HUZZAH32 ESP32 Feather board as the central microcontroller, which is connected to an Adafruit Quad AlphaNumeric Featherwing display and an Adafruit ADXL343 accelerometer via I2C communication (SCL and SDA lines). The ESP32 controls a vibration motor connected to one of its GPIO pins (A5_IO4) and shares a common power supply (3.3V) and ground (GND) with the other components. The purpose of this circuit is likely to read acceleration data, display information on the alphanumeric display, and provide haptic feedback through the vibration motor.
Cirkit Designer LogoOpen Project in Cirkit Designer
Solar-Powered Environmental Data Logger with Adafruit Feather M0 Express
Image of Lake Thoreau Monitoring Station: A project utilizing Adafruit Ethernet FeatherWing in a practical application
This circuit is designed for environmental data collection and logging, utilizing an Adafruit Feather M0 Express microcontroller as the central processing unit. It interfaces with a BME280 sensor for atmospheric temperature, humidity, and pressure measurements, an SGP30 sensor for monitoring air quality (eCO2 and TVOC), and a STEMMA soil sensor for detecting soil moisture and temperature. The system is powered by a solar panel and a 3.7v LiPo battery, managed by an Adafruit BQ24074 Solar-DC-USB Lipo Charger, and provides easy access to the microcontroller's connections through an Adafruit Terminal Breakout FeatherWing.
Cirkit Designer LogoOpen Project in Cirkit Designer
Multi-Sensor Health Monitoring System with Adafruit Feather M0 Adalogger
Image of health tracker: A project utilizing Adafruit Ethernet FeatherWing in a practical application
This circuit is designed to interface multiple sensors with an Adafruit Feather M0 Adalogger microcontroller for data logging purposes. The sensors include a MAX30205 temperature sensor, a body dehydration sensor, a MAX30102 pulse oximeter, an Adafruit LSM6DSOX 6-axis accelerometer and gyroscope, and an Adafruit BME680 environmental sensor. All sensors are connected to the microcontroller via an I2C bus, sharing the SDA and SCL lines for communication.
Cirkit Designer LogoOpen Project in Cirkit Designer

Explore Projects Built with Adafruit Ethernet FeatherWing

Use Cirkit Designer to design, explore, and prototype these projects online. Some projects support real-time simulation. Click "Open Project" to start designing instantly!
Image of ARDUINO_SSD1306: A project utilizing Adafruit Ethernet FeatherWing in a practical application
Arduino UNO and OLED FeatherWing Display: Battery-Powered Hello World Project
This circuit consists of an Arduino UNO connected to an Adafruit OLED FeatherWing display via I2C communication (SDA and SCL lines). The Arduino is powered through a Vcc source and provides 3.3V and GND connections to the OLED display. The Arduino runs a program to display 'Hello, World!' on the OLED screen.
Cirkit Designer LogoOpen Project in Cirkit Designer
Image of EC444 - Quest 3: A project utilizing Adafruit Ethernet FeatherWing in a practical application
ESP32-Based Vibration Feedback System with Quad Alphanumeric Display and ADXL343 Accelerometer
This circuit features an Adafruit HUZZAH32 ESP32 Feather board as the central microcontroller, which is connected to an Adafruit Quad AlphaNumeric Featherwing display and an Adafruit ADXL343 accelerometer via I2C communication (SCL and SDA lines). The ESP32 controls a vibration motor connected to one of its GPIO pins (A5_IO4) and shares a common power supply (3.3V) and ground (GND) with the other components. The purpose of this circuit is likely to read acceleration data, display information on the alphanumeric display, and provide haptic feedback through the vibration motor.
Cirkit Designer LogoOpen Project in Cirkit Designer
Image of Lake Thoreau Monitoring Station: A project utilizing Adafruit Ethernet FeatherWing in a practical application
Solar-Powered Environmental Data Logger with Adafruit Feather M0 Express
This circuit is designed for environmental data collection and logging, utilizing an Adafruit Feather M0 Express microcontroller as the central processing unit. It interfaces with a BME280 sensor for atmospheric temperature, humidity, and pressure measurements, an SGP30 sensor for monitoring air quality (eCO2 and TVOC), and a STEMMA soil sensor for detecting soil moisture and temperature. The system is powered by a solar panel and a 3.7v LiPo battery, managed by an Adafruit BQ24074 Solar-DC-USB Lipo Charger, and provides easy access to the microcontroller's connections through an Adafruit Terminal Breakout FeatherWing.
Cirkit Designer LogoOpen Project in Cirkit Designer
Image of health tracker: A project utilizing Adafruit Ethernet FeatherWing in a practical application
Multi-Sensor Health Monitoring System with Adafruit Feather M0 Adalogger
This circuit is designed to interface multiple sensors with an Adafruit Feather M0 Adalogger microcontroller for data logging purposes. The sensors include a MAX30205 temperature sensor, a body dehydration sensor, a MAX30102 pulse oximeter, an Adafruit LSM6DSOX 6-axis accelerometer and gyroscope, and an Adafruit BME680 environmental sensor. All sensors are connected to the microcontroller via an I2C bus, sharing the SDA and SCL lines for communication.
Cirkit Designer LogoOpen Project in Cirkit Designer

Common Applications and Use Cases

  • IoT devices requiring a stable, wired network connection
  • Data logging to a MicroSD card over a network
  • Serving web pages or files from a microcontroller
  • Remote sensor monitoring and control
  • Home automation systems

Technical Specifications

Key Technical Details

  • Controller: WIZnet W5500 Ethernet chip
  • Network Interface: 10/100 Base-T Ethernet (Auto-MDIX)
  • Connector: Standard RJ45 with integrated magnetics
  • MicroSD Card Slot: Supports standard MicroSD cards for data storage
  • Power Ratings: 3.3V I/O with onboard 3.3V regulator
  • Dimensions: 51mm x 23mm x 17.8mm (without headers)

Pin Configuration and Descriptions

Pin Description
MOSI Master Out Slave In - SPI data input to the W5500
MISO Master In Slave Out - SPI data output from the W5500
SCK Serial Clock - SPI clock signal
CS Chip Select - Active low, selects the W5500 for SPI communication
RST Reset - Active low, resets the W5500
INT Interrupt - Indicates the presence of an interrupt from the W5500
GND Ground - Common ground for power and logic
3V3 3.3V Power - Power supply for the W5500 and logic levels
VIN Voltage Input - Unregulated input for onboard voltage regulator

Usage Instructions

How to Use the Component in a Circuit

  1. Mounting: Attach the Ethernet FeatherWing to a compatible Feather board by aligning the headers and pressing them together.
  2. Power Supply: Ensure that the Feather board is powered with a sufficient and stable voltage source.
  3. Ethernet Cable: Connect an Ethernet cable from the RJ45 connector to your network switch or router.
  4. MicroSD Card (Optional): Insert a formatted MicroSD card into the slot if data storage is required.
  5. Programming: Use the appropriate libraries in your code to communicate with the W5500 chip and manage network connections.

Important Considerations and Best Practices

  • Library Usage: Make sure to include and use the Ethernet2 library, which supports the W5500 chip, in your Arduino sketches.
  • Static vs. DHCP: Decide whether to use a static IP address or DHCP for network configuration. DHCP is recommended for ease of use.
  • SPI Bus Sharing: If other SPI devices are connected, ensure that each device has a unique Chip Select (CS) pin and that it is managed correctly in the code.
  • Electrostatic Discharge (ESD): Handle the board with care to avoid ESD damage, especially when touching the Ethernet connector.
  • MicroSD Card Formatting: Format the MicroSD card to FAT16 or FAT32 before use.

Troubleshooting and FAQs

Common Issues Users Might Face

  • No Network Connection: Check the Ethernet cable and connections, verify the router or switch is operational, and ensure the correct network settings in the code.
  • SPI Communication Failure: Ensure that the CS pin is correctly managed and that there are no conflicts on the SPI bus.
  • MicroSD Card Not Recognized: Confirm that the card is formatted correctly and fully inserted into the slot.

Solutions and Tips for Troubleshooting

  • LED Indicators: Use the onboard LEDs to diagnose connection and activity status.
  • Ping Test: Perform a ping test to the FeatherWing's IP address to check network connectivity.
  • Serial Debugging: Use serial output to debug and track the initialization and network communication process.

FAQs

  • Can I use the Ethernet FeatherWing with any Feather board? Yes, it is designed to be compatible with all Feather boards that support SPI communication.

  • Do I need to install any drivers for the W5500 chip? No drivers are needed, but you will need to include the Ethernet2 library in your Arduino sketches.

  • Can I access the MicroSD card over the network? Yes, with the appropriate code, you can serve files from the MicroSD card over the network.

Example Code for Arduino UNO

#include <SPI.h>
#include <Ethernet2.h>

// MAC address for your Ethernet shield
byte mac[] = { 0xDE, 0xAD, 0xBE, 0xEF, 0xFE, 0xED };

// IP address for the shield (optional)
IPAddress ip(192, 168, 1, 177);

// Initialize the Ethernet client library
EthernetClient client;

void setup() {
  // Open serial communications and wait for port to open
  Serial.begin(9600);
  while (!Serial) {
    ; // Wait for serial port to connect (needed for Leonardo only)
  }

  // Start the Ethernet connection
  Serial.println("Initialize Ethernet with DHCP:");
  if (Ethernet.begin(mac) == 0) {
    Serial.println("Failed to configure Ethernet using DHCP");
    // Try to configure using IP address instead of DHCP
    Ethernet.begin(mac, ip);
  }
  // Give the Ethernet shield a second to initialize
  delay(1000);
  Serial.println("Ethernet initialized");
}

void loop() {
  // Your code to handle networking tasks goes here
}

Remember to adjust the mac and ip variables to match your network configuration. The above code initializes the Ethernet connection using DHCP, but falls back to a static IP if DHCP fails.