Cirkit Designer Logo
Cirkit Designer
Your all-in-one circuit design IDE
Home / 
Component Documentation

How to Use Meanwell HDR 30-24: Examples, Pinouts, and Specs

Image of Meanwell HDR 30-24
Cirkit Designer LogoDesign with Meanwell HDR 30-24 in Cirkit Designer

Introduction

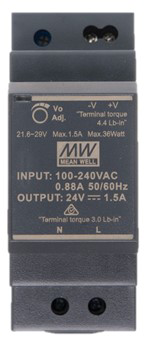
The Meanwell HDR 30-24 is a reliable and efficient DIN rail power supply designed for industrial applications. It provides a stable 24V DC output with a power rating of 30 watts. This component is commonly used to power various devices such as sensors, PLCs, relays, and other industrial control equipment.

Explore Projects Built with Meanwell HDR 30-24

Use Cirkit Designer to design, explore, and prototype these projects online. Some projects support real-time simulation. Click "Open Project" to start designing instantly!
LED Indicator Circuit with Push Switches and Voltage Regulation
Image of circuit 1: A project utilizing Meanwell HDR 30-24 in a practical application
This circuit converts 220V AC to 24V DC using a power transformer and a bridge rectifier, then regulates the voltage to a stable output using a voltage regulator. It includes multiple LEDs controlled by push switches, with current limiting provided by a resistor.
Cirkit Designer LogoOpen Project in Cirkit Designer
LED Array with Push Switch Control and Voltage Regulation
Image of Transformer safty device complete: A project utilizing Meanwell HDR 30-24 in a practical application
This circuit is a power supply and control system that steps down 220V AC to 24V AC using a transformer, rectifies it to DC using a bridge rectifier, and regulates it to 5V DC. It includes multiple LEDs controlled by push switches and a relay, with a capacitor for smoothing the output.
Cirkit Designer LogoOpen Project in Cirkit Designer
ESP32-Based Wi-Fi Controlled 24V Input/Output Interface Module
Image of ESP32 4 på rad: A project utilizing Meanwell HDR 30-24 in a practical application
This circuit uses an ESP32 microcontroller to interface with a 3.3V PNP to 24V NPN photoelectric isolation module, which in turn connects to a 40-pin connector for general-purpose input and output. The 24V power supply provides the necessary voltage for the isolation module and the 40-pin connector, enabling the ESP32 to control and monitor high-voltage signals safely.
Cirkit Designer LogoOpen Project in Cirkit Designer
Multi-Stage Voltage Regulation and Indicator LED Circuit
Image of Subramanyak_Power_Circuit: A project utilizing Meanwell HDR 30-24 in a practical application
This circuit is designed for power management, featuring buck and boost converters for voltage adjustment, and linear regulators for stable voltage output. It includes LEDs for status indication, and terminal blocks for external connections.
Cirkit Designer LogoOpen Project in Cirkit Designer

Explore Projects Built with Meanwell HDR 30-24

Use Cirkit Designer to design, explore, and prototype these projects online. Some projects support real-time simulation. Click "Open Project" to start designing instantly!
Image of circuit 1: A project utilizing Meanwell HDR 30-24 in a practical application
LED Indicator Circuit with Push Switches and Voltage Regulation
This circuit converts 220V AC to 24V DC using a power transformer and a bridge rectifier, then regulates the voltage to a stable output using a voltage regulator. It includes multiple LEDs controlled by push switches, with current limiting provided by a resistor.
Cirkit Designer LogoOpen Project in Cirkit Designer
Image of Transformer safty device complete: A project utilizing Meanwell HDR 30-24 in a practical application
LED Array with Push Switch Control and Voltage Regulation
This circuit is a power supply and control system that steps down 220V AC to 24V AC using a transformer, rectifies it to DC using a bridge rectifier, and regulates it to 5V DC. It includes multiple LEDs controlled by push switches and a relay, with a capacitor for smoothing the output.
Cirkit Designer LogoOpen Project in Cirkit Designer
Image of ESP32 4 på rad: A project utilizing Meanwell HDR 30-24 in a practical application
ESP32-Based Wi-Fi Controlled 24V Input/Output Interface Module
This circuit uses an ESP32 microcontroller to interface with a 3.3V PNP to 24V NPN photoelectric isolation module, which in turn connects to a 40-pin connector for general-purpose input and output. The 24V power supply provides the necessary voltage for the isolation module and the 40-pin connector, enabling the ESP32 to control and monitor high-voltage signals safely.
Cirkit Designer LogoOpen Project in Cirkit Designer
Image of Subramanyak_Power_Circuit: A project utilizing Meanwell HDR 30-24 in a practical application
Multi-Stage Voltage Regulation and Indicator LED Circuit
This circuit is designed for power management, featuring buck and boost converters for voltage adjustment, and linear regulators for stable voltage output. It includes LEDs for status indication, and terminal blocks for external connections.
Cirkit Designer LogoOpen Project in Cirkit Designer

Common Applications and Use Cases

  • Industrial automation systems
  • Building automation
  • Machinery control
  • Process control equipment
  • Instrumentation

Technical Specifications

Key Technical Details

Parameter Specification
Power Output 30W
Output Voltage 24V DC
Output Current 1.5A
Input Voltage 85-264V AC, 120-370V DC
Efficiency >89%
Operating Temperature -30 to +70°C
Mounting Type DIN Rail
Dimensions 35 x 90 x 54.5 mm
Certifications UL, CE, etc.

Pin Configuration and Descriptions

Pin No. Description Notes
1 AC/L Live input
2 AC/N Neutral input
3 -V (DC output) Negative DC output
4 +V (DC output) Positive DC output
- FG Frame Ground (Earth connection)

Usage Instructions

How to Use the Component in a Circuit

  1. Mount the HDR 30-24 onto a standard DIN rail within an electrical enclosure.
  2. Connect the AC input lines to pins 1 (AC/L) and 2 (AC/N). Ensure proper grounding by connecting the FG terminal to the earth ground.
  3. Connect the DC output terminals to your device, ensuring correct polarity: pin 3 (-V) to the negative input and pin 4 (+V) to the positive input.
  4. Verify all connections are secure and double-check for correct polarity before powering on the unit.

Important Considerations and Best Practices

  • Ensure the input voltage is within the specified range for the unit to function correctly.
  • Do not exceed the maximum output current of 1.5A to prevent overloading the power supply.
  • Provide adequate ventilation around the power supply to maintain optimal operating temperature and efficiency.
  • Use appropriate wire gauges for AC input and DC output to handle the current requirements.
  • Always disconnect power before making any connections or disconnections to prevent electrical shock or damage to the power supply and connected devices.

Troubleshooting and FAQs

Common Issues Users Might Face

  • Power Supply Does Not Turn On: Check the AC input connections and ensure the supply voltage is within the specified range.
  • Output Voltage is Unstable or Incorrect: Verify the load does not exceed the maximum output current and check for loose connections.
  • Overheating: Ensure there is sufficient ventilation and that the ambient temperature is within the operating range.

Solutions and Tips for Troubleshooting

  • If the power supply does not turn on, check the input voltage with a multimeter and inspect the fuse if applicable.
  • For unstable output voltage, reduce the load to below 1.5A and check for any shorts or overloads in the connected devices.
  • In case of overheating, remove any obstructions that may block airflow and consider adding a fan or improving ventilation in the enclosure.

FAQs

Q: Can the HDR 30-24 be used in outdoor applications? A: The HDR 30-24 is designed for indoor use. If used outdoors, it should be placed within a suitable enclosure to protect it from environmental factors.

Q: Is it possible to adjust the output voltage of the HDR 30-24? A: The HDR 30-24 has a fixed output voltage of 24V DC. It does not feature an adjustable output.

Q: What is the warranty period for the Meanwell HDR 30-24? A: The warranty period may vary. Please refer to the manufacturer's documentation or contact Meanwell directly for warranty information.

Note: This documentation is for informational purposes only. Always consult the manufacturer's official datasheet and installation guide before installation or use.