Cirkit Designer Logo
Cirkit Designer
Your all-in-one circuit design IDE
Home / 
Component Documentation

How to Use USB Host Shield Mini V2: Examples, Pinouts, and Specs

Image of USB Host Shield Mini V2
Cirkit Designer LogoDesign with USB Host Shield Mini V2 in Cirkit Designer

Introduction

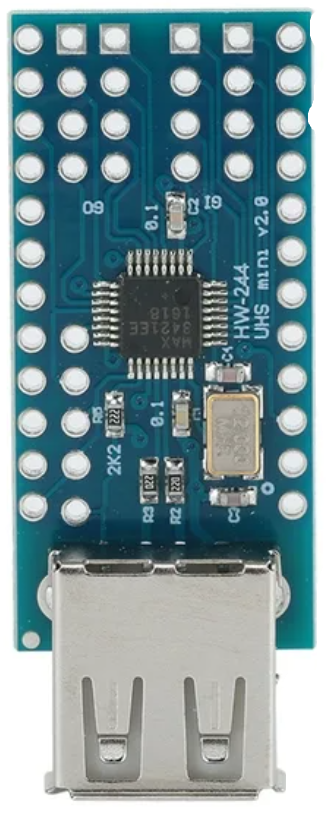
The USB Host Shield Mini V2 (Manufacturer Part ID: HW-244) is a compact and versatile shield designed by Arduino. It enables microcontrollers, such as the Arduino UNO, to interface with USB devices. This shield allows communication with peripherals like keyboards, mice, game controllers, USB storage devices, and more. It is particularly useful in projects requiring USB host functionality, such as data logging, HID device control, or USB-to-serial communication.

Explore Projects Built with USB Host Shield Mini V2

Use Cirkit Designer to design, explore, and prototype these projects online. Some projects support real-time simulation. Click "Open Project" to start designing instantly!
Beelink Mini S12 N95 and Arduino UNO Based Fingerprint Authentication System with ESP32 CAM
Image of design 3: A project utilizing USB Host Shield Mini V2 in a practical application
This circuit features a Beelink MINI S12 N95 computer connected to a 7-inch display via HDMI for video output and two USB connections for power and touch screen functionality. An Arduino UNO is interfaced with a fingerprint scanner for biometric input. The Beelink MINI S12 N95 is powered by a PC power supply, which in turn is connected to a 240V power source. Additionally, an ESP32 CAM module is powered and programmed via a USB plug and an FTDI programmer, respectively, for wireless camera capabilities.
Cirkit Designer LogoOpen Project in Cirkit Designer
I2C-Controlled OLED Display with External EEPROM and Interactive Pushbuttons
Image of godmode: A project utilizing USB Host Shield Mini V2 in a practical application
This is a microcontroller-based interactive device featuring a Wemos D1 Mini, an OLED display, external EEPROM, and an I/O expander. It includes user input buttons and status LEDs, with potential MIDI interface capabilities.
Cirkit Designer LogoOpen Project in Cirkit Designer
Arduino Sensor Shield with I2C LCD and Bluetooth Interface
Image of wallE: A project utilizing USB Host Shield Mini V2 in a practical application
This circuit features an Arduino Sensor Shield v5.0 interfaced with an I2C LCD Display and an HC-05 Bluetooth Module. The LCD Display is connected for power, ground, and I2C communication, allowing it to display data or messages. The HC-05 Bluetooth Module is wired for serial communication with the Arduino Sensor Shield, enabling wireless data exchange with other Bluetooth-enabled devices.
Cirkit Designer LogoOpen Project in Cirkit Designer
Arduino Pro Mini-Based Battery-Powered Temperature and Laser Display System
Image of thermal temperture gun: A project utilizing USB Host Shield Mini V2 in a practical application
This circuit features an Arduino Pro Mini microcontroller interfaced with a USB Serial TTL for programming and power, a momentary switch for user input, and a 9V battery for power supply. It includes a KY-008 laser emitter, a 0.96" OLED display, and an MLX90614 temperature sensor, all connected to the Arduino for a potential temperature measurement and display application.
Cirkit Designer LogoOpen Project in Cirkit Designer

Explore Projects Built with USB Host Shield Mini V2

Use Cirkit Designer to design, explore, and prototype these projects online. Some projects support real-time simulation. Click "Open Project" to start designing instantly!
Image of design 3: A project utilizing USB Host Shield Mini V2 in a practical application
Beelink Mini S12 N95 and Arduino UNO Based Fingerprint Authentication System with ESP32 CAM
This circuit features a Beelink MINI S12 N95 computer connected to a 7-inch display via HDMI for video output and two USB connections for power and touch screen functionality. An Arduino UNO is interfaced with a fingerprint scanner for biometric input. The Beelink MINI S12 N95 is powered by a PC power supply, which in turn is connected to a 240V power source. Additionally, an ESP32 CAM module is powered and programmed via a USB plug and an FTDI programmer, respectively, for wireless camera capabilities.
Cirkit Designer LogoOpen Project in Cirkit Designer
Image of godmode: A project utilizing USB Host Shield Mini V2 in a practical application
I2C-Controlled OLED Display with External EEPROM and Interactive Pushbuttons
This is a microcontroller-based interactive device featuring a Wemos D1 Mini, an OLED display, external EEPROM, and an I/O expander. It includes user input buttons and status LEDs, with potential MIDI interface capabilities.
Cirkit Designer LogoOpen Project in Cirkit Designer
Image of wallE: A project utilizing USB Host Shield Mini V2 in a practical application
Arduino Sensor Shield with I2C LCD and Bluetooth Interface
This circuit features an Arduino Sensor Shield v5.0 interfaced with an I2C LCD Display and an HC-05 Bluetooth Module. The LCD Display is connected for power, ground, and I2C communication, allowing it to display data or messages. The HC-05 Bluetooth Module is wired for serial communication with the Arduino Sensor Shield, enabling wireless data exchange with other Bluetooth-enabled devices.
Cirkit Designer LogoOpen Project in Cirkit Designer
Image of thermal temperture gun: A project utilizing USB Host Shield Mini V2 in a practical application
Arduino Pro Mini-Based Battery-Powered Temperature and Laser Display System
This circuit features an Arduino Pro Mini microcontroller interfaced with a USB Serial TTL for programming and power, a momentary switch for user input, and a 9V battery for power supply. It includes a KY-008 laser emitter, a 0.96" OLED display, and an MLX90614 temperature sensor, all connected to the Arduino for a potential temperature measurement and display application.
Cirkit Designer LogoOpen Project in Cirkit Designer

Common Applications and Use Cases

  • Connecting USB keyboards or mice to microcontrollers for input handling.
  • Interfacing with USB storage devices for data logging or retrieval.
  • Controlling USB-based game controllers in robotics or gaming projects.
  • USB-to-serial communication for debugging or device interfacing.
  • Building custom USB host applications for embedded systems.

Technical Specifications

The USB Host Shield Mini V2 is built around the MAX3421E USB peripheral/host controller IC. Below are its key technical details:

Key Technical Details

  • Operating Voltage: 5V (from Arduino board)
  • Logic Level: 3.3V (onboard regulator for MAX3421E)
  • Communication Interface: SPI (Serial Peripheral Interface)
  • USB Port: Standard USB Type-A connector
  • Current Consumption: ~50mA (excluding connected USB device)
  • Dimensions: 61mm x 34mm
  • Compatibility: Arduino UNO, Arduino Mega, and other Arduino-compatible boards

Pin Configuration and Descriptions

The USB Host Shield Mini V2 connects to the Arduino board via SPI and additional control pins. Below is the pin configuration:

Pin Name Arduino Pin Description
MISO D12 SPI Master-In-Slave-Out for data reception.
MOSI D11 SPI Master-Out-Slave-In for data transmission.
SCK D13 SPI clock signal.
SS D10 SPI Slave Select (chip select for MAX3421E).
INT D9 Interrupt pin for USB event notifications.
GND GND Ground connection.
3.3V 3.3V Power supply for the MAX3421E IC.
5V 5V Power supply for the USB device.

Usage Instructions

How to Use the USB Host Shield Mini V2 in a Circuit

  1. Hardware Setup:

    • Mount the USB Host Shield Mini V2 onto your Arduino board.
    • Connect the USB device (e.g., keyboard, mouse, or USB storage) to the USB Type-A port on the shield.
    • Ensure the Arduino board is powered via USB or an external power source.
  2. Install Required Libraries:

    • Download and install the USB Host Shield Library 2.0 from the Arduino Library Manager or GitHub.
    • Navigate to Sketch > Include Library > Manage Libraries, search for "USB Host Shield Library 2.0," and install it.
  3. Basic Example Code: Below is an example sketch to detect and print information about a connected USB device:

    #include <Usb.h> // Core USB library
    #include <usbhub.h> // USB hub support
    
    USB Usb; // Create USB object
    USBHub Hub(&Usb); // Create USB hub object (optional, for hubs)
    
    void setup() {
      Serial.begin(9600); // Initialize serial communication
      if (Usb.Init() == -1) {
        Serial.println("USB Host Shield initialization failed!");
        while (1); // Halt if initialization fails
      }
      Serial.println("USB Host Shield initialized successfully.");
    }
    
    void loop() {
      Usb.Task(); // Process USB events
    }
    
    • Upload the code to your Arduino board.
    • Open the Serial Monitor to view initialization messages and USB device information.

Important Considerations and Best Practices

  • Power Supply: Ensure the Arduino board can supply sufficient current for the connected USB device. For high-power devices, use an external power source.
  • Logic Level: The shield operates at 3.3V logic. Ensure compatibility with your Arduino board.
  • Library Updates: Always use the latest version of the USB Host Shield Library for improved compatibility and bug fixes.
  • Device Compatibility: Not all USB devices are supported. Check the library documentation for a list of tested devices.

Troubleshooting and FAQs

Common Issues and Solutions

  1. USB Host Shield Initialization Fails:

    • Cause: Incorrect wiring or insufficient power supply.
    • Solution: Verify the shield is properly seated on the Arduino board. Ensure the Arduino is powered via USB or an external source.
  2. USB Device Not Detected:

    • Cause: Unsupported device or faulty USB cable.
    • Solution: Test with a different USB device or cable. Check the library documentation for supported devices.
  3. Serial Monitor Shows No Output:

    • Cause: Incorrect baud rate or USB library not initialized.
    • Solution: Ensure the Serial Monitor is set to 9600 baud. Verify the USB library is correctly installed.
  4. High Current Draw from USB Device:

    • Cause: USB device exceeds the Arduino's power supply capacity.
    • Solution: Use an external power source for the Arduino or a powered USB hub.

FAQs

Q1: Can I use the USB Host Shield Mini V2 with an Arduino Mega?
A1: Yes, the shield is compatible with the Arduino Mega. However, you may need to modify the library settings to match the Mega's SPI pins.

Q2: Does the shield support USB 3.0 devices?
A2: The shield is designed for USB 2.0. While some USB 3.0 devices may work, compatibility is not guaranteed.

Q3: Can I connect multiple USB devices simultaneously?
A3: Yes, but you will need a powered USB hub to connect multiple devices.

Q4: Is it possible to use the shield for USB-to-serial communication?
A4: Yes, the shield can be used for USB-to-serial communication with supported devices.

By following this documentation, you can effectively integrate the USB Host Shield Mini V2 into your projects and troubleshoot common issues.