How to Use ESP32-C3-Mini-1 Dual Type-C USB Development Board 4Mbit Flash: Examples, Pinouts, and Specs
Introduction
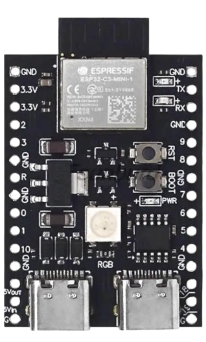
The ESP32-C3-Mini-1 Dual Type-C USB Development Board is a compact and versatile development platform designed by Espressif. It features the ESP32-C3 chip, a low-power, RISC-V-based microcontroller with integrated Wi-Fi and Bluetooth 5 (LE) capabilities. This board is equipped with dual Type-C USB ports for seamless connectivity and programming, along with 4Mbit of flash memory for application storage and development.
Explore Projects Built with ESP32-C3-Mini-1 Dual Type-C USB Development Board 4Mbit Flash


Explore Projects Built with ESP32-C3-Mini-1 Dual Type-C USB Development Board 4Mbit Flash
Common Applications and Use Cases
- IoT (Internet of Things) devices and applications
- Smart home automation systems
- Wireless sensor networks
- Bluetooth Low Energy (BLE) beacons
- Prototyping and development of Wi-Fi-enabled devices
- Educational projects and learning platforms
Technical Specifications
The following table outlines the key technical details of the ESP32-C3-Mini-1 Dual Type-C USB Development Board:
| Parameter | Specification |
|---|---|
| Microcontroller | ESP32-C3 (RISC-V single-core, 32-bit) |
| Flash Memory | 4Mbit (512KB) |
| Wi-Fi | IEEE 802.11 b/g/n (2.4 GHz) |
| Bluetooth | Bluetooth 5 (LE) |
| USB Ports | Dual Type-C USB |
| Operating Voltage | 3.3V |
| Input Voltage Range | 5V (via USB) |
| GPIO Pins | 15 (configurable for digital I/O, ADC, PWM, etc.) |
| ADC Resolution | 12-bit |
| UART | 2 UART interfaces |
| SPI/I2C Support | Yes |
| Power Consumption | Ultra-low power in deep sleep mode (<5 µA) |
| Dimensions | 48mm x 18mm |
Pin Configuration and Descriptions
The ESP32-C3-Mini-1 board features a 15-pin GPIO header. Below is the pinout and description:
| Pin Number | Pin Name | Function |
|---|---|---|
| 1 | GND | Ground |
| 2 | 3V3 | 3.3V Power Output |
| 3 | GPIO0 | General Purpose I/O, Boot Mode Selection |
| 4 | GPIO1 | General Purpose I/O |
| 5 | GPIO2 | General Purpose I/O |
| 6 | GPIO3 | General Purpose I/O |
| 7 | GPIO4 | General Purpose I/O |
| 8 | GPIO5 | General Purpose I/O |
| 9 | GPIO6 | General Purpose I/O |
| 10 | GPIO7 | General Purpose I/O |
| 11 | GPIO8 | General Purpose I/O |
| 12 | GPIO9 | General Purpose I/O |
| 13 | GPIO10 | General Purpose I/O |
| 14 | RXD | UART Receive |
| 15 | TXD | UART Transmit |
Usage Instructions
How to Use the Component in a Circuit
Powering the Board:
- Connect the board to a computer or power source using one of the Type-C USB ports. The board operates at 5V input and regulates it to 3.3V internally.
Programming the Board:
- Install the latest version of the Arduino IDE or ESP-IDF (Espressif IoT Development Framework).
- Add the ESP32-C3 board support package to your development environment.
- Use the USB connection to upload code to the board.
Connecting Peripherals:
- Use the GPIO pins to connect sensors, actuators, or other peripherals. Ensure that the voltage levels are compatible with the 3.3V logic of the ESP32-C3.
Wi-Fi and Bluetooth Configuration:
- Use the built-in Wi-Fi and Bluetooth capabilities to connect to networks or pair with other devices. Libraries such as
WiFi.handBLEDevice.hcan simplify this process.
- Use the built-in Wi-Fi and Bluetooth capabilities to connect to networks or pair with other devices. Libraries such as
Important Considerations and Best Practices
- Voltage Levels: Ensure that all connected peripherals operate at 3.3V logic levels to avoid damaging the board.
- Boot Mode: To enter bootloader mode for programming, hold down the
BOOTbutton while pressing theRESETbutton. - Power Supply: Use a stable 5V power source when powering the board via USB to ensure reliable operation.
- Deep Sleep Mode: Utilize the deep sleep mode for battery-powered applications to minimize power consumption.
Example Code for Arduino UNO Integration
Below is an example of how to use the ESP32-C3-Mini-1 to blink an LED connected to GPIO2:
// Example: Blink an LED connected to GPIO2 on the ESP32-C3-Mini-1

// Define the GPIO pin for the LED
#define LED_PIN 2

void setup() {
  // Initialize the LED pin as an output
  pinMode(LED_PIN, OUTPUT);
}

void loop() {
  // Turn the LED on
  digitalWrite(LED_PIN, HIGH);
  delay(1000); // Wait for 1 second

  // Turn the LED off
  digitalWrite(LED_PIN, LOW);
  delay(1000); // Wait for 1 second
}
Troubleshooting and FAQs
Common Issues Users Might Face
Board Not Detected by Computer:
- Ensure the USB cable is functional and supports data transfer.
- Verify that the correct drivers for the ESP32-C3 are installed on your computer.
Code Upload Fails:
- Check that the correct board and port are selected in the Arduino IDE or ESP-IDF.
- Ensure the board is in bootloader mode by holding the
BOOTbutton during upload.
Wi-Fi Connection Issues:
- Verify the SSID and password in your code.
- Ensure the Wi-Fi network operates on the 2.4 GHz band, as the ESP32-C3 does not support 5 GHz.
Peripheral Not Responding:
- Double-check the wiring and connections.
- Confirm that the peripheral operates at 3.3V logic levels.
Solutions and Tips for Troubleshooting
- Use a multimeter to verify power supply voltages and continuity of connections.
- Update the ESP32 board support package in your development environment to the latest version.
- Refer to the Espressif documentation for advanced debugging techniques and tools.
By following this documentation, users can effectively utilize the ESP32-C3-Mini-1 Dual Type-C USB Development Board for a wide range of applications.