Cirkit Designer Logo
Cirkit Designer
Your all-in-one circuit design IDE
Home / 
Component Documentation

How to Use PiSugar 3: Examples, Pinouts, and Specs

Image of PiSugar 3
Cirkit Designer LogoDesign with PiSugar 3 in Cirkit Designer

Introduction

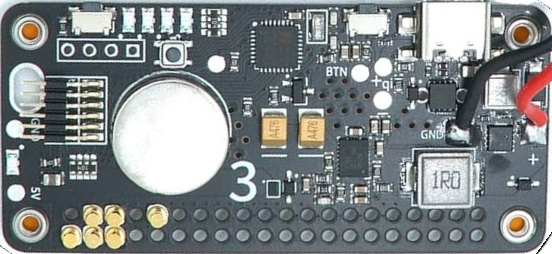
PiSugar 3, manufactured by RPi (Part ID: 3), is a compact and versatile power bank designed specifically for Raspberry Pi projects. It provides a rechargeable battery solution, enabling portable operation of Raspberry Pi devices without the need for external power sources. With its seamless integration and robust design, PiSugar 3 is ideal for applications requiring mobility, such as IoT devices, robotics, and portable computing projects.

Explore Projects Built with PiSugar 3

Use Cirkit Designer to design, explore, and prototype these projects online. Some projects support real-time simulation. Click "Open Project" to start designing instantly!
Battery-Powered Raspberry Pi Pico GPS Tracker with Sensor Integration
Image of Copy of CanSet v1: A project utilizing PiSugar 3 in a practical application
This circuit is a data acquisition and communication system powered by a LiPoly battery and managed by a Raspberry Pi Pico. It includes sensors (BMP280, MPU9250) for environmental data, a GPS module for location tracking, an SD card for data storage, and a WLR089-CanSAT for wireless communication. The TP4056 module handles battery charging, and a toggle switch controls power distribution.
Cirkit Designer LogoOpen Project in Cirkit Designer
Raspberry Pi Pico-Based Gas Detection System with LCD Display and Buzzer Alert
Image of Gas Detector: A project utilizing PiSugar 3 in a practical application
This circuit features a Raspberry Pi Pico microcontroller interfaced with various components including a 16x2 I2C LCD, an MQ-9 gas sensor, a potentiometer, a buzzer, and a pushbutton. The circuit is designed to read sensor data, display information on the LCD, and control the buzzer and other peripherals through the microcontroller.
Cirkit Designer LogoOpen Project in Cirkit Designer
Battery-Powered Raspberry Pi Pico GPS and Sensor Data Logger
Image of CanSet v1: A project utilizing PiSugar 3 in a practical application
This circuit is a data logging and telemetry system powered by a LiPoly battery and managed by a Raspberry Pi Pico. It includes sensors for environmental data (BMP280 for pressure and temperature, MPU9250 for motion), a GPS module for location tracking, and an SD card for data storage, with a TP4056 module for battery charging and a toggle switch for power control.
Cirkit Designer LogoOpen Project in Cirkit Designer
Arduino Mega 2560 Based Security System with Fingerprint Authentication and SMS Alerts
Image of Door security system: A project utilizing PiSugar 3 in a practical application
This circuit features an Arduino Mega 2560 microcontroller interfaced with a SIM800L GSM module, two fingerprint scanners, an I2C LCD display, an IR sensor, and a piezo buzzer. Power management is handled by a PowerBoost 1000 Basic Pad USB, a TP4056 charging module, and a Li-ion 18650 battery, with an option to use a Mini AC-DC 110V-230V to 5V 700mA module for direct power supply. The primary functionality appears to be a security system with GSM communication capabilities, biometric access control, and visual/audible feedback.
Cirkit Designer LogoOpen Project in Cirkit Designer

Explore Projects Built with PiSugar 3

Use Cirkit Designer to design, explore, and prototype these projects online. Some projects support real-time simulation. Click "Open Project" to start designing instantly!
Image of Copy of CanSet v1: A project utilizing PiSugar 3 in a practical application
Battery-Powered Raspberry Pi Pico GPS Tracker with Sensor Integration
This circuit is a data acquisition and communication system powered by a LiPoly battery and managed by a Raspberry Pi Pico. It includes sensors (BMP280, MPU9250) for environmental data, a GPS module for location tracking, an SD card for data storage, and a WLR089-CanSAT for wireless communication. The TP4056 module handles battery charging, and a toggle switch controls power distribution.
Cirkit Designer LogoOpen Project in Cirkit Designer
Image of Gas Detector: A project utilizing PiSugar 3 in a practical application
Raspberry Pi Pico-Based Gas Detection System with LCD Display and Buzzer Alert
This circuit features a Raspberry Pi Pico microcontroller interfaced with various components including a 16x2 I2C LCD, an MQ-9 gas sensor, a potentiometer, a buzzer, and a pushbutton. The circuit is designed to read sensor data, display information on the LCD, and control the buzzer and other peripherals through the microcontroller.
Cirkit Designer LogoOpen Project in Cirkit Designer
Image of CanSet v1: A project utilizing PiSugar 3 in a practical application
Battery-Powered Raspberry Pi Pico GPS and Sensor Data Logger
This circuit is a data logging and telemetry system powered by a LiPoly battery and managed by a Raspberry Pi Pico. It includes sensors for environmental data (BMP280 for pressure and temperature, MPU9250 for motion), a GPS module for location tracking, and an SD card for data storage, with a TP4056 module for battery charging and a toggle switch for power control.
Cirkit Designer LogoOpen Project in Cirkit Designer
Image of Door security system: A project utilizing PiSugar 3 in a practical application
Arduino Mega 2560 Based Security System with Fingerprint Authentication and SMS Alerts
This circuit features an Arduino Mega 2560 microcontroller interfaced with a SIM800L GSM module, two fingerprint scanners, an I2C LCD display, an IR sensor, and a piezo buzzer. Power management is handled by a PowerBoost 1000 Basic Pad USB, a TP4056 charging module, and a Li-ion 18650 battery, with an option to use a Mini AC-DC 110V-230V to 5V 700mA module for direct power supply. The primary functionality appears to be a security system with GSM communication capabilities, biometric access control, and visual/audible feedback.
Cirkit Designer LogoOpen Project in Cirkit Designer

Common Applications and Use Cases

  • Portable Raspberry Pi projects (e.g., handheld gaming consoles, portable media centers)
  • IoT devices requiring uninterrupted power
  • Robotics and automation systems
  • Educational and prototyping projects
  • Field data collection and monitoring systems

Technical Specifications

Below are the key technical details and pin configuration for the PiSugar 3:

Key Technical Details

Parameter Specification
Input Voltage 5V (via USB-C port)
Output Voltage 5V (regulated for Raspberry Pi)
Battery Capacity 5000mAh (varies by model)
Charging Current Up to 2A
Output Current Up to 3A
Dimensions 65mm x 56mm x 15mm
Weight ~50g
Battery Type Lithium Polymer (LiPo)
Protection Features Overcharge, over-discharge, short-circuit protection

Pin Configuration and Descriptions

The PiSugar 3 connects directly to the GPIO pins of the Raspberry Pi. Below is the pin configuration:

Pin Number Pin Name Description
2 5V Power Out Supplies 5V regulated power to the Raspberry Pi
6 Ground (GND) Common ground connection
8 UART TX Optional UART communication (for advanced use)
10 UART RX Optional UART communication (for advanced use)

Usage Instructions

How to Use the PiSugar 3 in a Circuit

  1. Attach to Raspberry Pi: Align the PiSugar 3 with the GPIO pins of your Raspberry Pi and gently press it into place. Ensure proper alignment to avoid damage.
  2. Charge the Battery: Use a USB-C cable to connect the PiSugar 3 to a power source. The onboard LED will indicate the charging status.
  3. Power On: Once charged, press the power button on the PiSugar 3 to supply power to the Raspberry Pi.
  4. Monitor Battery Status: Use the PiSugar software (available for download from the official website) to monitor battery levels and configure advanced settings.

Important Considerations and Best Practices

  • Battery Safety: Avoid exposing the PiSugar 3 to extreme temperatures or physical damage to prevent battery hazards.
  • Power Requirements: Ensure the connected Raspberry Pi and peripherals do not exceed the 3A output current limit.
  • Software Configuration: Install the PiSugar software for advanced features like power scheduling and battery monitoring.
  • Shutdown Procedure: Use the software or the power button to safely shut down the Raspberry Pi before disconnecting the PiSugar 3.

Example Code for Battery Monitoring with Raspberry Pi

The PiSugar 3 can communicate with the Raspberry Pi via UART for battery status monitoring. Below is an example Python script:

import serial

Initialize UART communication on the Raspberry Pi

Replace '/dev/ttyS0' with the correct UART port if necessary

ser = serial.Serial('/dev/ttyS0', 9600, timeout=1)

try: while True: # Send a command to request battery status ser.write(b'BATTERY_STATUS\n')

    # Read the response from PiSugar 3
    response = ser.readline().decode('utf-8').strip()
    
    if response:
        print(f"Battery Status: {response}")
    else:
        print("No response from PiSugar 3. Check connections.")

except KeyboardInterrupt: print("Exiting program.") finally: ser.close()


Notes:

  • Ensure the UART pins (TX and RX) are properly connected if using UART communication.
  • Install the pyserial library using pip install pyserial before running the script.

Troubleshooting and FAQs

Common Issues and Solutions

  1. Raspberry Pi Does Not Power On

    • Cause: The PiSugar 3 battery may be depleted.
    • Solution: Connect the PiSugar 3 to a power source via USB-C and charge the battery.
  2. Battery Drains Quickly

    • Cause: High power consumption from connected peripherals.
    • Solution: Disconnect unnecessary peripherals or use a higher-capacity PiSugar 3 model.
  3. No UART Communication

    • Cause: Incorrect UART pin connections or configuration.
    • Solution: Verify the TX and RX connections and ensure UART is enabled in the Raspberry Pi configuration.
  4. Overheating

    • Cause: Excessive current draw or poor ventilation.
    • Solution: Reduce the load on the PiSugar 3 and ensure proper airflow around the device.

FAQs

Q: Can I use the PiSugar 3 with Raspberry Pi Zero?
A: Yes, the PiSugar 3 is compatible with Raspberry Pi Zero and other Raspberry Pi models.

Q: How long does it take to fully charge the PiSugar 3?
A: Charging time depends on the input current but typically takes 2-3 hours with a 2A charger.

Q: Can I use the PiSugar 3 while charging?
A: Yes, the PiSugar 3 supports pass-through charging, allowing you to power the Raspberry Pi while charging the battery.

Q: Is the PiSugar 3 compatible with non-Raspberry Pi devices?
A: While designed for Raspberry Pi, the PiSugar 3 can power other 5V devices with similar power requirements. However, GPIO integration may not be supported.

Q: How do I update the PiSugar software?
A: Visit the official PiSugar website for the latest software updates and installation instructions.