Cirkit Designer Logo
Cirkit Designer
Your all-in-one circuit design IDE
Home / 
Component Documentation

How to Use mpx5100dp Pressure Sensor: Examples, Pinouts, and Specs

Image of mpx5100dp Pressure Sensor
Cirkit Designer LogoDesign with mpx5100dp Pressure Sensor in Cirkit Designer

Introduction

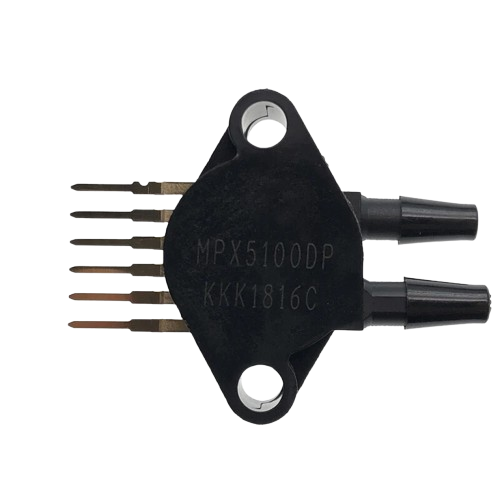
The MPX5100DP is a piezoresistive pressure sensor manufactured by MPX Pressure Sensors. It provides an analog output voltage proportional to the applied pressure, making it ideal for precise pressure measurement. The sensor is designed to measure pressures in the range of 0 to 100 kPa (kilopascals) and is widely used in applications such as HVAC systems, medical devices, and automotive systems. Its dual-port design allows for differential pressure measurements, enhancing its versatility.

Explore Projects Built with mpx5100dp Pressure Sensor

Use Cirkit Designer to design, explore, and prototype these projects online. Some projects support real-time simulation. Click "Open Project" to start designing instantly!
ESP8266 NodeMCU Based Multi-Sensor Monitoring System
Image of test 2: A project utilizing mpx5100dp Pressure Sensor in a practical application
This circuit is designed around an ESP8266 NodeMCU microcontroller, which interfaces with a BMP180 barometric pressure sensor, a VL53L0X time-of-flight distance sensor, and a VL6180X proximity and ambient light sensor. The microcontroller collects environmental data such as atmospheric pressure, temperature, and distances to objects, and processes this information to monitor conditions such as eye pressure. The circuit is powered by a LiPoly battery, regulated by an AMS1117 3.3V voltage regulator, and is likely intended for applications in health monitoring or environmental sensing.
Cirkit Designer LogoOpen Project in Cirkit Designer
ESP32 and ESP8266 Wi-Fi Controlled Sensor Hub with Battery Backup
Image of baby guard: A project utilizing mpx5100dp Pressure Sensor in a practical application
This circuit is a sensor monitoring and data transmission system powered by a Li-ion battery and a 12V adapter. It includes various sensors (tilt, optical encoder, force sensing resistors, and air pressure) connected to an ESP32 microcontroller, which reads sensor data and transmits it via a WiFi module (ESP8266-01). The system is designed to provide real-time sensor data over a WiFi network.
Cirkit Designer LogoOpen Project in Cirkit Designer
Arduino BMP180 Tire Pressure Monitoring System with LCD Display and NRF24L01 Wireless Transmission
Image of TPMS: A project utilizing mpx5100dp Pressure Sensor in a practical application
This circuit is designed for a Tire Pressure Monitoring System using an ATmega328P microcontroller. It reads temperature and pressure data from BMP180 sensors, displays the readings on a 16x2 LCD, and transmits the data wirelessly via an NRF24L01 module. The circuit is powered by a 5V battery, with a 3.3V battery specifically for the NRF24L01, and includes a resistor for the LCD backlight.
Cirkit Designer LogoOpen Project in Cirkit Designer
Arduino Nano Weather Station with BMP180 Sensor and MicroSD Data Logging
Image of circuito: A project utilizing mpx5100dp Pressure Sensor in a practical application
This circuit features an Arduino Nano microcontroller interfaced with an Adafruit BMP180 sensor for measuring atmospheric pressure and a MicroSD card socket for data storage. The BMP180 communicates with the Arduino via I2C, while the MicroSD card uses SPI for data transfer.
Cirkit Designer LogoOpen Project in Cirkit Designer

Explore Projects Built with mpx5100dp Pressure Sensor

Use Cirkit Designer to design, explore, and prototype these projects online. Some projects support real-time simulation. Click "Open Project" to start designing instantly!
Image of test 2: A project utilizing mpx5100dp Pressure Sensor in a practical application
ESP8266 NodeMCU Based Multi-Sensor Monitoring System
This circuit is designed around an ESP8266 NodeMCU microcontroller, which interfaces with a BMP180 barometric pressure sensor, a VL53L0X time-of-flight distance sensor, and a VL6180X proximity and ambient light sensor. The microcontroller collects environmental data such as atmospheric pressure, temperature, and distances to objects, and processes this information to monitor conditions such as eye pressure. The circuit is powered by a LiPoly battery, regulated by an AMS1117 3.3V voltage regulator, and is likely intended for applications in health monitoring or environmental sensing.
Cirkit Designer LogoOpen Project in Cirkit Designer
Image of baby guard: A project utilizing mpx5100dp Pressure Sensor in a practical application
ESP32 and ESP8266 Wi-Fi Controlled Sensor Hub with Battery Backup
This circuit is a sensor monitoring and data transmission system powered by a Li-ion battery and a 12V adapter. It includes various sensors (tilt, optical encoder, force sensing resistors, and air pressure) connected to an ESP32 microcontroller, which reads sensor data and transmits it via a WiFi module (ESP8266-01). The system is designed to provide real-time sensor data over a WiFi network.
Cirkit Designer LogoOpen Project in Cirkit Designer
Image of TPMS: A project utilizing mpx5100dp Pressure Sensor in a practical application
Arduino BMP180 Tire Pressure Monitoring System with LCD Display and NRF24L01 Wireless Transmission
This circuit is designed for a Tire Pressure Monitoring System using an ATmega328P microcontroller. It reads temperature and pressure data from BMP180 sensors, displays the readings on a 16x2 LCD, and transmits the data wirelessly via an NRF24L01 module. The circuit is powered by a 5V battery, with a 3.3V battery specifically for the NRF24L01, and includes a resistor for the LCD backlight.
Cirkit Designer LogoOpen Project in Cirkit Designer
Image of circuito: A project utilizing mpx5100dp Pressure Sensor in a practical application
Arduino Nano Weather Station with BMP180 Sensor and MicroSD Data Logging
This circuit features an Arduino Nano microcontroller interfaced with an Adafruit BMP180 sensor for measuring atmospheric pressure and a MicroSD card socket for data storage. The BMP180 communicates with the Arduino via I2C, while the MicroSD card uses SPI for data transfer.
Cirkit Designer LogoOpen Project in Cirkit Designer

Technical Specifications

Below are the key technical details of the MPX5100DP pressure sensor:

  • Pressure Range: 0 to 100 kPa (0 to 14.5 psi)
  • Output Voltage: 0.2 V to 4.7 V (analog output)
  • Supply Voltage (VCC): 4.75 V to 5.25 V
  • Accuracy: ±1.5% of full-scale span
  • Operating Temperature Range: -40°C to +125°C
  • Response Time: 1 ms
  • Port Configuration: Dual port (differential pressure measurement)
  • Package Type: SIP (Single Inline Package)

Pin Configuration and Descriptions

The MPX5100DP has a 6-pin configuration. The table below describes each pin:

Pin Number Pin Name Description
1 VOUT Analog output voltage proportional to pressure
2 GND Ground (0 V reference)
3 VCC Supply voltage (4.75 V to 5.25 V)
4 NC Not connected
5 NC Not connected
6 NC Not connected

Note: Pins 4, 5, and 6 are not used and should be left unconnected.

Usage Instructions

How to Use the MPX5100DP in a Circuit

  1. Power Supply: Connect the VCC pin to a stable 5 V power supply and the GND pin to the ground of the circuit.
  2. Output Signal: The VOUT pin provides an analog voltage proportional to the applied pressure. This output can be read using an ADC (Analog-to-Digital Converter) on a microcontroller or data acquisition system.
  3. Pressure Ports: The MPX5100DP has two ports:
    • Port P1: High-pressure port (positive pressure input).
    • Port P2: Low-pressure port (reference or negative pressure input).
    • For differential pressure measurements, connect P1 and P2 to the respective pressure sources. For gauge pressure measurements, leave P2 open to the atmosphere.

Important Considerations and Best Practices

  • Filtering: Add a decoupling capacitor (e.g., 0.1 µF) between VCC and GND to reduce noise.
  • Pressure Range: Ensure the applied pressure does not exceed the sensor's maximum rating of 100 kPa to avoid damage.
  • Temperature Effects: The sensor is temperature-compensated, but extreme temperatures may still affect accuracy. Use within the specified operating range.
  • Mounting: Handle the sensor carefully to avoid damaging the ports or pins. Ensure proper alignment when mounting.

Example: Connecting MPX5100DP to an Arduino UNO

Below is an example of how to interface the MPX5100DP with an Arduino UNO to read pressure values:

// Define the analog pin connected to the MPX5100DP VOUT pin
const int pressurePin = A0;

// Define constants for the sensor's output range
const float VOUT_MIN = 0.2; // Minimum output voltage (V)
const float VOUT_MAX = 4.7; // Maximum output voltage (V)
const float PRESSURE_MAX = 100.0; // Maximum pressure (kPa)

void setup() {
  Serial.begin(9600); // Initialize serial communication
}

void loop() {
  // Read the analog value from the sensor
  int sensorValue = analogRead(pressurePin);

  // Convert the analog value to voltage
  float voltage = sensorValue * (5.0 / 1023.0);

  // Calculate the pressure in kPa
  float pressure = (voltage - VOUT_MIN) * (PRESSURE_MAX / (VOUT_MAX - VOUT_MIN));

  // Print the pressure value to the Serial Monitor
  Serial.print("Pressure: ");
  Serial.print(pressure);
  Serial.println(" kPa");

  delay(1000); // Wait for 1 second before the next reading
}

Notes:

  • Ensure the Arduino's 5 V pin is used to power the MPX5100DP.
  • The analog pin (A0 in this example) should be connected to the VOUT pin of the sensor.

Troubleshooting and FAQs

Common Issues and Solutions

  1. No Output Voltage:

    • Check the power supply connections (VCC and GND).
    • Verify that the applied pressure is within the sensor's range.
  2. Inaccurate Readings:

    • Ensure the sensor is properly calibrated in your application.
    • Check for noise in the power supply and add a decoupling capacitor if needed.
    • Verify that the pressure ports are not blocked or leaking.
  3. Output Voltage Stuck at Minimum or Maximum:

    • Confirm that the pressure applied is within the specified range.
    • Inspect the sensor for physical damage or contamination.

FAQs

Q1: Can the MPX5100DP measure vacuum pressure?
A1: Yes, the MPX5100DP can measure vacuum pressure when P2 (low-pressure port) is connected to the vacuum source and P1 (high-pressure port) is open to the atmosphere.

Q2: What is the response time of the sensor?
A2: The MPX5100DP has a response time of 1 ms, making it suitable for dynamic pressure measurements.

Q3: Can I use the MPX5100DP with a 3.3 V microcontroller?
A3: The MPX5100DP requires a 5 V supply for proper operation. If your microcontroller operates at 3.3 V, use a level shifter or ADC with a 5 V input range to interface with the sensor.

Q4: How do I protect the sensor from overpressure?
A4: Use a pressure relief valve or restrictor in your system to prevent the applied pressure from exceeding 100 kPa.

By following this documentation, you can effectively integrate the MPX5100DP pressure sensor into your projects and troubleshoot common issues.