Cirkit Designer Logo
Cirkit Designer
Your all-in-one circuit design IDE
Home / 
Component Documentation

How to Use Adafruit Mini Relay FeatherWing: Examples, Pinouts, and Specs

Image of Adafruit Mini Relay FeatherWing
Cirkit Designer LogoDesign with Adafruit Mini Relay FeatherWing in Cirkit Designer

Introduction

The Adafruit Mini Relay FeatherWing is a small, yet powerful relay module that seamlessly integrates with the Adafruit Feather ecosystem. This component allows a low-power microcontroller to switch high-power devices on and off. It's an ideal choice for home automation, IoT projects, and any application where remote control of high-power devices is needed.

Explore Projects Built with Adafruit Mini Relay FeatherWing

Use Cirkit Designer to design, explore, and prototype these projects online. Some projects support real-time simulation. Click "Open Project" to start designing instantly!
ESP32-C6 Feather Controlled Smart Relay for AC Bulb Automation
Image of ESP32 Based ZigBee Device: A project utilizing Adafruit Mini Relay FeatherWing in a practical application
This circuit uses an ESP32-C6 Feather microcontroller to control an AC bulb via a KY-019 5V relay module. The ESP32 is programmed to receive Zigbee wireless commands to toggle the relay, which in turn switches the AC bulb on or off. The relay module is powered by a DC power source, and the bulb is connected to an AC supply, with the relay acting as an intermediary to control the bulb's power state.
Cirkit Designer LogoOpen Project in Cirkit Designer
Solar-Powered Environmental Data Logger with Adafruit Feather M0 Express
Image of Lake Thoreau Monitoring Station: A project utilizing Adafruit Mini Relay FeatherWing in a practical application
This circuit is designed for environmental data collection and logging, utilizing an Adafruit Feather M0 Express microcontroller as the central processing unit. It interfaces with a BME280 sensor for atmospheric temperature, humidity, and pressure measurements, an SGP30 sensor for monitoring air quality (eCO2 and TVOC), and a STEMMA soil sensor for detecting soil moisture and temperature. The system is powered by a solar panel and a 3.7v LiPo battery, managed by an Adafruit BQ24074 Solar-DC-USB Lipo Charger, and provides easy access to the microcontroller's connections through an Adafruit Terminal Breakout FeatherWing.
Cirkit Designer LogoOpen Project in Cirkit Designer
Arduino Nano Controlled Smart Relay with APDS-9960 Gesture Sensor
Image of contactless smart switch: A project utilizing Adafruit Mini Relay FeatherWing in a practical application
This circuit features an Arduino Nano microcontroller interfaced with an Adafruit APDS-9960 sensor and a 2-channel relay module. The APDS-9960 sensor, which is capable of gesture detection, is connected to the Arduino via I2C communication lines (SCL, SDA) and powered by the Arduino's 3.3V output. The relay module is controlled by the Arduino through a digital pin (D7) and is used to switch an AC-powered bulb on and off, with the relay's common (COM) terminal connected to the AC source and the normally open (NO1) terminal connected to the bulb.
Cirkit Designer LogoOpen Project in Cirkit Designer
Touch-Sensitive Interface with Adafruit MPR121 and Feather 32u4 Bluefruit
Image of MPR121: A project utilizing Adafruit Mini Relay FeatherWing in a practical application
This circuit integrates an Adafruit MPR121 capacitive touch sensor with an Adafruit Feather 32u4 Bluefruit microcontroller. The MPR121 is powered by the Feather and communicates via I2C (SCL and SDA) to detect touch inputs, which can be processed or transmitted wirelessly by the Feather.
Cirkit Designer LogoOpen Project in Cirkit Designer

Explore Projects Built with Adafruit Mini Relay FeatherWing

Use Cirkit Designer to design, explore, and prototype these projects online. Some projects support real-time simulation. Click "Open Project" to start designing instantly!
Image of ESP32 Based ZigBee Device: A project utilizing Adafruit Mini Relay FeatherWing in a practical application
ESP32-C6 Feather Controlled Smart Relay for AC Bulb Automation
This circuit uses an ESP32-C6 Feather microcontroller to control an AC bulb via a KY-019 5V relay module. The ESP32 is programmed to receive Zigbee wireless commands to toggle the relay, which in turn switches the AC bulb on or off. The relay module is powered by a DC power source, and the bulb is connected to an AC supply, with the relay acting as an intermediary to control the bulb's power state.
Cirkit Designer LogoOpen Project in Cirkit Designer
Image of Lake Thoreau Monitoring Station: A project utilizing Adafruit Mini Relay FeatherWing in a practical application
Solar-Powered Environmental Data Logger with Adafruit Feather M0 Express
This circuit is designed for environmental data collection and logging, utilizing an Adafruit Feather M0 Express microcontroller as the central processing unit. It interfaces with a BME280 sensor for atmospheric temperature, humidity, and pressure measurements, an SGP30 sensor for monitoring air quality (eCO2 and TVOC), and a STEMMA soil sensor for detecting soil moisture and temperature. The system is powered by a solar panel and a 3.7v LiPo battery, managed by an Adafruit BQ24074 Solar-DC-USB Lipo Charger, and provides easy access to the microcontroller's connections through an Adafruit Terminal Breakout FeatherWing.
Cirkit Designer LogoOpen Project in Cirkit Designer
Image of contactless smart switch: A project utilizing Adafruit Mini Relay FeatherWing in a practical application
Arduino Nano Controlled Smart Relay with APDS-9960 Gesture Sensor
This circuit features an Arduino Nano microcontroller interfaced with an Adafruit APDS-9960 sensor and a 2-channel relay module. The APDS-9960 sensor, which is capable of gesture detection, is connected to the Arduino via I2C communication lines (SCL, SDA) and powered by the Arduino's 3.3V output. The relay module is controlled by the Arduino through a digital pin (D7) and is used to switch an AC-powered bulb on and off, with the relay's common (COM) terminal connected to the AC source and the normally open (NO1) terminal connected to the bulb.
Cirkit Designer LogoOpen Project in Cirkit Designer
Image of MPR121: A project utilizing Adafruit Mini Relay FeatherWing in a practical application
Touch-Sensitive Interface with Adafruit MPR121 and Feather 32u4 Bluefruit
This circuit integrates an Adafruit MPR121 capacitive touch sensor with an Adafruit Feather 32u4 Bluefruit microcontroller. The MPR121 is powered by the Feather and communicates via I2C (SCL and SDA) to detect touch inputs, which can be processed or transmitted wirelessly by the Feather.
Cirkit Designer LogoOpen Project in Cirkit Designer

Common Applications and Use Cases

  • Home automation systems
  • Remote control of lights, fans, and other appliances
  • IoT devices for controlling power to various systems
  • Robotics for controlling actuators and larger motors

Technical Specifications

Key Technical Details

  • Switching Voltage: Up to 60V DC or 125V AC
  • Carrying Current: Up to 1.2A
  • Coil Voltage: 3V DC
  • Contact Resistance: 100mΩ max
  • Operate Time: 10ms max
  • Release Time: 5ms max

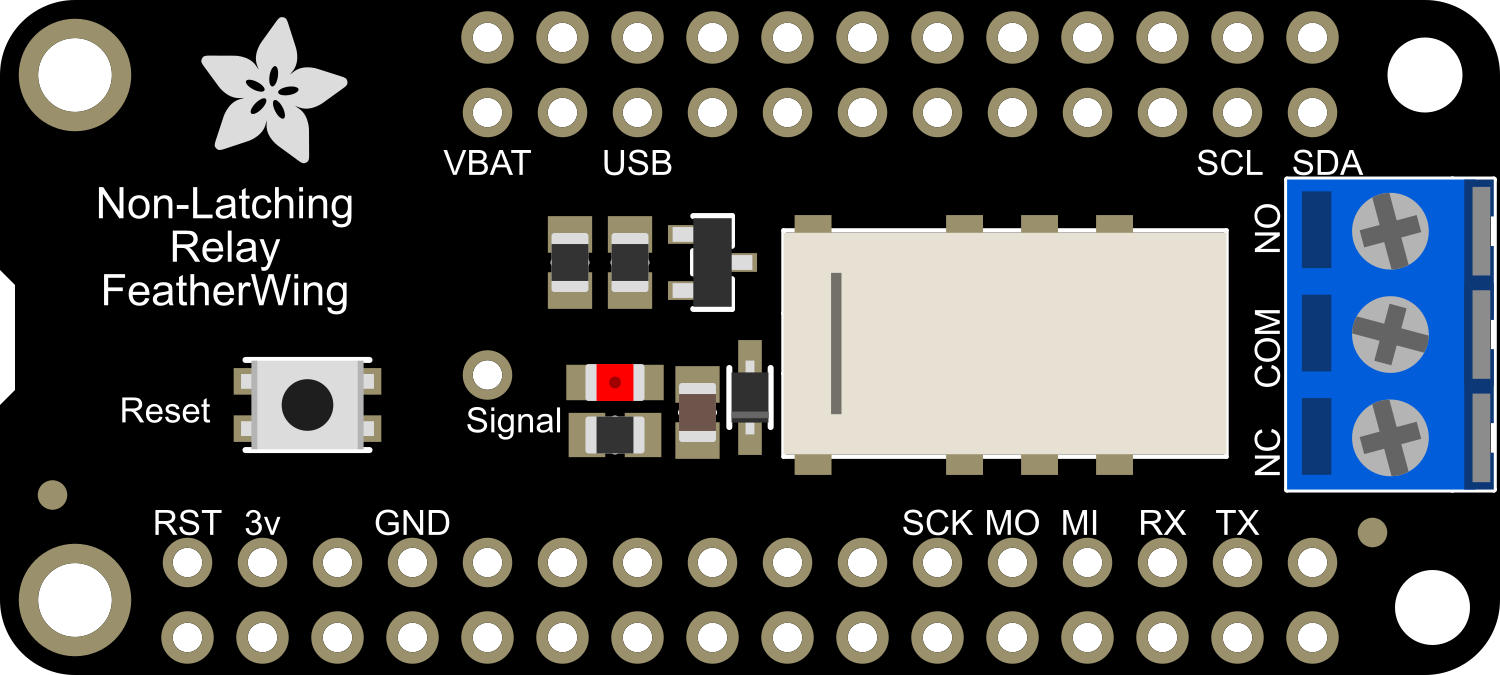
Pin Configuration and Descriptions

Pin Number Name Description
1 GND Ground connection for the relay coil
2 Sig Digital signal input to control the relay
3 NC Normally Closed contact; connected to COM when relay is not active
4 NO Normally Open contact; connected to COM when relay is active
5 COM Common connection for the switching circuit
6 VCC Power supply for the relay coil (3.3V - 5V)

Usage Instructions

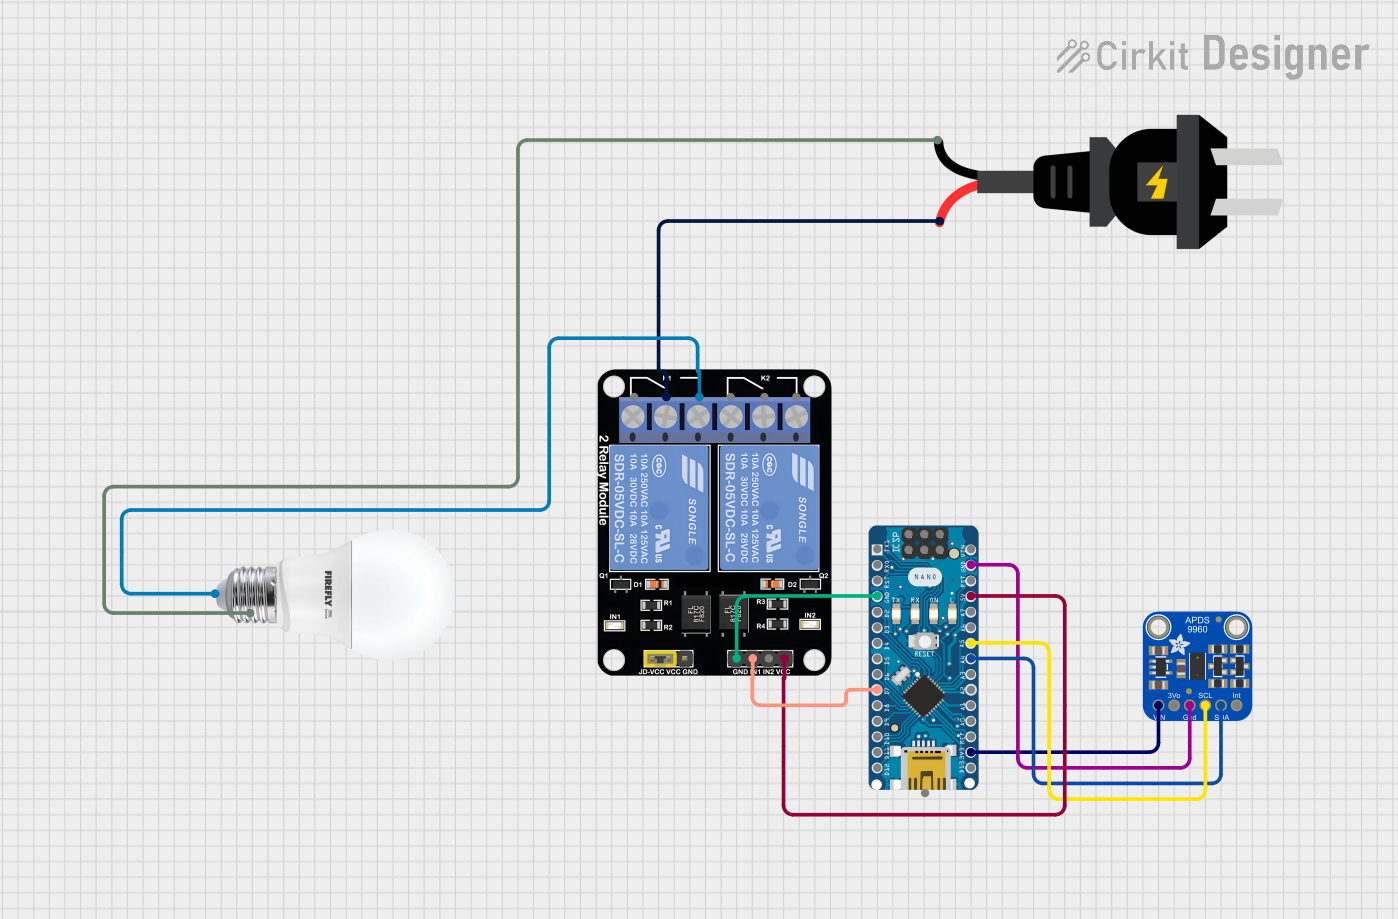
How to Use the Component in a Circuit

  1. Power Connections:

    • Connect the VCC pin to a 3.3V or 5V power supply.
    • Connect the GND pin to the ground of the power supply.
  2. Signal Connection:

    • Connect the Sig pin to a digital output pin on the Feather board.
  3. Load Connections:

    • Connect the device you wish to control between the COM and NO or NC pins, depending on whether you want the device to be on when the relay is activated (NO) or off (NC).

Important Considerations and Best Practices

  • Ensure the power supply for the relay coil matches the voltage requirements (3.3V - 5V).
  • Do not exceed the maximum switching voltage and current ratings of the relay.
  • Use a flyback diode when switching inductive loads to prevent back EMF damage.
  • Avoid placing the relay near sensitive electronic components to prevent interference.
  • Always disconnect power before making or changing connections.

Example Code for Arduino UNO

// Define the pin connected to the Relay FeatherWing
const int relayPin = 5;

void setup() {
  // Set the relay pin as an output
  pinMode(relayPin, OUTPUT);
}

void loop() {
  // Turn the relay on
  digitalWrite(relayPin, HIGH);
  delay(1000); // Wait for 1 second
  
  // Turn the relay off
  digitalWrite(relayPin, LOW);
  delay(1000); // Wait for 1 second
}

Troubleshooting and FAQs

Common Issues

  • Relay not switching: Ensure the Sig pin is receiving the correct digital signal and that the power supply is properly connected.
  • Intermittent operation: Check for loose connections and ensure the power supply is stable.
  • Clicking sound but no switching: Verify that the load does not exceed the relay's maximum ratings.

Solutions and Tips for Troubleshooting

  • Double-check wiring against the pin configuration table.
  • Use a multimeter to verify the presence of voltage at the relay coil and the continuity of the relay contacts.
  • Ensure the code uploaded to the Feather board is correctly setting the relayPin as an output and toggling its state.

FAQs

Q: Can I control the relay with a 3.3V signal? A: Yes, the relay can be controlled with a 3.3V signal, making it compatible with most Feather boards.

Q: What is the maximum current the relay can switch? A: The relay can switch currents up to 1.2A for DC or AC loads.

Q: Can I use multiple Relay FeatherWings together? A: Yes, you can stack multiple Relay FeatherWings, but ensure each relay is controlled by a separate digital output pin.

Q: Is there an indicator to show when the relay is active? A: Yes, there is an LED on the board that lights up when the relay is activated.

For further assistance, consult the Adafruit support forums or the product's official documentation.