
How to Use Transformer 3 - 12v: Examples, Pinouts, and Specs
 Design with Transformer 3 - 12v in Cirkit Designer
Introduction
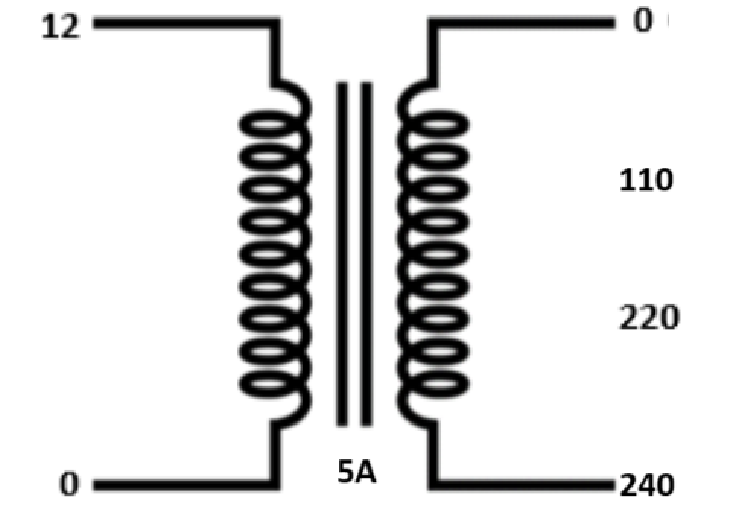
The Transformer 3 - 12v is a step-down transformer designed to convert higher AC voltage levels (e.g., 110V or 220V) to a lower AC voltage of 12 volts. This component is widely used in power supply circuits to provide the necessary voltage for various electronic devices, such as LED lighting systems, low-power appliances, and embedded systems. Its robust design ensures reliable performance in both residential and industrial applications.
Explore Projects Built with Transformer 3 - 12v
 Open Project in Cirkit Designer
 Open Project in Cirkit Designer
 Open Project in Cirkit Designer
 Open Project in Cirkit Designer
Explore Projects Built with Transformer 3 - 12v
Open Project in Cirkit DesignerOpen Project in Cirkit DesignerOpen Project in Cirkit DesignerOpen Project in Cirkit DesignerCommon Applications
- Power supplies for electronic devices
- LED lighting systems
- Low-voltage AC circuits
- Embedded systems requiring 12V AC input
- Battery charging circuits (with rectification)
Technical Specifications
| Parameter | Value |
|---|---|
| Manufacturer | Transformer 3 - 12v |
| Part ID | Transformer 3 - 12v |
| Input Voltage Range | 110V AC or 220V AC (depending on model) |
| Output Voltage | 12V AC |
| Output Current Rating | 1A to 5A (depending on model) |
| Frequency | 50Hz / 60Hz |
| Efficiency | ≥ 90% |
| Insulation Resistance | ≥ 100MΩ |
| Operating Temperature | -10°C to 50°C |
| Dimensions | Varies by model |
| Weight | Varies by model |
Pin Configuration and Descriptions
| Pin Number | Label | Description |
|---|---|---|
| 1 | Primary Input 1 | Connect to the live wire of the AC mains input. |
| 2 | Primary Input 2 | Connect to the neutral wire of the AC mains input. |
| 3 | Secondary Output 1 | Provides 12V AC output. |
| 4 | Secondary Output 2 | Provides 12V AC output (complementary to Pin 3). |
Note: Ensure proper insulation and safety precautions when handling the primary side of the transformer, as it is connected to high-voltage AC mains.
Usage Instructions
How to Use the Transformer in a Circuit
Connect the Primary Side:
- Identify the primary input pins (Pin 1 and Pin 2).
- Connect these pins to the AC mains input (110V or 220V, depending on the transformer model).
- Use a fuse and a switch in series with the primary side for safety.
Connect the Secondary Side:
- Identify the secondary output pins (Pin 3 and Pin 4).
- Connect these pins to the load or to a rectifier circuit if DC output is required.
- Ensure the load does not exceed the transformer's current rating.
Optional Rectification:
- If DC voltage is needed, use a bridge rectifier and a smoothing capacitor on the secondary side.
- For example, a 12V AC output can be rectified to approximately 16.8V DC (peak voltage).
Grounding:
- Ground the transformer casing (if applicable) to ensure safety and reduce electrical noise.
Important Considerations
- Voltage Compatibility: Ensure the input voltage matches the transformer's rated input voltage.
- Current Rating: Do not exceed the transformer's maximum current rating to avoid overheating or damage.
- Safety Precautions: Always handle the primary side with care, as it is connected to high-voltage AC mains.
- Heat Dissipation: Provide adequate ventilation or heat sinking if the transformer operates at high loads for extended periods.
Example: Using the Transformer with an Arduino UNO
To power an Arduino UNO using the Transformer 3 - 12v, you will need to convert the 12V AC output to 12V DC using a rectifier and voltage regulator. Below is an example circuit and Arduino code:
Circuit Steps:
- Connect the transformer's secondary output to a bridge rectifier.
- Add a smoothing capacitor (e.g., 1000µF, 25V) across the rectifier's DC output.
- Use a 12V voltage regulator (e.g., LM7812) to stabilize the DC voltage.
- Connect the regulated 12V DC output to the Arduino UNO's VIN pin.
Arduino Code Example:
// Example code to blink an LED using Arduino UNO powered by Transformer 3 - 12v
// Ensure the transformer output is rectified and regulated to 12V DC before use.

const int ledPin = 13; // Pin connected to the onboard LED

void setup() {
  pinMode(ledPin, OUTPUT); // Set the LED pin as an output
}

void loop() {
  digitalWrite(ledPin, HIGH); // Turn the LED on
  delay(1000);                // Wait for 1 second
  digitalWrite(ledPin, LOW);  // Turn the LED off
  delay(1000);                // Wait for 1 second
}
Warning: Ensure the rectified and regulated DC voltage does not exceed the Arduino UNO's input voltage range (7-12V recommended).
Troubleshooting and FAQs
Common Issues and Solutions
| Issue | Possible Cause | Solution |
|---|---|---|
| No output voltage on the secondary side | Incorrect wiring on the primary side | Verify the primary connections and input voltage. |
| Transformer overheating | Overloaded secondary side | Reduce the load to within the transformer's rating. |
| High noise or hum in the output | Poor grounding or loose connections | Ensure proper grounding and secure all connections. |
| Output voltage too low | Input voltage too low or high load on secondary | Check the input voltage and reduce the load. |
FAQs
Can I use this transformer for DC output?
- No, the transformer itself provides AC output. You will need a rectifier and a voltage regulator to convert the output to DC.
What happens if I exceed the current rating?
- Exceeding the current rating can cause the transformer to overheat, potentially leading to damage or failure.
Can I use this transformer with a 50Hz or 60Hz mains supply?
- Yes, the transformer is compatible with both 50Hz and 60Hz AC mains frequencies.
Is the transformer waterproof?
- No, the transformer is not waterproof. Use it in a dry environment or within a protective enclosure.
By following this documentation, you can safely and effectively use the Transformer 3 - 12v in your electronic projects.