Cirkit Designer Logo
Cirkit Designer
Your all-in-one circuit design IDE
Home / 
Component Documentation

How to Use Elegoo Passive Buzzer: Examples, Pinouts, and Specs

Image of Elegoo Passive Buzzer
Cirkit Designer LogoDesign with Elegoo Passive Buzzer in Cirkit Designer

Introduction

The Elegoo Passive Buzzer is an audio signaling device that can be used to generate sound waves in a variety of tones. Unlike active buzzers, which have an internal oscillator and generate a tone when powered, passive buzzers require an external signal to produce sound. This makes them more versatile, as they can be used to create different tones and melodies by controlling the frequency of the input signal. Common applications include alarm devices, timers, confirmation or alert sounds in user interfaces, and simple music or sound effects in DIY projects.

Explore Projects Built with Elegoo Passive Buzzer

Use Cirkit Designer to design, explore, and prototype these projects online. Some projects support real-time simulation. Click "Open Project" to start designing instantly!
Wi-Fi Controlled Buzzer with Wemos D1 Mini
Image of Buzzer Twinkle: A project utilizing Elegoo Passive Buzzer in a practical application
This circuit consists of a Wemos D1 Mini microcontroller connected to an active buzzer module. The Wemos D1 Mini provides power to the buzzer and controls it through its D1 pin, allowing for programmable sound output.
Cirkit Designer LogoOpen Project in Cirkit Designer
Arduino Nano Battery-Powered Buzzer and LED Control with Pushbutton
Image of Smart Water Bottle: A project utilizing Elegoo Passive Buzzer in a practical application
This circuit features an Arduino Nano microcontroller that controls a piezo buzzer and a green LED, powered by a 18650 Li-Ion battery through a rocker switch. A pushbutton connected to the Arduino allows user interaction, likely to trigger the buzzer and LED.
Cirkit Designer LogoOpen Project in Cirkit Designer
Raspberry Pi 4B LED and Buzzer Control Circuit
Image of CA Assignment 2: A project utilizing Elegoo Passive Buzzer in a practical application
This circuit uses a Raspberry Pi 4B to control an LED and a piezo buzzer. The LED is connected to GPIO17 through a 220-ohm resistor, and the piezo buzzer is connected to GPIO27. Both the LED and the buzzer share a common ground with the Raspberry Pi.
Cirkit Designer LogoOpen Project in Cirkit Designer
Arduino UNO-Based Smart Sensor System with Temperature and Ultrasonic Sensing
Image of ICE MELTING TIME: A project utilizing Elegoo Passive Buzzer in a practical application
This circuit uses an Arduino UNO to interface with two DS18B20 temperature sensors, an HC-SR04 ultrasonic sensor, and an Elegoo passive buzzer. The Arduino reads temperature data from the DS18B20 sensors and distance measurements from the ultrasonic sensor, and it can activate the buzzer based on the sensor inputs. The resistors are used as pull-up resistors for the DS18B20 sensors.
Cirkit Designer LogoOpen Project in Cirkit Designer

Explore Projects Built with Elegoo Passive Buzzer

Use Cirkit Designer to design, explore, and prototype these projects online. Some projects support real-time simulation. Click "Open Project" to start designing instantly!
Image of Buzzer Twinkle: A project utilizing Elegoo Passive Buzzer in a practical application
Wi-Fi Controlled Buzzer with Wemos D1 Mini
This circuit consists of a Wemos D1 Mini microcontroller connected to an active buzzer module. The Wemos D1 Mini provides power to the buzzer and controls it through its D1 pin, allowing for programmable sound output.
Cirkit Designer LogoOpen Project in Cirkit Designer
Image of Smart Water Bottle: A project utilizing Elegoo Passive Buzzer in a practical application
Arduino Nano Battery-Powered Buzzer and LED Control with Pushbutton
This circuit features an Arduino Nano microcontroller that controls a piezo buzzer and a green LED, powered by a 18650 Li-Ion battery through a rocker switch. A pushbutton connected to the Arduino allows user interaction, likely to trigger the buzzer and LED.
Cirkit Designer LogoOpen Project in Cirkit Designer
Image of CA Assignment 2: A project utilizing Elegoo Passive Buzzer in a practical application
Raspberry Pi 4B LED and Buzzer Control Circuit
This circuit uses a Raspberry Pi 4B to control an LED and a piezo buzzer. The LED is connected to GPIO17 through a 220-ohm resistor, and the piezo buzzer is connected to GPIO27. Both the LED and the buzzer share a common ground with the Raspberry Pi.
Cirkit Designer LogoOpen Project in Cirkit Designer
Image of ICE MELTING TIME: A project utilizing Elegoo Passive Buzzer in a practical application
Arduino UNO-Based Smart Sensor System with Temperature and Ultrasonic Sensing
This circuit uses an Arduino UNO to interface with two DS18B20 temperature sensors, an HC-SR04 ultrasonic sensor, and an Elegoo passive buzzer. The Arduino reads temperature data from the DS18B20 sensors and distance measurements from the ultrasonic sensor, and it can activate the buzzer based on the sensor inputs. The resistors are used as pull-up resistors for the DS18B20 sensors.
Cirkit Designer LogoOpen Project in Cirkit Designer

Technical Specifications

Key Technical Details

  • Rated Voltage: 5V
  • Operating Voltage: 1V to 6V
  • Rated Current: ≤30mA
  • Sound Output: ≥85dB
  • Resonant Frequency: 2.5kHz ± 300Hz
  • Operating Temperature: -20°C to 70°C

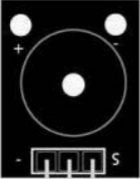
Pin Configuration and Descriptions

Pin Number Name Description
1 VCC Connect to the positive supply voltage (5V recommended)
2 GND Connect to the ground of the circuit

Usage Instructions

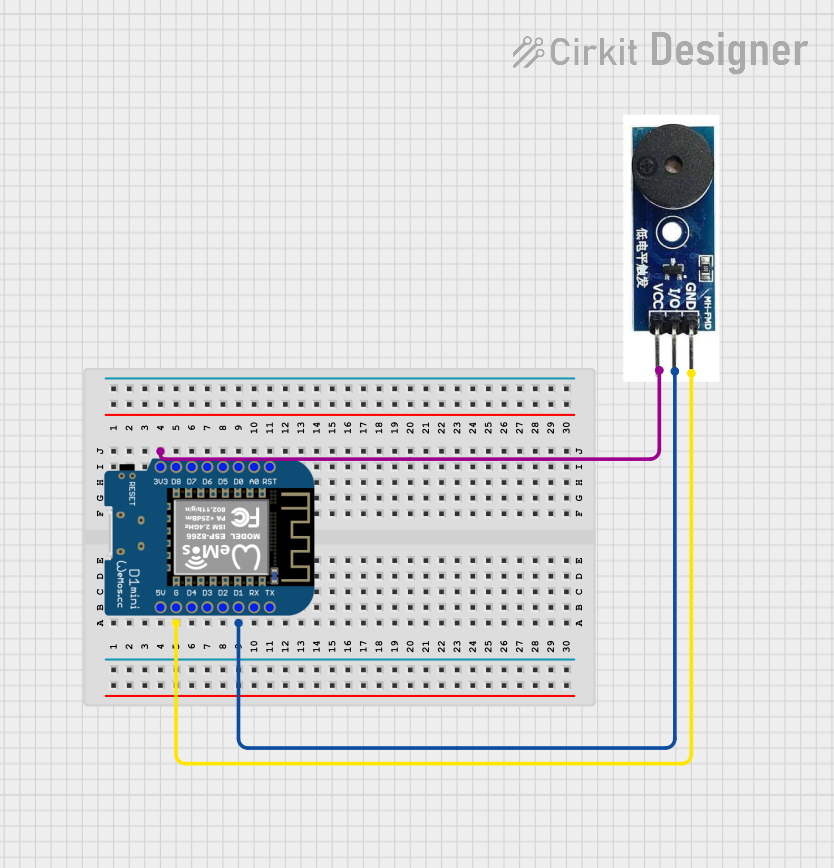
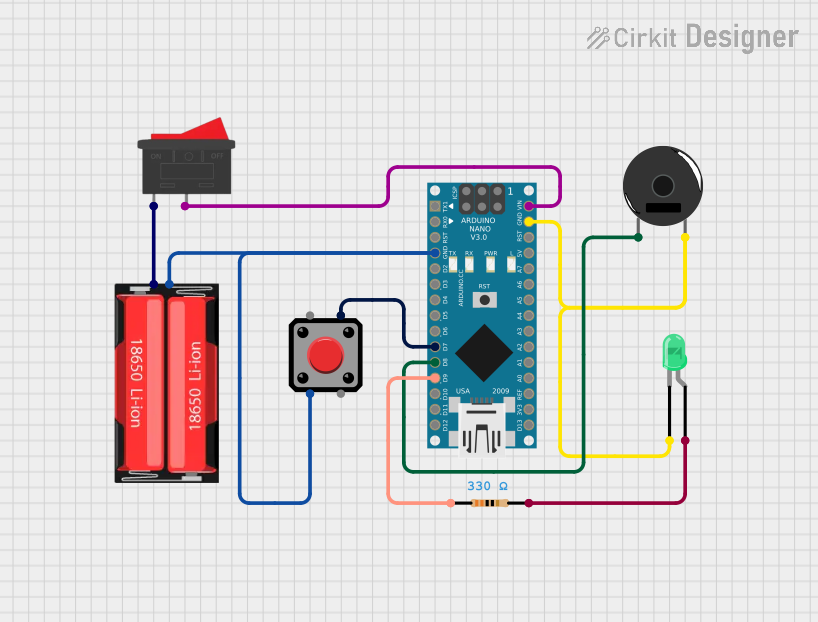
How to Use the Component in a Circuit

  1. Connect the VCC pin of the passive buzzer to a digital output pin on a microcontroller, such as an Arduino UNO.
  2. Connect the GND pin to the ground (GND) on the microcontroller.
  3. To generate sound, you need to create a square wave of the desired frequency on the digital output pin connected to the VCC of the buzzer.

Important Considerations and Best Practices

  • Do not exceed the operating voltage range to prevent damage to the buzzer.
  • Use pulse-width modulation (PWM) to control the frequency of the sound.
  • To produce different tones, change the frequency of the PWM signal.
  • Ensure that the buzzer is mounted securely to prevent vibrations from affecting the sound quality.

Example Code for Arduino UNO

// Define the buzzer pin
int buzzerPin = 9;

void setup() {
  // Set the buzzer pin as an output
  pinMode(buzzerPin, OUTPUT);
}

void loop() {
  // Play a tone on the buzzer for 1 second
  tone(buzzerPin, 1000); // 1000 Hz frequency
  delay(1000); // Delay for 1 second
  noTone(buzzerPin); // Stop the tone
  delay(1000); // Delay for 1 second
}

Note: The tone() function generates a square wave of the specified frequency (in Hz) on a pin. The noTone() function stops the generation of a square wave on a pin.

Troubleshooting and FAQs

Common Issues

  • No Sound: Ensure that the buzzer's pins are correctly connected and that the microcontroller's output pin is configured correctly.
  • Low Volume: Check if the voltage applied to the buzzer is within the recommended range. Low voltage can result in low volume.
  • Distorted Sound: Make sure that the buzzer is not physically obstructed or damaged.

Solutions and Tips for Troubleshooting

  • Verify the connections and ensure that the solder joints are solid and not causing intermittent connections.
  • Test the buzzer with a known good circuit to rule out issues with the microcontroller or the code.
  • Replace the buzzer if it is damaged or if you suspect it is not functioning correctly.

FAQs

Q: Can I use the passive buzzer with a 3.3V microcontroller? A: Yes, the passive buzzer can operate at voltages as low as 1V, but the sound output may be quieter at lower voltages.

Q: How do I change the tone produced by the buzzer? A: Change the frequency of the PWM signal sent to the buzzer. Higher frequencies will produce higher-pitched tones, while lower frequencies will produce lower-pitched tones.

Q: Can I play melodies with the passive buzzer? A: Yes, by varying the frequency of the input signal in a sequence that corresponds to the melody, you can play simple tunes with the passive buzzer.