Cirkit Designer Logo
Cirkit Designer
Your all-in-one circuit design IDE
Home / 
Component Documentation

How to Use Adafruit Touch Screen Breakout: Examples, Pinouts, and Specs

Image of Adafruit Touch Screen Breakout
Cirkit Designer LogoDesign with Adafruit Touch Screen Breakout in Cirkit Designer

Introduction

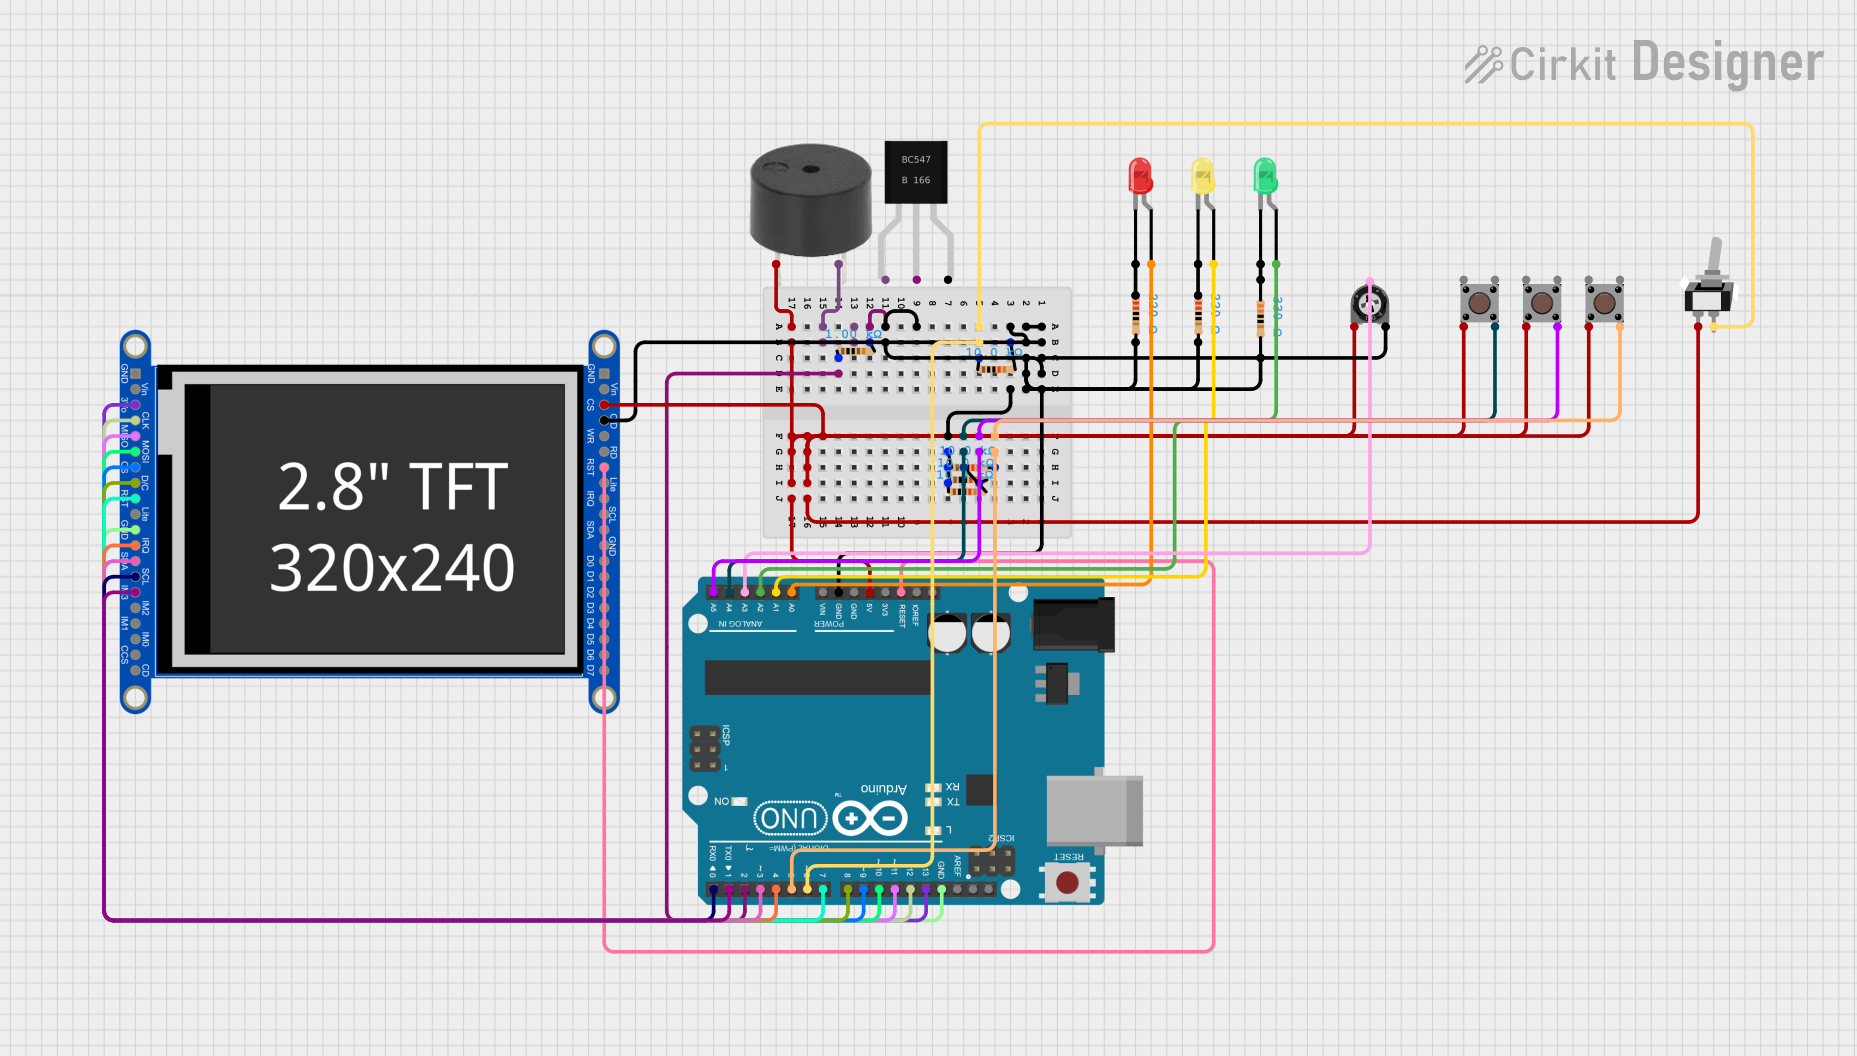
The Adafruit Touch Screen Breakout is a versatile and user-friendly capacitive touch screen module designed for hobbyists and professionals alike. It features a 2.8-inch TFT display with a 320x240 pixel resolution, providing a colorful and interactive interface for various applications. The module incorporates a resistive touch controller, ensuring precise and responsive touch detection. With I2C communication support, it can be easily integrated with a wide range of microcontrollers, including the popular Arduino UNO, making it ideal for projects such as DIY tablets, control panels, and interactive art installations.

Explore Projects Built with Adafruit Touch Screen Breakout

Use Cirkit Designer to design, explore, and prototype these projects online. Some projects support real-time simulation. Click "Open Project" to start designing instantly!
Arduino Mega 2560 Controlled TFT Touchscreen Interface
Image of Tablero Moto: A project utilizing Adafruit Touch Screen Breakout in a practical application
This circuit connects an Arduino Mega 2560 microcontroller to a 3.5-inch 480x320 TFT LCD display. The Arduino provides power, ground, and digital signals to control the display, including data lines for pixel information and control lines for reset, write, and command/data selection. The embedded code initializes the display and configures the Arduino's pins for communication, likely to create a user interface or visual output for a project.
Cirkit Designer LogoOpen Project in Cirkit Designer
Arduino Mega 2560 Controlled TFT Touchscreen Interface with 4-Channel Relay Automation
Image of Display relay: A project utilizing Adafruit Touch Screen Breakout in a practical application
This circuit features an Arduino Mega 2560 microcontroller connected to an ILI9488 HD TFT LCD screen and a 4-channel relay module, powered by a 5V battery. The Arduino controls the LCD to display interactive buttons and uses digital output pins to toggle the state of the relays based on touch input. The code provided facilitates a user interface on the LCD for controlling devices connected to the relays, making it suitable for home automation or similar applications.
Cirkit Designer LogoOpen Project in Cirkit Designer
Raspberry Pi 3B Powered 15.6-inch Touchscreen Display with USB Type-C Power Delivery
Image of Pi Touch Screen Kiosk: A project utilizing Adafruit Touch Screen Breakout in a practical application
This circuit powers a 15.6-inch capacitive touch display and a Raspberry Pi 3B using a USB Type C power delivery breakout and two buck converters. The Raspberry Pi connects to the display via HDMI and USB for touch functionality, while the power delivery breakout provides regulated power to both the display and the Raspberry Pi through the buck converters.
Cirkit Designer LogoOpen Project in Cirkit Designer
Arduino UNO Controlled Interface with TFT Display and Feedback Indicators
Image of Mission Control: A project utilizing Adafruit Touch Screen Breakout in a practical application
This circuit features an Arduino UNO microcontroller connected to a capacitive touch TFT display for user interface, three LEDs for visual feedback, a buzzer for audio alerts, and multiple pushbuttons for user input. It is designed to interact with users through the display and buttons, control visual and audio indicators, and can be customized via the provided code template.
Cirkit Designer LogoOpen Project in Cirkit Designer

Explore Projects Built with Adafruit Touch Screen Breakout

Use Cirkit Designer to design, explore, and prototype these projects online. Some projects support real-time simulation. Click "Open Project" to start designing instantly!
Image of Tablero Moto: A project utilizing Adafruit Touch Screen Breakout in a practical application
Arduino Mega 2560 Controlled TFT Touchscreen Interface
This circuit connects an Arduino Mega 2560 microcontroller to a 3.5-inch 480x320 TFT LCD display. The Arduino provides power, ground, and digital signals to control the display, including data lines for pixel information and control lines for reset, write, and command/data selection. The embedded code initializes the display and configures the Arduino's pins for communication, likely to create a user interface or visual output for a project.
Cirkit Designer LogoOpen Project in Cirkit Designer
Image of Display relay: A project utilizing Adafruit Touch Screen Breakout in a practical application
Arduino Mega 2560 Controlled TFT Touchscreen Interface with 4-Channel Relay Automation
This circuit features an Arduino Mega 2560 microcontroller connected to an ILI9488 HD TFT LCD screen and a 4-channel relay module, powered by a 5V battery. The Arduino controls the LCD to display interactive buttons and uses digital output pins to toggle the state of the relays based on touch input. The code provided facilitates a user interface on the LCD for controlling devices connected to the relays, making it suitable for home automation or similar applications.
Cirkit Designer LogoOpen Project in Cirkit Designer
Image of Pi Touch Screen Kiosk: A project utilizing Adafruit Touch Screen Breakout in a practical application
Raspberry Pi 3B Powered 15.6-inch Touchscreen Display with USB Type-C Power Delivery
This circuit powers a 15.6-inch capacitive touch display and a Raspberry Pi 3B using a USB Type C power delivery breakout and two buck converters. The Raspberry Pi connects to the display via HDMI and USB for touch functionality, while the power delivery breakout provides regulated power to both the display and the Raspberry Pi through the buck converters.
Cirkit Designer LogoOpen Project in Cirkit Designer
Image of Mission Control: A project utilizing Adafruit Touch Screen Breakout in a practical application
Arduino UNO Controlled Interface with TFT Display and Feedback Indicators
This circuit features an Arduino UNO microcontroller connected to a capacitive touch TFT display for user interface, three LEDs for visual feedback, a buzzer for audio alerts, and multiple pushbuttons for user input. It is designed to interact with users through the display and buttons, control visual and audio indicators, and can be customized via the provided code template.
Cirkit Designer LogoOpen Project in Cirkit Designer

Technical Specifications

Key Technical Details

  • Display Type: 2.8-inch TFT
  • Resolution: 320x240 pixels
  • Touch Controller: Resistive touch
  • Communication Interface: I2C
  • Operating Voltage: 3.3V - 5V

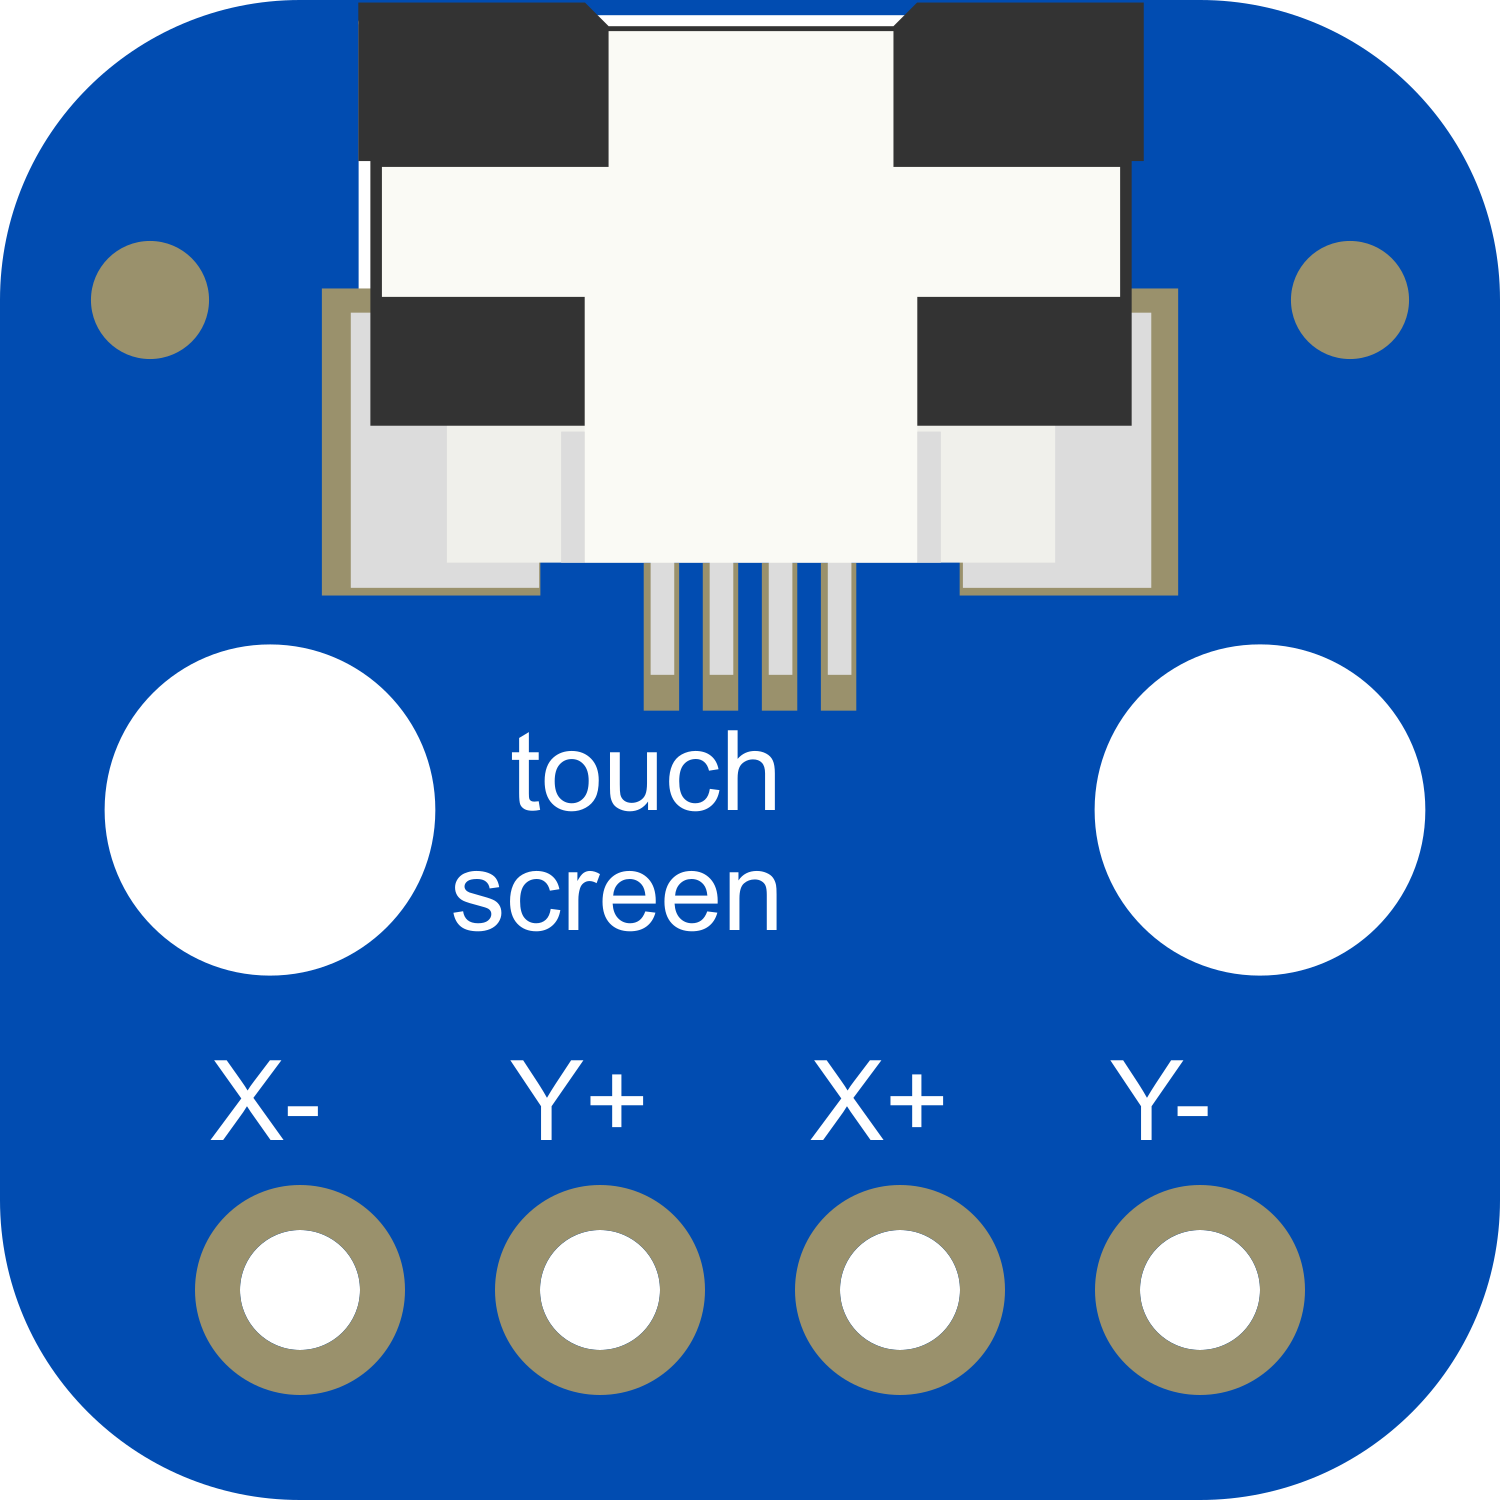
Pin Configuration and Descriptions

Pin Number Name Description
1 VCC Power supply (3.3V - 5V)
2 GND Ground connection
3 SCL I2C clock line
4 SDA I2C data line
5 IRQ Interrupt request, active low
6 RESET Reset line for the touch controller

Usage Instructions

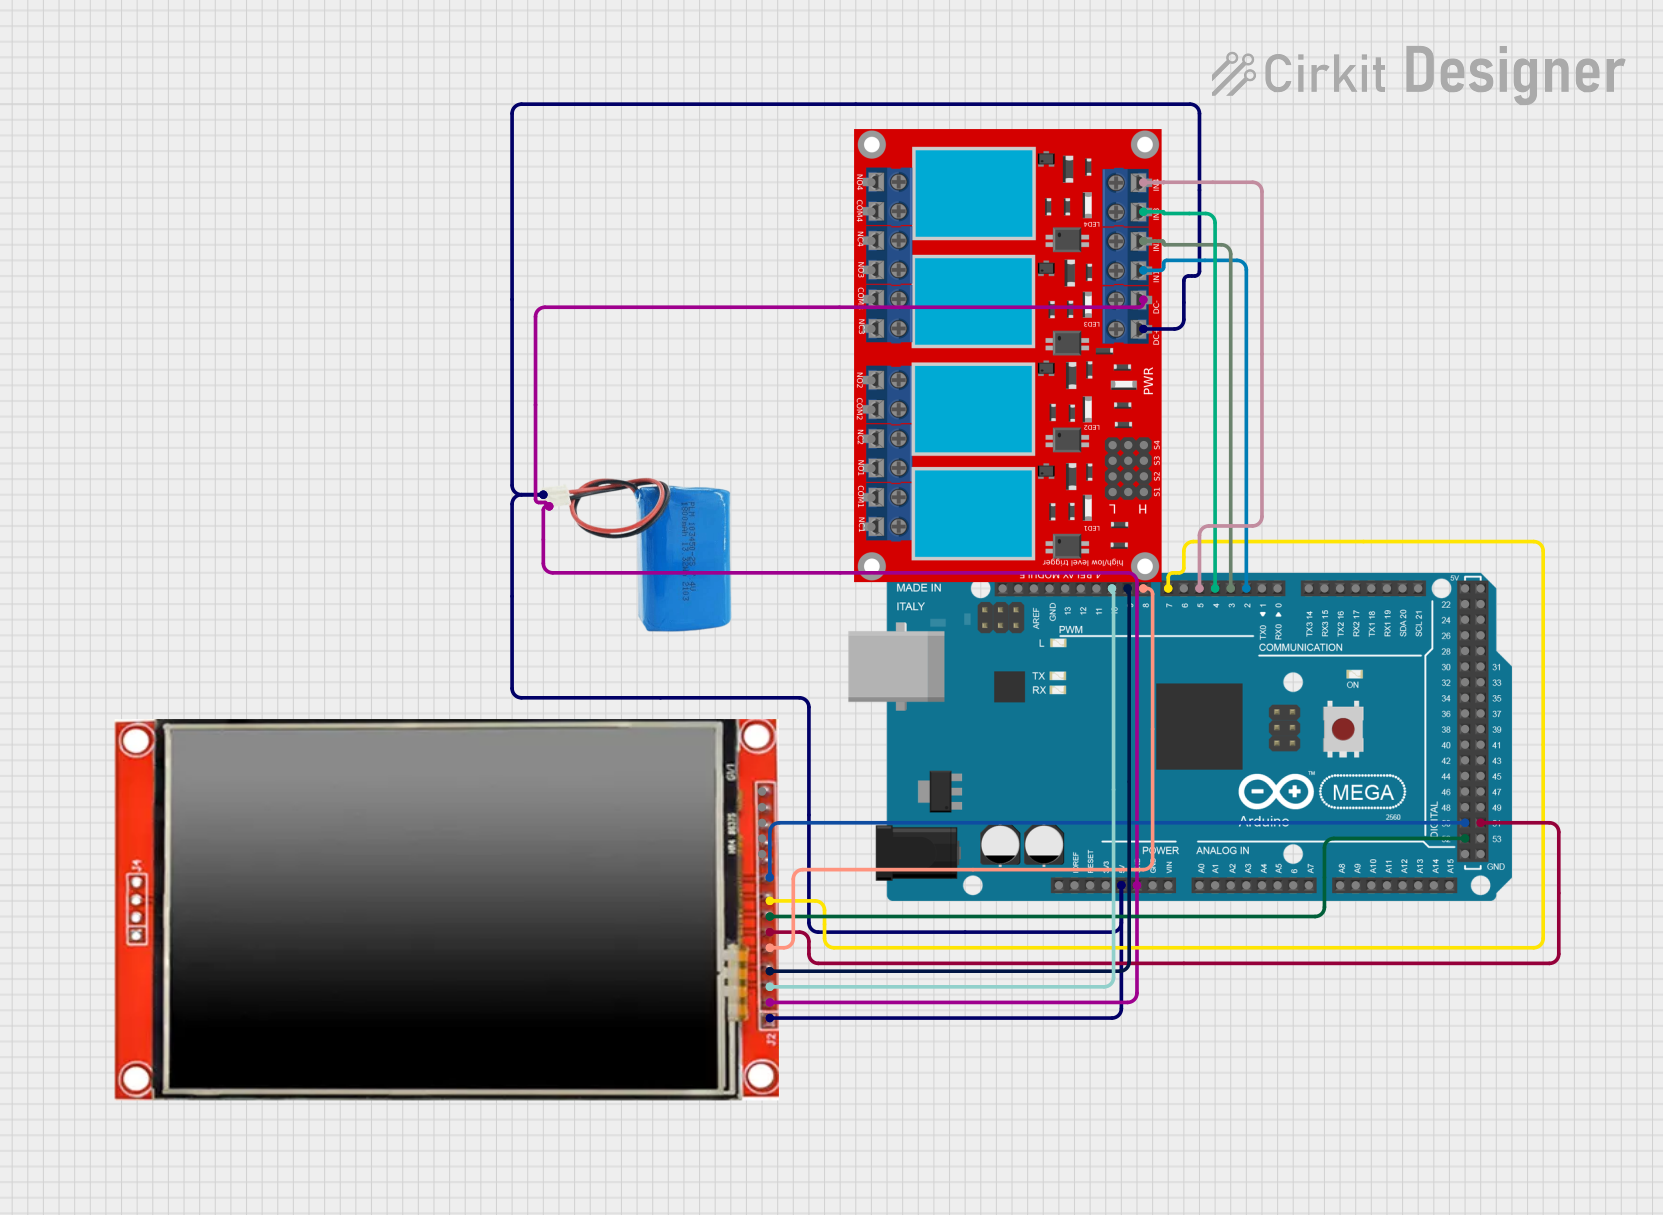
Integrating with a Circuit

  1. Power Connections: Connect the VCC pin to a 3.3V or 5V power supply, and the GND pin to the ground.
  2. I2C Communication: Connect the SCL and SDA pins to the corresponding I2C clock and data lines on your microcontroller.
  3. Interrupt Request: The IRQ pin can be connected to an interrupt-capable GPIO pin on your microcontroller to detect touch events.
  4. Reset Line: The RESET pin can be connected to a GPIO pin to allow software reset of the touch controller.

Important Considerations and Best Practices

  • Ensure that the power supply voltage matches the operating voltage of the touch screen to prevent damage.
  • Use pull-up resistors on the I2C lines if they are not already present on the microcontroller board.
  • Calibrate the touch screen for accurate touch detection.
  • Avoid applying excessive force to the touch screen to prevent damage.

Example Code for Arduino UNO

#include <Wire.h> // Include the I2C library

// Define the I2C address for the touch screen (check datasheet)
#define TOUCH_SCREEN_I2C_ADDRESS 0x38

void setup() {
  Wire.begin(); // Initialize I2C communication
  Serial.begin(9600); // Start serial communication for debugging
  // Initialize the touch screen here (if necessary)
}

void loop() {
  // Code to read touch events and process them
  // This is a placeholder for actual touch screen library code
  // Check for touch event and read data
  // Process touch data and perform actions
}

Troubleshooting and FAQs

Common Issues

  • Touch Not Responsive: Ensure the touch screen is properly calibrated and that the IRQ pin is correctly connected and configured.
  • Inaccurate Touch Detection: Recalibrate the touch screen and verify that the screen is clean and free of debris.
  • No Display Output: Check the power supply connections and ensure that the display is correctly initialized in your code.

Solutions and Tips for Troubleshooting

  • Calibration: Use a touch screen calibration sketch to improve accuracy.
  • Connection Check: Verify all connections, especially the I2C lines, for solid solder joints and correct wiring.
  • Code Debugging: Use serial output to debug and verify that touch events are being detected and processed correctly.

FAQs

Q: Can I use the touch screen with a 5V microcontroller like the Arduino UNO? A: Yes, the touch screen can operate at 3.3V - 5V, making it compatible with both 3.3V and 5V microcontrollers.

Q: How do I calibrate the touch screen? A: Calibration typically involves running a calibration sketch that will prompt you to touch different points on the screen to determine the touch boundaries.

Q: What should I do if the touch screen stops responding? A: Check the connections, especially the IRQ and RESET lines. If the issue persists, try resetting the touch controller or reinitializing the touch screen in your code.