How to Use 12V Air Compressor: Examples, Pinouts, and Specs

Introduction
The 12V Air Compressor is a portable device designed to compress air using a 12-volt power supply. It is widely used for inflating car tires, bicycle tires, sports equipment, air mattresses, and other inflatable items. Its compact size and compatibility with standard 12V power sources, such as car cigarette lighter sockets, make it a convenient tool for on-the-go applications.
Explore Projects Built with 12V Air Compressor

Explore Projects Built with 12V Air Compressor
Common Applications and Use Cases
- Inflating vehicle tires (cars, motorcycles, bicycles)
- Pumping air into sports equipment (e.g., basketballs, soccer balls)
- Inflating air mattresses, pool floats, and camping gear
- Emergency roadside tire inflation
- General-purpose air compression for small tasks
Technical Specifications
Key Technical Details
| Parameter | Specification |
|---|---|
| Operating Voltage | 12V DC |
| Maximum Current | 10A (varies by model) |
| Maximum Pressure | 100-150 PSI (varies by model) |
| Air Flow Rate | 25-35 L/min (varies by model) |
| Power Connector | 12V car cigarette lighter plug |
| Hose Length | 1-2 meters (varies by model) |
| Noise Level | 60-80 dB |
| Weight | 1-2 kg (varies by model) |
| Dimensions | Compact, typically 20x15x10 cm |
Pin Configuration and Descriptions
The 12V Air Compressor does not have traditional pins like electronic ICs. Instead, it has the following key connectors and components:
| Component/Connector | Description |
|---|---|
| 12V Power Plug | Connects to a car's cigarette lighter socket to draw power. |
| Air Hose | Delivers compressed air to the target object. |
| Pressure Gauge | Displays the current air pressure in PSI or bar. |
| On/Off Switch | Controls the power to the compressor. |
| Air Nozzle Attachments | Various adapters for inflating different items (e.g., tires, balls). |
Usage Instructions
How to Use the 12V Air Compressor in a Circuit
The 12V Air Compressor is a standalone device and does not require integration into a circuit. It operates by connecting directly to a 12V DC power source, such as a car's cigarette lighter socket. Follow these steps to use the compressor:
Prepare the Compressor:
- Ensure the compressor is in good condition and free of visible damage.
- Attach the appropriate nozzle adapter to the air hose, if required.
Connect to Power:
- Plug the 12V power connector into the car's cigarette lighter socket or a compatible 12V DC power source.
Attach the Air Hose:
- Securely connect the air hose to the valve of the item you want to inflate (e.g., tire valve).
Turn On the Compressor:
- Flip the On/Off switch to the "On" position. The compressor will start running and compressing air.
Monitor Pressure:
- Use the built-in pressure gauge to monitor the air pressure. Stop the compressor once the desired pressure is reached.
Turn Off and Disconnect:
- Turn off the compressor using the On/Off switch.
- Disconnect the air hose and power plug.
Important Considerations and Best Practices
- Power Source: Ensure the power source can supply sufficient current (typically up to 10A).
- Duty Cycle: Most 12V air compressors have a limited duty cycle (e.g., 10 minutes of operation followed by a 10-minute cooldown). Exceeding this can cause overheating.
- Pressure Limit: Do not exceed the maximum pressure rating of the compressor or the item being inflated.
- Secure Connections: Ensure all connections (power, air hose, nozzle) are secure to prevent leaks or damage.
- Storage: Store the compressor in a dry, cool place to prevent damage from moisture or extreme temperatures.
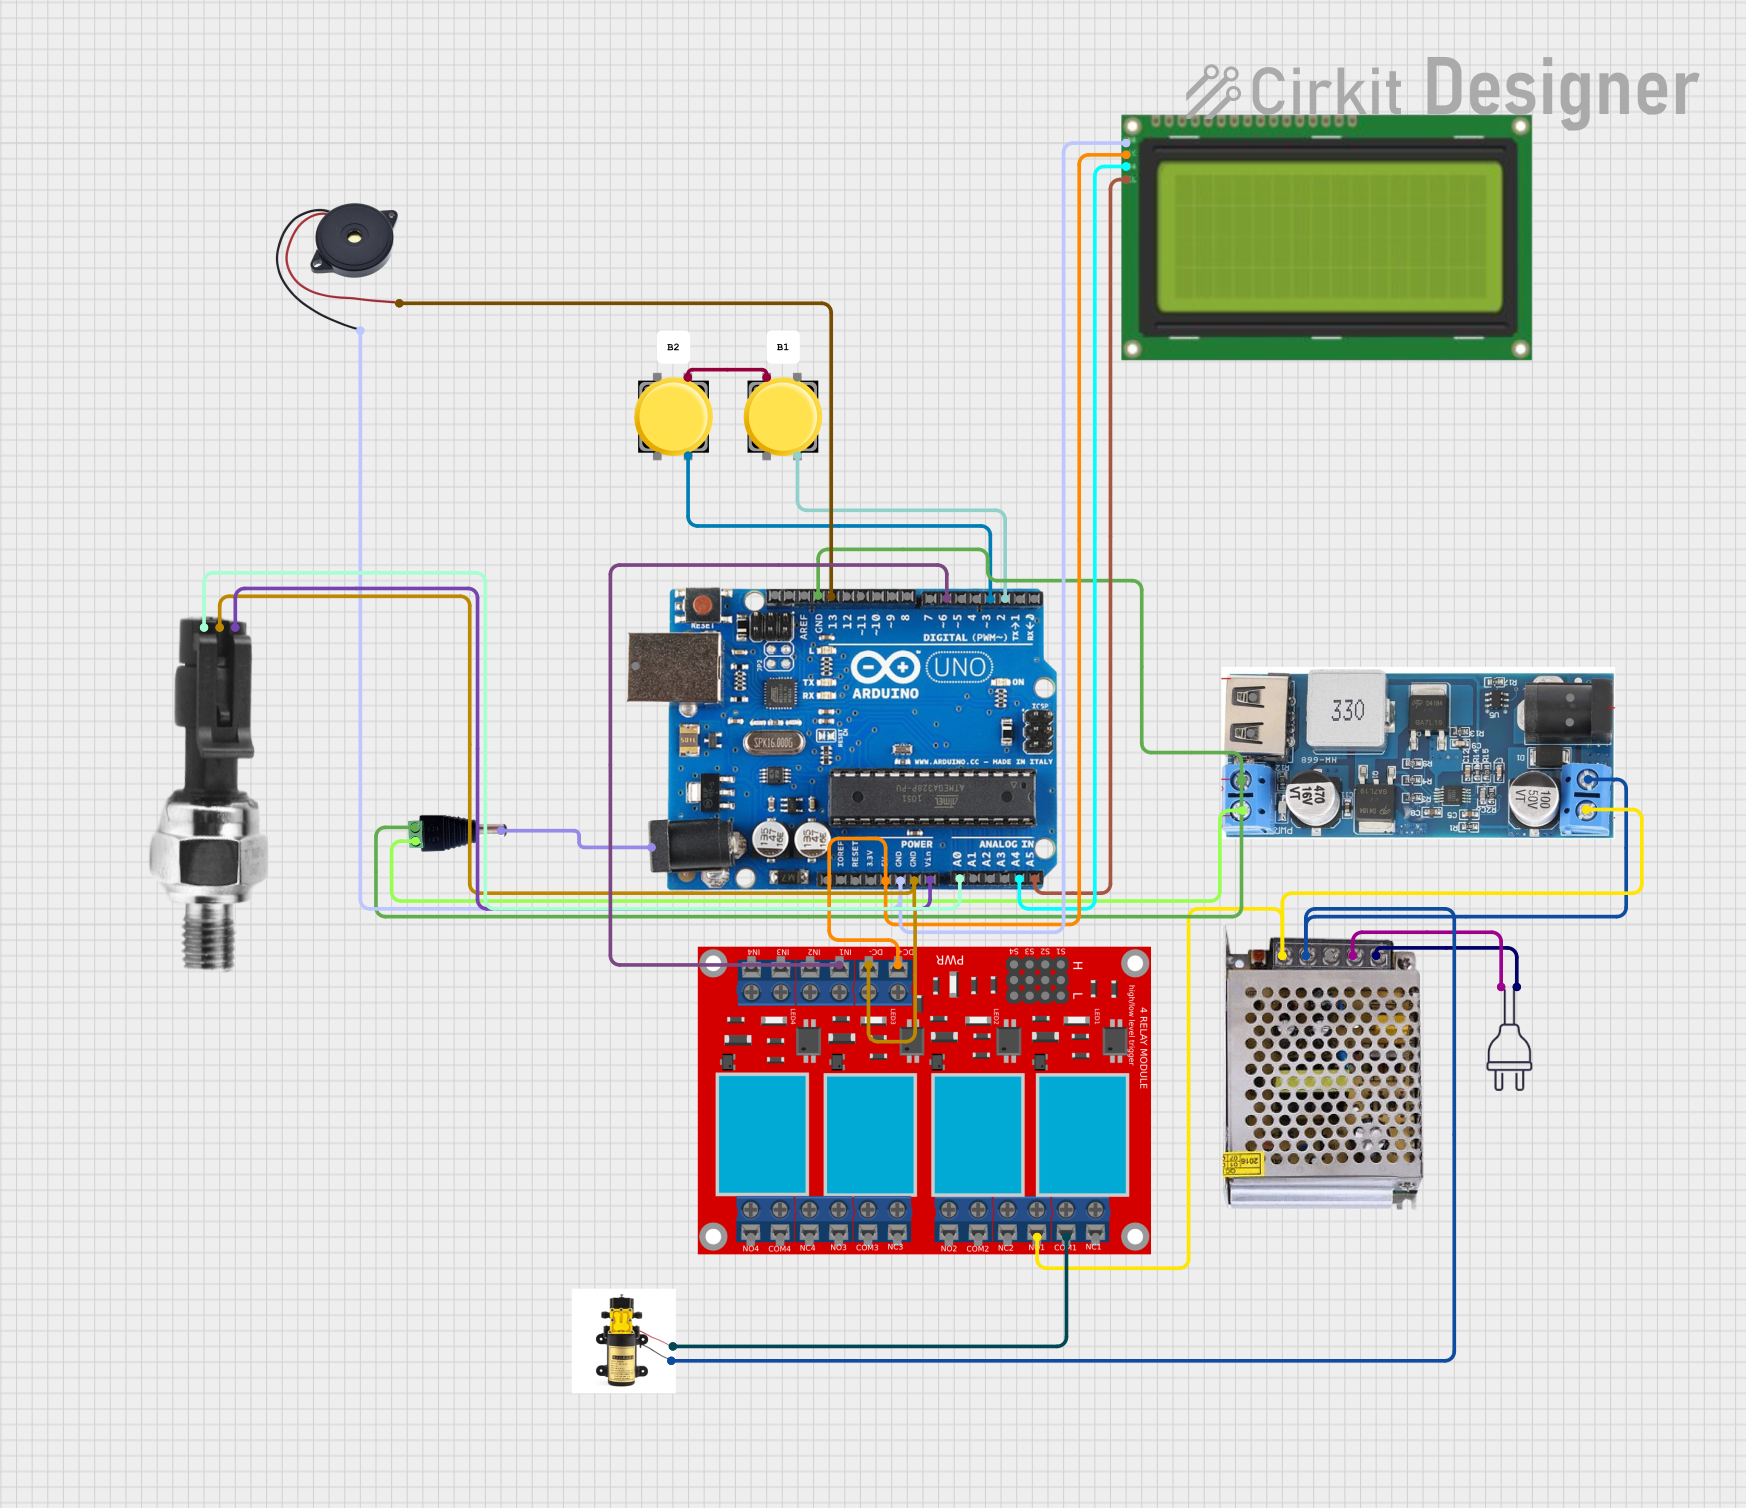
Arduino Integration
While the 12V Air Compressor is not typically controlled by an Arduino, it is possible to automate its operation using a relay module. Below is an example of how to control the compressor using an Arduino UNO and a relay:
/*
  Example: Controlling a 12V Air Compressor with Arduino and a Relay Module
  This code turns the compressor on for 10 seconds, then off for 10 seconds in a loop.
  Ensure the relay module is rated for the compressor's current (10A or higher).
*/

const int relayPin = 7; // Pin connected to the relay module

void setup() {
  pinMode(relayPin, OUTPUT); // Set the relay pin as an output
  digitalWrite(relayPin, LOW); // Ensure the relay is off at startup
}

void loop() {
  digitalWrite(relayPin, HIGH); // Turn on the compressor
  delay(10000); // Run for 10 seconds
  digitalWrite(relayPin, LOW); // Turn off the compressor
  delay(10000); // Wait for 10 seconds
}
Note: Use a relay module capable of handling the compressor's current. Connect the relay's output terminals in series with the compressor's power line.
Troubleshooting and FAQs
Common Issues and Solutions
| Issue | Possible Cause | Solution |
|---|---|---|
| Compressor does not turn on | No power from the 12V source | Check the power source and ensure the plug is securely connected. |
| Low or no air pressure | Air hose or nozzle is not secure | Ensure all connections are tight and free of leaks. |
| Overheating | Exceeded duty cycle | Allow the compressor to cool down before resuming operation. |
| Pressure gauge not working | Faulty or damaged gauge | Inspect the gauge and replace it if necessary. |
| Loud noise or vibration | Loose components or internal damage | Tighten any loose parts or consult the manufacturer for repairs. |
FAQs
Can I use the compressor with a 12V battery directly?
- Yes, as long as the battery can supply sufficient current (10A or more).
What happens if I exceed the duty cycle?
- The compressor may overheat, leading to reduced performance or permanent damage. Always follow the recommended duty cycle.
Can I use the compressor indoors?
- Yes, but ensure proper ventilation and use a compatible 12V DC power source.
How do I know when to stop inflating?
- Monitor the pressure gauge and stop the compressor once the desired pressure is reached.
Can I repair the compressor myself?
- Minor issues like loose connections can be fixed, but for major repairs, consult the manufacturer or a professional technician.