How to Use SparkFun TeensyView: Examples, Pinouts, and Specs
Introduction
The SparkFun TeensyView is a compact OLED display module that provides a high-contrast, readable display for embedded electronics projects. With its 128x32 pixel resolution, it is capable of displaying text, graphics, and animations. The display uses an I2C interface for communication, which simplifies the wiring and integration with microcontrollers like the Teensy and Arduino platforms. Common applications include user interfaces, data monitoring displays, and any project requiring a small yet clear visual output.
Explore Projects Built with SparkFun TeensyView


Explore Projects Built with SparkFun TeensyView
Technical Specifications
Key Technical Details
- Display Type: OLED (Organic Light Emitting Diode)
- Resolution: 128x32 pixels
- Color: Monochrome (White)
- Interface: I2C (Inter-Integrated Circuit)
- Operating Voltage: 3.3V to 5V
- I2C Address: 0x3C (default)
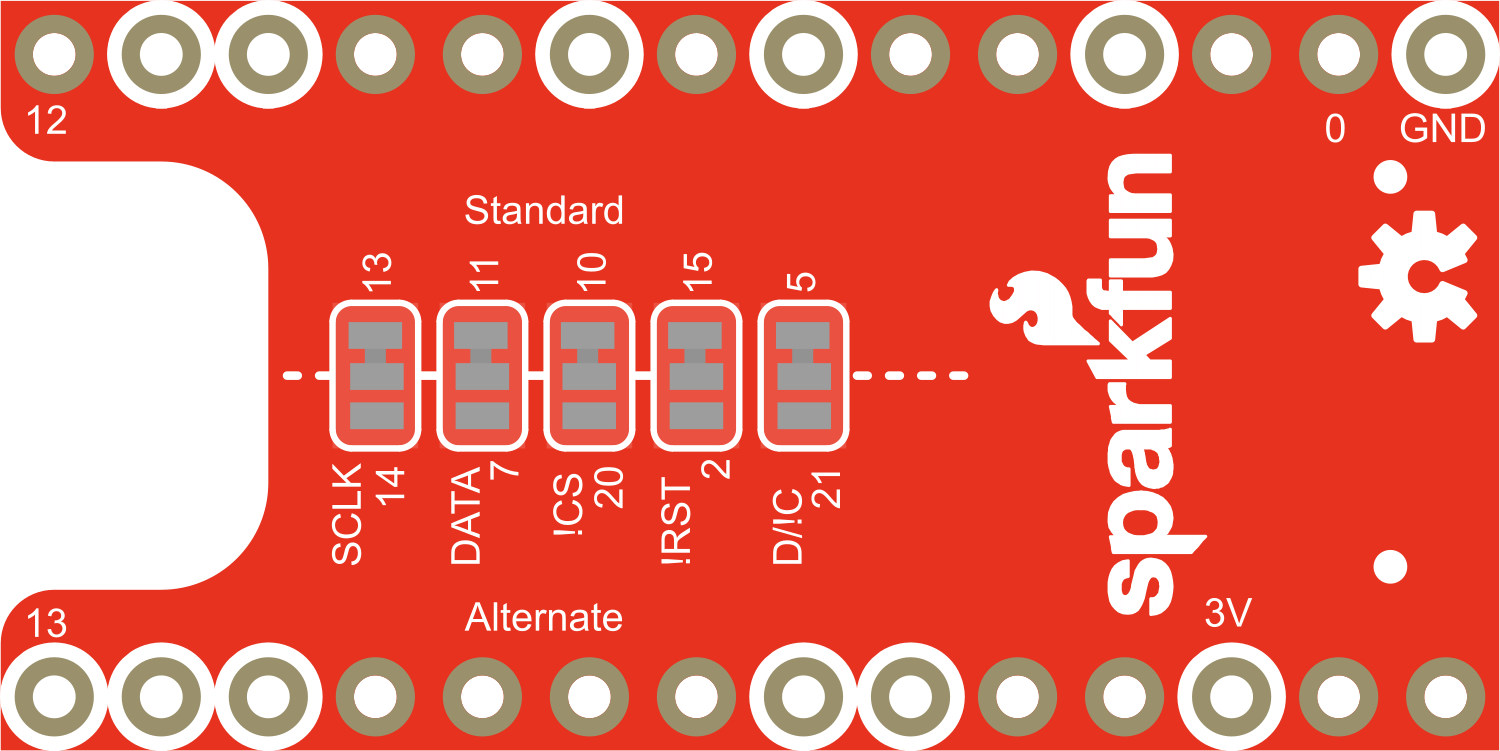
Pin Configuration and Descriptions
| Pin Number | Name | Description |
|---|---|---|
| 1 | GND | Ground connection |
| 2 | VCC | Power supply (3.3V to 5V) |
| 3 | SDA | I2C Data Line |
| 4 | SCL | I2C Clock Line |
| 5 | RST | Reset pin (optional use) |
| 6 | D/C | Data/Command control pin (optional use) |
Usage Instructions
Integrating with a Circuit
- Power Connections: Connect the VCC pin to the power supply (3.3V or 5V) and the GND pin to the ground of your microcontroller.
- I2C Connections: Connect the SDA and SCL pins to the corresponding I2C data and clock lines on your microcontroller.
- Optional Pins: The RST (reset) and D/C (data/command) pins are optional for basic operation but can be used for additional control.
Important Considerations and Best Practices
- Logic Levels: Ensure that the logic levels for I2C communication match the microcontroller's operating voltage to prevent damage.
- Pull-up Resistors: The I2C lines typically require pull-up resistors. Some microcontroller boards have these built-in, but if not, 4.7kΩ resistors are commonly used.
- Library Support: Use the appropriate libraries for interfacing with the display. For Arduino, the
U8g2library is recommended. - Power Supply: Ensure that the power supply is stable and within the specified voltage range to avoid any display issues.
Example Code for Arduino UNO
#include <Wire.h>
#include <U8g2lib.h>

// Initialize the OLED display using the U8g2 library
U8G2_SSD1306_128X32_UNIVISION_F_HW_I2C u8g2(U8G2_R0, /* reset=*/ U8X8_PIN_NONE);

void setup() {
  // Begin communication with the display
  u8g2.begin();
}

void loop() {
  // Clear the buffer
  u8g2.clearBuffer();

  // Set the font and draw a string at position (0,22)
  u8g2.setFont(u8g2_font_ncenB08_tr);
  u8g2.drawStr(0,22,"Hello, TeensyView!");

  // Send the buffer to the display
  u8g2.sendBuffer();

  // Add a small delay
  delay(1000);
}
Troubleshooting and FAQs
Common Issues
- Display Not Powering On: Check the power connections and ensure the voltage is within the specified range.
- Garbled or No Display: Verify that the I2C connections are correct and secure. Also, check for proper logic level matching.
- Display Not Responding to Commands: Ensure that the correct I2C address is being used in the code. The default address is 0x3C.
Solutions and Tips for Troubleshooting
- Check Wiring: Double-check all connections, especially the I2C lines and power supply.
- Use Example Code: Start with example code to ensure the display is functioning before integrating it into your project.
- I2C Scanner: Use an I2C scanner sketch to confirm the display's address and that it is communicating on the bus.
- Library Configuration: Make sure the display library is correctly configured for the TeensyView.
FAQs
Q: Can I use the TeensyView with a 5V microcontroller? A: Yes, the TeensyView can be used with both 3.3V and 5V systems. Ensure that the I2C logic levels are compatible.
Q: How do I update the display content? A: Use the display library's functions to clear the buffer, draw new content, and then send the buffer to the display.
Q: What should I do if the display is very dim? A: Check the power supply voltage and the contrast settings in your display library. Adjusting the contrast can improve display brightness.
Q: Can I use multiple TeensyViews on the same I2C bus? A: The TeensyView has a fixed I2C address, so you cannot use multiple displays with the same address on the same bus without additional hardware or software to change the address.