Cirkit Designer Logo
Cirkit Designer
Your all-in-one circuit design IDE
Home / 
Component Documentation

How to Use Adafruit Rotary Trinkey: Examples, Pinouts, and Specs

Image of Adafruit Rotary Trinkey
Cirkit Designer LogoDesign with Adafruit Rotary Trinkey in Cirkit Designer

Introduction

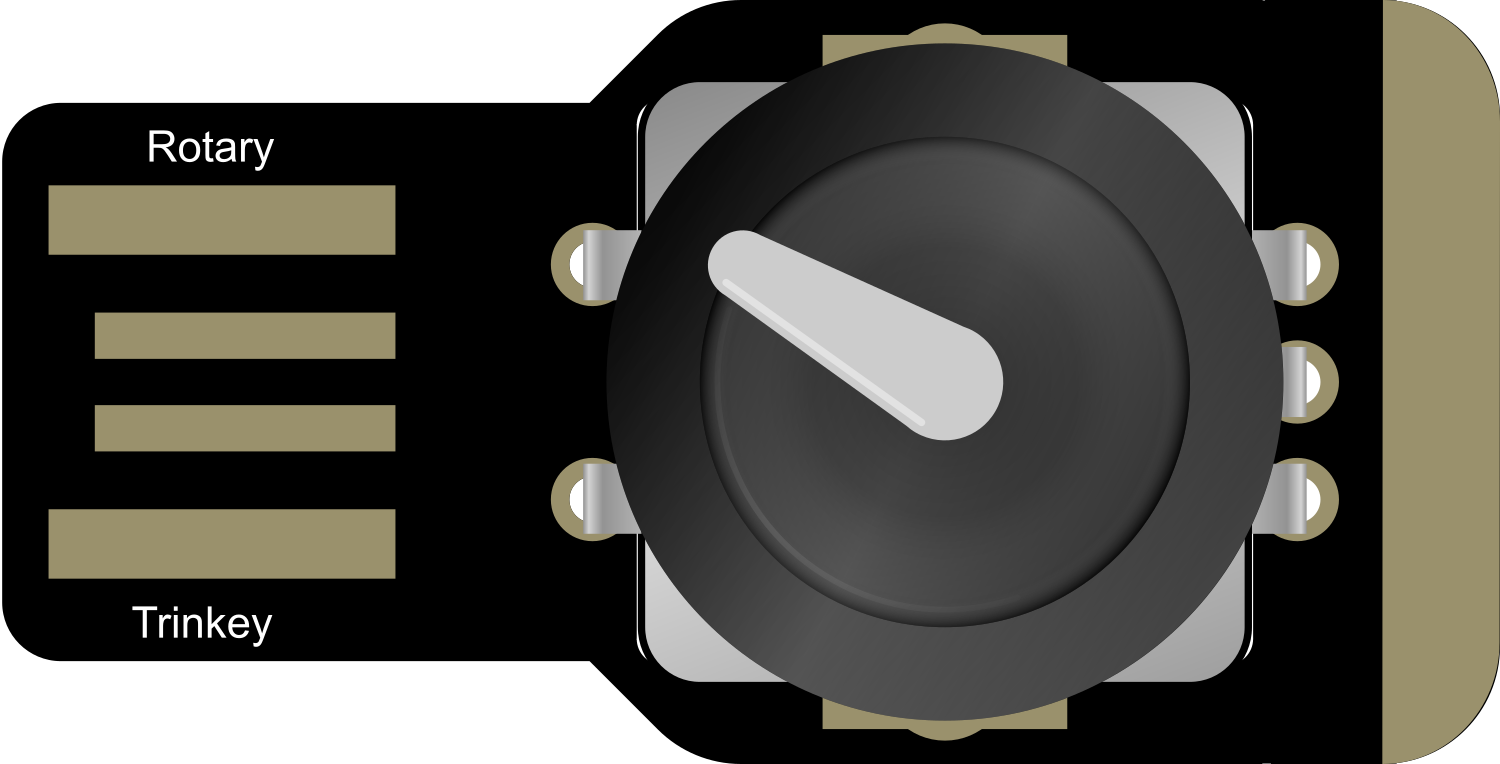
The Adafruit Rotary Trinkey is a compact and versatile microcontroller board designed for user input and feedback in various electronic projects. It integrates a rotary encoder, an RGB NeoPixel, and a USB-C connector, making it an ideal choice for adding a controllable interface to your projects. The board is based on the Adafruit Trinkey platform and supports programming with CircuitPython or Arduino, offering flexibility for both beginners and experienced developers.

Explore Projects Built with Adafruit Rotary Trinkey

Use Cirkit Designer to design, explore, and prototype these projects online. Some projects support real-time simulation. Click "Open Project" to start designing instantly!
Arduino Leonardo-Based Gaming Steering Wheel with Pedals and Gear Shifter
Image of DIY Steering Wheel: A project utilizing Adafruit Rotary Trinkey in a practical application
This circuit is a gaming steering wheel system with 3 pedals and a gear shifter, interfaced with an Arduino Leonardo. It includes a 600 PPR optical rotary encoder for steering, three potentiometers for pedal input, and multiple push buttons connected via an IO expander for gear shifting and additional controls. The Arduino processes inputs from these components and communicates the data for further processing or display.
Cirkit Designer LogoOpen Project in Cirkit Designer
Arduino Nano Controlled Joystick and Rotary Encoder Interface with OLED Display and Multi-Color LED Feedback
Image of Blinking LED  with joystick: A project utilizing Adafruit Rotary Trinkey in a practical application
This circuit features an Arduino Nano interfaced with a joystick module, a rotary encoder, an OLED display, and multiple LEDs with current-limiting resistors. The joystick controls the selection of LED colors and toggles a blinking mode, while the rotary encoder adjusts the brightness of the LEDs and toggles their on/off state. The OLED display provides real-time feedback on the LED color, brightness level, and mode, enhancing user interaction.
Cirkit Designer LogoOpen Project in Cirkit Designer
Arduino Nano-Based Wireless Controller with Joystick and Potentiometers
Image of Schema RC ovládač: A project utilizing Adafruit Rotary Trinkey in a practical application
This circuit features an Arduino Nano microcontroller interfaced with various input devices including rotary potentiometers, push buttons, and joystick modules, as well as an NRF24L01 wireless module for communication. The circuit is powered by a 9V battery regulated by an AMS1117 voltage regulator. The setup is designed for user input collection and wireless data transmission.
Cirkit Designer LogoOpen Project in Cirkit Designer
Arduino Mega 2560-Controlled Servo System with Bluetooth and Sensor Interface
Image of Završni: A project utilizing Adafruit Rotary Trinkey in a practical application
This is a microcontroller-based control system featuring an Arduino Mega 2560, designed to receive inputs from a rotary potentiometer, push switches, and an IR sensor, and to drive multiple servos and an LCD display. It includes an HC-05 Bluetooth module for wireless communication, allowing for remote interfacing and control.
Cirkit Designer LogoOpen Project in Cirkit Designer

Explore Projects Built with Adafruit Rotary Trinkey

Use Cirkit Designer to design, explore, and prototype these projects online. Some projects support real-time simulation. Click "Open Project" to start designing instantly!
Image of DIY Steering Wheel: A project utilizing Adafruit Rotary Trinkey in a practical application
Arduino Leonardo-Based Gaming Steering Wheel with Pedals and Gear Shifter
This circuit is a gaming steering wheel system with 3 pedals and a gear shifter, interfaced with an Arduino Leonardo. It includes a 600 PPR optical rotary encoder for steering, three potentiometers for pedal input, and multiple push buttons connected via an IO expander for gear shifting and additional controls. The Arduino processes inputs from these components and communicates the data for further processing or display.
Cirkit Designer LogoOpen Project in Cirkit Designer
Image of Blinking LED  with joystick: A project utilizing Adafruit Rotary Trinkey in a practical application
Arduino Nano Controlled Joystick and Rotary Encoder Interface with OLED Display and Multi-Color LED Feedback
This circuit features an Arduino Nano interfaced with a joystick module, a rotary encoder, an OLED display, and multiple LEDs with current-limiting resistors. The joystick controls the selection of LED colors and toggles a blinking mode, while the rotary encoder adjusts the brightness of the LEDs and toggles their on/off state. The OLED display provides real-time feedback on the LED color, brightness level, and mode, enhancing user interaction.
Cirkit Designer LogoOpen Project in Cirkit Designer
Image of Schema RC ovládač: A project utilizing Adafruit Rotary Trinkey in a practical application
Arduino Nano-Based Wireless Controller with Joystick and Potentiometers
This circuit features an Arduino Nano microcontroller interfaced with various input devices including rotary potentiometers, push buttons, and joystick modules, as well as an NRF24L01 wireless module for communication. The circuit is powered by a 9V battery regulated by an AMS1117 voltage regulator. The setup is designed for user input collection and wireless data transmission.
Cirkit Designer LogoOpen Project in Cirkit Designer
Image of Završni: A project utilizing Adafruit Rotary Trinkey in a practical application
Arduino Mega 2560-Controlled Servo System with Bluetooth and Sensor Interface
This is a microcontroller-based control system featuring an Arduino Mega 2560, designed to receive inputs from a rotary potentiometer, push switches, and an IR sensor, and to drive multiple servos and an LCD display. It includes an HC-05 Bluetooth module for wireless communication, allowing for remote interfacing and control.
Cirkit Designer LogoOpen Project in Cirkit Designer

Common Applications and Use Cases

  • Volume control for audio devices
  • Menu selection in user interfaces
  • Scrolling through lists or settings
  • Lighting control with color and brightness adjustments
  • Prototyping user input devices

Technical Specifications

Key Technical Details

  • Microcontroller: ATSAMD21E18 32-bit Cortex M0+
  • Operating Voltage: 5V (USB-C powered)
  • I/O Voltage: 3.3V
  • Digital I/O Pins: 4
  • PWM Channels: 1
  • Analog Input Channels: 1
  • Flash Memory: 256KB
  • SRAM: 32KB
  • Clock Speed: 48 MHz
  • LED: 1 x RGB NeoPixel
  • Rotary Encoder: 24 pulses per revolution

Pin Configuration and Descriptions

Pin Number Description Notes
1 NeoPixel Data Control signal for RGB NeoPixel
2 Rotary Encoder A Encoder signal A
3 Rotary Encoder B Encoder signal B
4 Rotary Encoder Button Push button switch
5 Analog/Digital I/O Can be used as GPIO or ADC
USB-C Power and Data Connects to USB host

Usage Instructions

How to Use the Component in a Circuit

  1. Powering the Device:

    • Connect the Adafruit Rotary Trinkey to a USB-C power source. The device is powered through the USB-C connection.
  2. Interfacing with the Rotary Encoder:

    • The rotary encoder outputs two square wave signals, A and B, which are 90 degrees out of phase. By monitoring these signals, you can determine the direction and amount of rotation.
  3. Controlling the NeoPixel:

    • The onboard NeoPixel can be controlled via the NeoPixel Data pin. You can set the color and brightness using appropriate libraries in CircuitPython or Arduino.
  4. Programming the Device:

    • The Adafruit Rotary Trinkey can be programmed using CircuitPython or Arduino. For CircuitPython, simply drag and drop the .uf2 file onto the board when it appears as a USB drive. For Arduino, select the appropriate board and port in the Arduino IDE and upload your sketch.

Important Considerations and Best Practices

  • Ensure that the power source does not exceed 5V to prevent damage to the board.
  • When handling the board, take precautions to avoid electrostatic discharge (ESD) which can damage the microcontroller.
  • Use debounce algorithms for the rotary encoder button to prevent false triggering due to mechanical noise.
  • When using the NeoPixel, be mindful of the power consumption and limit the brightness if necessary to avoid drawing too much current from the USB port.

Example Code for Arduino UNO

#include <Adafruit_NeoPixel.h>

#define NEOPIXEL_PIN 1 // Replace with the correct pin number for NeoPixel
#define ENCODER_PIN_A 2 // Replace with the correct pin number for Encoder A
#define ENCODER_PIN_B 3 // Replace with the correct pin number for Encoder B
#define BUTTON_PIN 4 // Replace with the correct pin number for Button

Adafruit_NeoPixel pixel(1, NEOPIXEL_PIN, NEO_GRB + NEO_KHZ800);

void setup() {
  pinMode(ENCODER_PIN_A, INPUT_PULLUP);
  pinMode(ENCODER_PIN_B, INPUT_PULLUP);
  pinMode(BUTTON_PIN, INPUT_PULLUP);
  pixel.begin();
  pixel.show(); // Initialize all pixels to 'off'
}

void loop() {
  // Add your code here to read the rotary encoder and button
  // and control the NeoPixel.
}

Troubleshooting and FAQs

Common Issues Users Might Face

  • Rotary Encoder Not Responding:

    • Check the connections to the encoder pins.
    • Ensure the code is correctly reading the encoder signals.
  • NeoPixel Not Lighting Up:

    • Verify that the NeoPixel Data pin is correctly defined in your code.
    • Check if the pixel is receiving power from the USB-C connection.
  • Button Presses Not Detected:

    • Confirm that the button pin is set up correctly in the code.
    • Use a debounce algorithm to filter out noise.

Solutions and Tips for Troubleshooting

  • Double-check all connections and ensure they are secure and correctly oriented.
  • Use serial output to debug and monitor the state of the encoder, button, and NeoPixel.
  • Consult the Adafruit Rotary Trinkey guide and forums for additional support and resources.

FAQs

Q: Can I use the Adafruit Rotary Trinkey with a battery? A: Yes, but you will need to ensure the battery's output is regulated to 5V and connect it through the USB-C port.

Q: How do I change the color of the NeoPixel? A: You can change the color by sending RGB values to the NeoPixel using the appropriate library functions in your code.

Q: What should I do if the device is not recognized by my computer? A: Try using a different USB cable or port, and ensure that the Trinkey is not in bootloader mode unless you are uploading new firmware.