How to Use Haptic controller: Examples, Pinouts, and Specs

 Design with Haptic controller in Cirkit Designer
Introduction
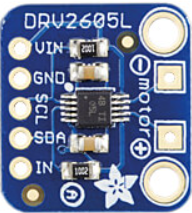
The Adafruit DRV2605L VCC Haptic Controller is a versatile device designed to provide tactile feedback through vibrations or motions. It enhances the interactive experience in applications such as gaming, virtual reality, mobile devices, and wearable technology. This component is capable of driving Linear Resonant Actuators (LRAs) and Eccentric Rotating Mass (ERM) motors, making it suitable for a wide range of haptic feedback applications.
The DRV2605L VCC features an integrated library of haptic effects, allowing developers to easily implement pre-programmed vibration patterns. Additionally, it supports I²C communication, making it compatible with microcontrollers like the Arduino UNO.
Explore Projects Built with Haptic controller

 Open Project in Cirkit Designer
 Open Project in Cirkit Designer
 Open Project in Cirkit Designer
 Open Project in Cirkit Designer
Explore Projects Built with Haptic controller

 Open Project in Cirkit Designer
 Open Project in Cirkit Designer
 Open Project in Cirkit Designer
 Open Project in Cirkit Designer
Technical Specifications
Below are the key technical details and pin configuration for the DRV2605L VCC:
Key Technical Details
| Parameter | Value |
|---|---|
| Operating Voltage | 2.0V to 5.2V |
| Interface | I²C |
| Output Type | Drives ERM and LRA actuators |
| Haptic Effects Library | Integrated (123 pre-programmed effects) |
| Current Consumption | 3.5mA (typical) |
| Standby Current | 5µA |
| Operating Temperature | -40°C to +85°C |
| Package Type | QFN-10 |
Pin Configuration and Descriptions
| Pin Name | Pin Number | Description |
|---|---|---|
| VDD | 1 | Power supply input (2.0V to 5.2V) |
| GND | 2 | Ground |
| SDA | 3 | I²C data line |
| SCL | 4 | I²C clock line |
| IN/TRIG | 5 | Trigger input for external control |
| OUT+ | 6 | Positive output to the actuator |
| OUT- | 7 | Negative output to the actuator |
| EN | 8 | Enable pin (active high) |
| NC | 9 | No connection |
| NC | 10 | No connection |
Usage Instructions
How to Use the Component in a Circuit
- Power Supply: Connect the VDD pin to a 3.3V or 5V power source and the GND pin to ground.
- I²C Communication: Connect the SDA and SCL pins to the corresponding I²C pins on your microcontroller (e.g., Arduino UNO).
- Actuator Connection: Connect the OUT+ and OUT- pins to the terminals of your ERM or LRA actuator.
- Enable Pin: Pull the EN pin high to enable the device.
- Trigger Input (Optional): Use the IN/TRIG pin for external triggering if required.
Important Considerations and Best Practices
- Power Supply: Ensure the power supply voltage is within the specified range (2.0V to 5.2V).
- I²C Address: The default I²C address of the DRV2605L is
0x5A. Ensure no other devices on the I²C bus share this address. - Actuator Compatibility: Verify that the connected actuator is either an ERM or LRA and is within the output specifications of the DRV2605L.
- Bypass Capacitor: Place a 0.1µF ceramic capacitor close to the VDD pin to stabilize the power supply.
Example Code for Arduino UNO
Below is an example of how to use the DRV2605L with an Arduino UNO to play a haptic effect:
#include <Wire.h>
#include <Adafruit_DRV2605.h>

// Create an instance of the DRV2605L library
Adafruit_DRV2605 drv;

void setup() {
  Serial.begin(9600);
  Serial.println("Initializing DRV2605L...");

  // Initialize the DRV2605L
  if (!drv.begin()) {
    Serial.println("Failed to find DRV2605L. Check connections.");
    while (1);
  }
  Serial.println("DRV2605L initialized!");

  // Select the ERM (Eccentric Rotating Mass) motor mode
  drv.selectLibrary(1);

  // Set the haptic effect to play (e.g., effect #1)
  drv.setMode(DRV2605_MODE_INTTRIG); // Internal trigger mode
  drv.setWaveform(0, 1);             // Play effect #1
  drv.setWaveform(1, 0);             // End of sequence
}

void loop() {
  Serial.println("Playing haptic effect...");
  drv.go(); // Start the haptic effect
  delay(1000); // Wait for 1 second
}
Notes on the Code
- The
Adafruit_DRV2605library must be installed in the Arduino IDE. You can install it via the Library Manager. - The
selectLibrary(1)function sets the DRV2605L to use the ERM motor library. If using an LRA, useselectLibrary(6)instead.
Troubleshooting and FAQs
Common Issues and Solutions
Device Not Detected on I²C Bus:
- Ensure the SDA and SCL pins are correctly connected to the microcontroller.
- Verify the I²C address (
0x5A) does not conflict with other devices on the bus. - Check for loose or faulty connections.
No Vibration Output:
- Confirm the actuator is properly connected to the OUT+ and OUT- pins.
- Ensure the EN pin is pulled high to enable the device.
- Verify the selected haptic effect is valid and supported.
Erratic Behavior:
- Check the power supply for stability and ensure it meets the voltage requirements.
- Add a bypass capacitor (0.1µF) near the VDD pin to filter noise.
FAQs
Q: Can the DRV2605L drive both ERM and LRA actuators?
A: Yes, the DRV2605L supports both ERM and LRA actuators. Use the appropriate library setting (selectLibrary(1) for ERM and selectLibrary(6) for LRA).
Q: What is the maximum current output of the DRV2605L?
A: The DRV2605L can drive actuators with a maximum current of 250mA.
Q: Can I use the DRV2605L with a 3.3V microcontroller?
A: Yes, the DRV2605L operates within a voltage range of 2.0V to 5.2V, making it compatible with both 3.3V and 5V systems.
Q: How many haptic effects are pre-programmed in the DRV2605L?
A: The DRV2605L includes 123 pre-programmed haptic effects in its internal library.
By following this documentation, you can effectively integrate the Adafruit DRV2605L VCC Haptic Controller into your projects and create engaging tactile feedback experiences.