How to Use ECX FLAT: Examples, Pinouts, and Specs
Introduction
The ECX FLAT is a type of flat connector designed for use in electronic circuits. It is commonly employed to connect wires or components in a compact and efficient manner, making it ideal for applications where space is limited. Its flat design ensures a secure and reliable connection while minimizing bulk, making it a popular choice in modern electronic devices.
Explore Projects Built with ECX FLAT


Explore Projects Built with ECX FLAT
Common Applications and Use Cases
- Consumer electronics, such as smartphones and tablets
- Compact circuit boards in IoT devices
- Automotive electronics for space-constrained wiring
- Robotics and automation systems
- Prototyping and testing environments
Technical Specifications
Key Technical Details
| Parameter | Value |
|---|---|
| Connector Type | Flat |
| Material | Copper alloy with tin plating |
| Current Rating | Up to 3A |
| Voltage Rating | Up to 250V |
| Operating Temperature | -40°C to +105°C |
| Contact Resistance | ≤ 20 mΩ |
| Insulation Resistance | ≥ 1000 MΩ |
| Durability | 500 mating cycles |
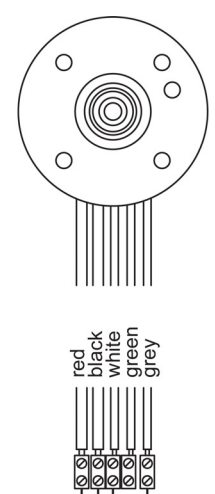
Pin Configuration and Descriptions
The ECX FLAT connector typically comes in multiple pin configurations, ranging from 2 to 20 pins. Below is an example of a 4-pin configuration:
| Pin Number | Description |
|---|---|
| 1 | Power (VCC) |
| 2 | Ground (GND) |
| 3 | Signal/Data Line 1 |
| 4 | Signal/Data Line 2 |
Usage Instructions
How to Use the ECX FLAT in a Circuit
- Identify the Pinout: Refer to the pin configuration table to ensure proper connections.
- Prepare the Wires: Strip the insulation from the wires to expose the conductive core. Ensure the exposed length matches the connector's specifications.
- Insert the Wires: Align the wires with the corresponding pins and insert them into the connector.
- Secure the Connection: Use a crimping tool or soldering (if applicable) to secure the wires to the connector.
- Connect to the Circuit: Plug the ECX FLAT connector into the corresponding socket or PCB header.
Important Considerations and Best Practices
- Avoid Overcurrent: Ensure the current passing through the connector does not exceed its 3A rating to prevent overheating or damage.
- Proper Alignment: Always align the connector properly with the mating socket to avoid bent pins or poor connections.
- Environmental Conditions: Use the connector within its specified operating temperature range (-40°C to +105°C).
- Durability: While the connector is rated for 500 mating cycles, avoid excessive plugging/unplugging to extend its lifespan.
Example: Connecting ECX FLAT to an Arduino UNO
The ECX FLAT connector can be used to connect sensors or modules to an Arduino UNO. Below is an example of connecting a 4-pin ECX FLAT connector to an Arduino:
// Example: Reading data from a sensor connected via ECX FLAT connector
// Pin 1: VCC (5V), Pin 2: GND, Pin 3: Data Line 1, Pin 4: Data Line 2

const int dataPin1 = 2; // Connect Pin 3 of ECX FLAT to Arduino digital pin 2
const int dataPin2 = 3; // Connect Pin 4 of ECX FLAT to Arduino digital pin 3

void setup() {
  pinMode(dataPin1, INPUT); // Set dataPin1 as input
  pinMode(dataPin2, INPUT); // Set dataPin2 as input
  Serial.begin(9600);       // Initialize serial communication
}

void loop() {
  int sensorValue1 = digitalRead(dataPin1); // Read data from Pin 3
  int sensorValue2 = digitalRead(dataPin2); // Read data from Pin 4

  // Print the sensor values to the Serial Monitor
  Serial.print("Sensor 1: ");
  Serial.println(sensorValue1);
  Serial.print("Sensor 2: ");
  Serial.println(sensorValue2);

  delay(1000); // Wait for 1 second before reading again
}
Troubleshooting and FAQs
Common Issues and Solutions
Loose Connections:
- Issue: The connector feels loose or the circuit is intermittent.
- Solution: Ensure the wires are properly crimped or soldered. Check for bent pins or debris in the connector.
Overheating:
- Issue: The connector becomes hot during operation.
- Solution: Verify that the current does not exceed the 3A rating. Use thicker wires if necessary.
Signal Interference:
- Issue: Data transmission is unreliable or noisy.
- Solution: Use shielded cables for data lines and ensure proper grounding.
Connector Misalignment:
- Issue: The connector does not fit properly into the socket.
- Solution: Double-check the orientation and alignment before inserting the connector.
FAQs
Q1: Can the ECX FLAT connector be used outdoors?
A1: The ECX FLAT connector is not inherently weatherproof. For outdoor use, ensure it is housed in a protective enclosure.
Q2: What tools are required for crimping the ECX FLAT connector?
A2: A standard crimping tool compatible with flat connectors is recommended. Ensure the tool matches the connector's specifications.
Q3: Can the ECX FLAT handle high-frequency signals?
A3: Yes, the ECX FLAT is suitable for high-frequency signals, but proper shielding and grounding are recommended to minimize interference.
Q4: Is the ECX FLAT connector RoHS compliant?
A4: Yes, the ECX FLAT connector is typically manufactured to meet RoHS compliance standards. Check the specific product datasheet for confirmation.