How to Use ESP32-C6 Zero (BACKVIEW): Examples, Pinouts, and Specs
Introduction
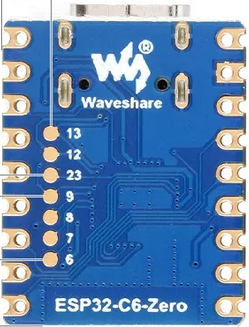
The ESP32-C6 Zero is a low-power, dual-core microcontroller developed by Waveshare, featuring integrated Wi-Fi 6 and Bluetooth 5.0 capabilities. It is designed for IoT applications, offering robust connectivity, high performance, and energy efficiency. The back view of the ESP32-C6 Zero provides a detailed layout of its pins and components, aiding in understanding its connectivity and design.
Explore Projects Built with ESP32-C6 Zero (BACKVIEW)


Explore Projects Built with ESP32-C6 Zero (BACKVIEW)
Common Applications and Use Cases
- Smart home devices
- Industrial IoT systems
- Wearable technology
- Wireless sensor networks
- Robotics and automation
- Low-power, high-performance edge computing
Technical Specifications
Key Technical Details
| Parameter | Specification |
|---|---|
| Manufacturer | Waveshare |
| Part ID | ESP32-C6-Zero |
| Microcontroller | ESP32-C6 (dual-core) |
| Wireless Connectivity | Wi-Fi 6, Bluetooth 5.0 |
| Operating Voltage | 3.3V |
| Flash Memory | 4MB |
| SRAM | 512KB |
| GPIO Pins | 24 |
| Communication Interfaces | UART, SPI, I2C, I2S, PWM |
| Power Consumption | Ultra-low power in deep sleep mode |
| Dimensions | 51mm x 25.4mm |
Pin Configuration and Descriptions
The ESP32-C6 Zero features a total of 24 GPIO pins, along with power and communication pins. Below is the pinout description:
| Pin Number | Pin Name | Functionality |
|---|---|---|
| 1 | 3V3 | 3.3V Power Supply |
| 2 | GND | Ground |
| 3 | GPIO0 | General Purpose I/O, Boot Mode Select |
| 4 | GPIO1 | General Purpose I/O |
| 5 | GPIO2 | General Purpose I/O |
| 6 | GPIO3 | General Purpose I/O |
| 7 | GPIO4 | General Purpose I/O |
| 8 | GPIO5 | General Purpose I/O |
| 9 | GPIO6 | General Purpose I/O |
| 10 | GPIO7 | General Purpose I/O |
| 11 | GPIO8 | General Purpose I/O |
| 12 | GPIO9 | General Purpose I/O |
| 13 | GPIO10 | General Purpose I/O |
| 14 | GPIO11 | General Purpose I/O |
| 15 | GPIO12 | General Purpose I/O |
| 16 | GPIO13 | General Purpose I/O |
| 17 | GPIO14 | General Purpose I/O |
| 18 | GPIO15 | General Purpose I/O |
| 19 | GPIO16 | General Purpose I/O |
| 20 | GPIO17 | General Purpose I/O |
| 21 | TXD0 | UART Transmit |
| 22 | RXD0 | UART Receive |
| 23 | EN | Enable Pin (Active High) |
| 24 | RST | Reset Pin |
Usage Instructions
How to Use the ESP32-C6 Zero in a Circuit
Powering the Board:
- Connect the 3V3 pin to a 3.3V power source and GND to ground.
- Ensure the power supply is stable and within the operating voltage range.
Programming the Board:
- Use a USB-to-serial adapter to connect the ESP32-C6 Zero to your computer.
- Install the necessary drivers and development environment (e.g., Arduino IDE or ESP-IDF).
- Select the correct board and port in your IDE.
Connecting Peripherals:
- Use the GPIO pins to connect sensors, actuators, or other peripherals.
- Configure the pins in your code according to the desired functionality (e.g., input, output, PWM).
Wireless Connectivity:
- Configure Wi-Fi and Bluetooth settings in your code to enable wireless communication.
- Use the ESP-IDF or Arduino libraries for seamless integration.
Important Considerations and Best Practices
- Avoid exceeding the maximum voltage rating of 3.3V on any pin.
- Use pull-up or pull-down resistors where necessary to stabilize GPIO inputs.
- Ensure proper grounding to minimize noise and interference.
- Use decoupling capacitors near the power pins for stable operation.
- When using Wi-Fi or Bluetooth, ensure the antenna area is unobstructed for optimal signal strength.
Example Code for Arduino UNO Integration
Below is an example of how to connect the ESP32-C6 Zero to an Arduino UNO for basic communication via UART:
// Example: UART Communication between Arduino UNO and ESP32-C6 Zero

#include <SoftwareSerial.h>

// Define RX and TX pins for Arduino
SoftwareSerial espSerial(10, 11); // RX = Pin 10, TX = Pin 11

void setup() {
  Serial.begin(9600); // Initialize Serial Monitor
  espSerial.begin(115200); // Initialize ESP32-C6 Serial Communication

  Serial.println("Arduino is ready to communicate with ESP32-C6 Zero.");
}

void loop() {
  // Send data from Arduino to ESP32-C6
  if (Serial.available()) {
    char data = Serial.read();
    espSerial.write(data); // Forward data to ESP32-C6
  }

  // Receive data from ESP32-C6 and display on Serial Monitor
  if (espSerial.available()) {
    char data = espSerial.read();
    Serial.write(data); // Display received data
  }
}
Troubleshooting and FAQs
Common Issues and Solutions
Board Not Detected by Computer:
- Ensure the USB cable is functional and supports data transfer.
- Install the correct USB-to-serial drivers for your operating system.
Wi-Fi or Bluetooth Not Working:
- Verify that the antenna area is not obstructed.
- Double-check the Wi-Fi credentials or Bluetooth pairing code in your program.
GPIO Pins Not Responding:
- Confirm that the pins are correctly configured in your code (e.g., input, output).
- Check for loose connections or damaged components.
Program Upload Fails:
- Ensure the board is in boot mode by holding GPIO0 low during reset.
- Verify the correct board and port settings in your IDE.
FAQs
Q: Can the ESP32-C6 Zero operate on 5V?
A: No, the ESP32-C6 Zero operates at 3.3V. Applying 5V to any pin may damage the board.
Q: How do I reset the board?
A: Press the RST pin or use the EN pin to reset the board.
Q: Is the ESP32-C6 Zero compatible with Arduino libraries?
A: Yes, the ESP32-C6 Zero is compatible with most Arduino libraries, provided the correct board definitions are installed.
Q: Can I use the ESP32-C6 Zero for battery-powered applications?
A: Yes, the ESP32-C6 Zero is designed for low-power applications and is suitable for battery-powered projects.