The SparkFun Mini Tristimulus Color Sensor - OPT4048DTSR is a compact and efficient color sensor designed for easy integration into various projects. Utilizing the Qwiic connect system, this sensor simplifies the process of measuring red, green, and blue light intensity. It is ideal for applications requiring accurate color detection, such as color sorting, ambient light sensing, and color matching.
Explore Projects Built with SparkFun Mini Tristimulus Color Sensor - OPT4048DTSR (Qwiic)
Use Cirkit Designer to design, explore, and prototype these projects online. Some projects support real-time simulation. Click "Open Project" to start designing instantly!
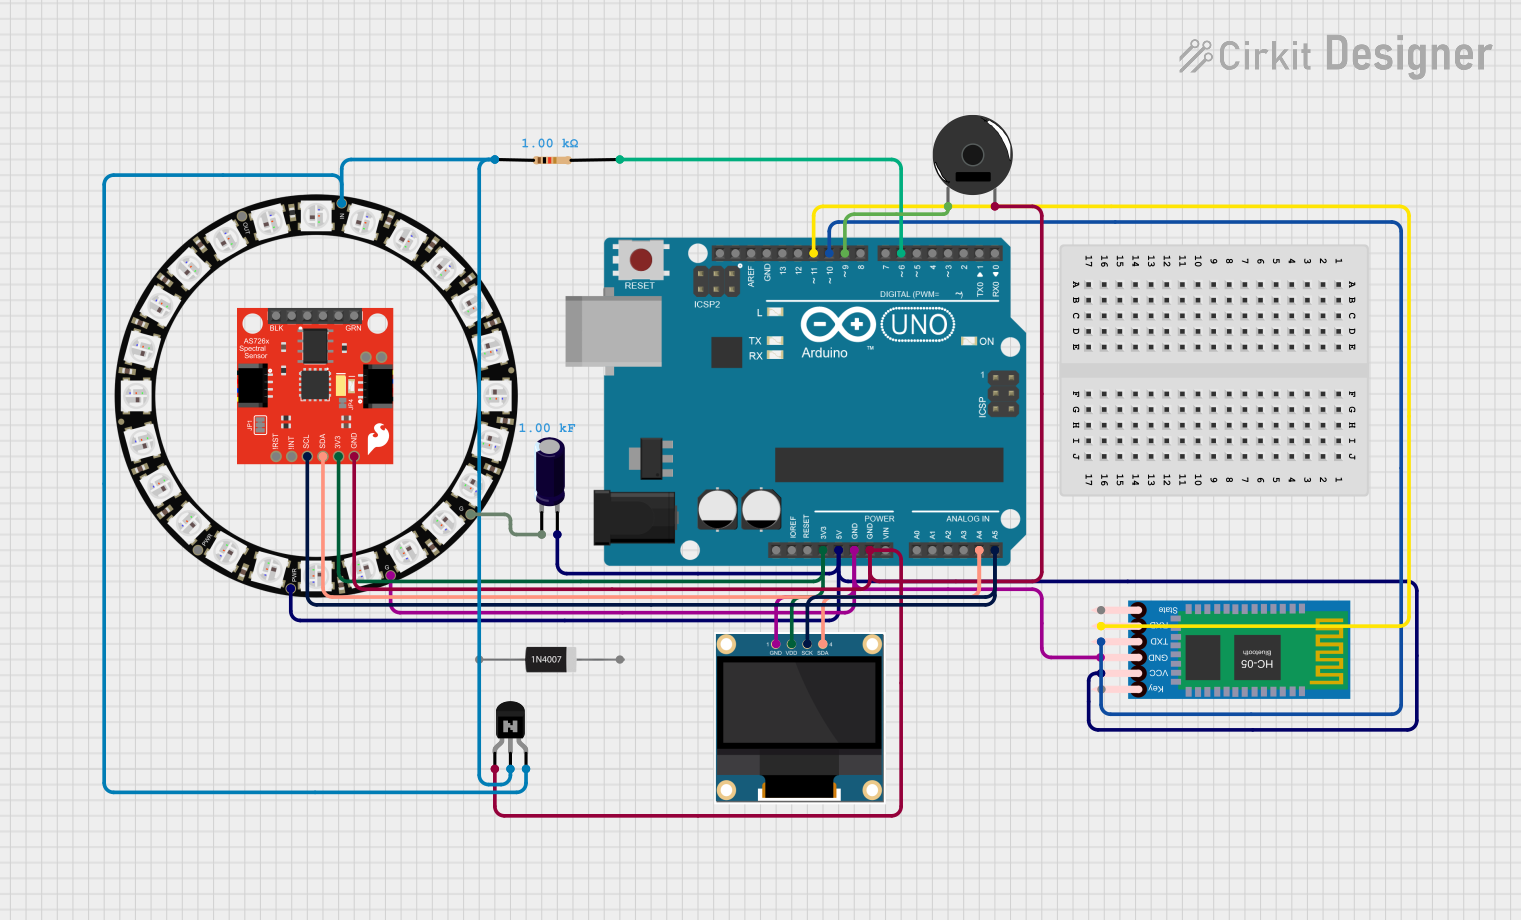
This circuit is designed to detect color changes in a solution using a spectral sensor, time the change, provide a sound cue via a piezo buzzer, and send the timing data to a computer via a Bluetooth module. The Arduino UNO microcontroller coordinates the sensor readings, timing, and communication, while an OLED display and NeoPixel ring provide visual feedback.
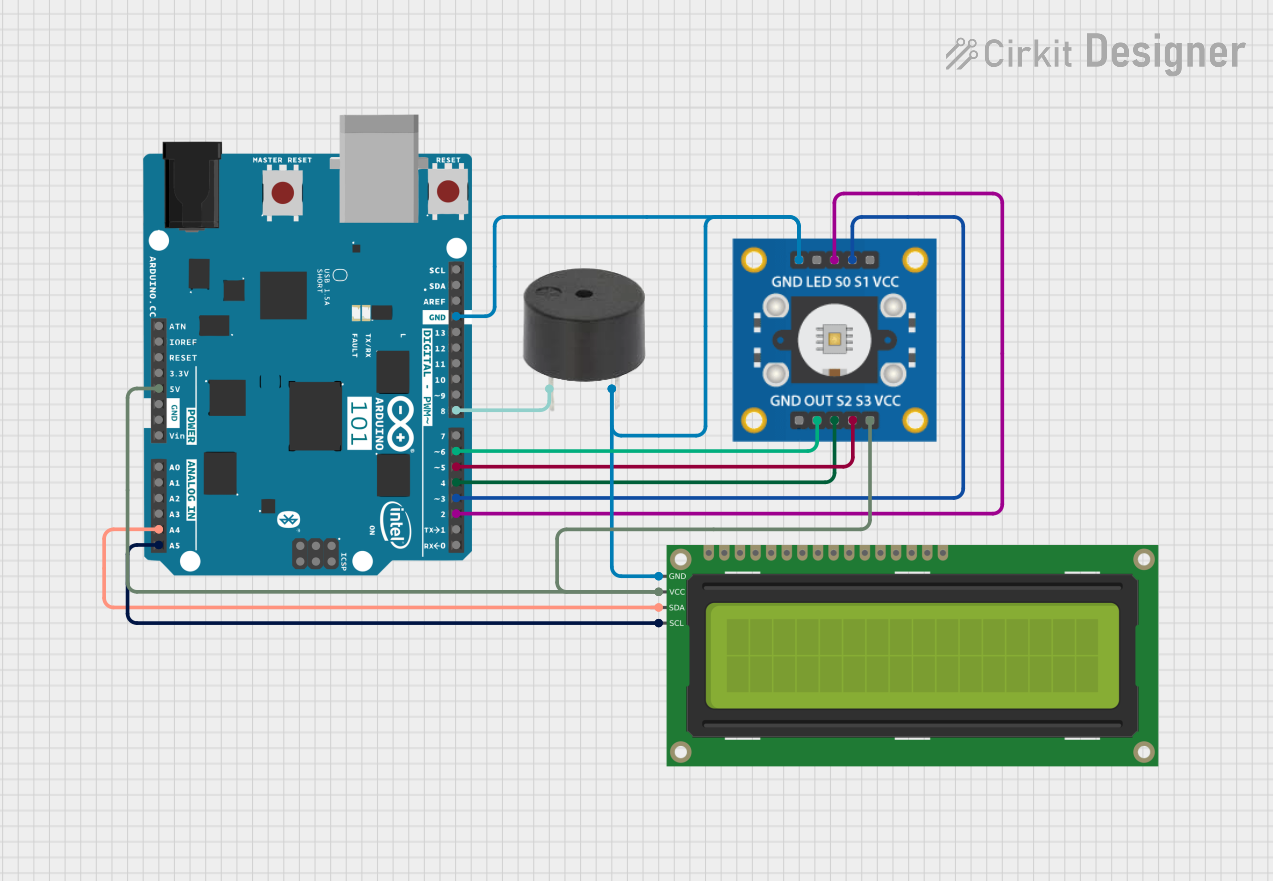
This circuit features an Arduino 101 microcontroller connected to a TCS3200 color sensor and a 16x2 I2C LCD display for output. The Arduino is configured to communicate with the LCD via I2C (using A4/SDA and A5/SCL pins for data exchange) and to receive color frequency signals from the TCS3200 on its D6 PWM pin. Additionally, a buzzer is connected to the D8 pin of the Arduino, potentially for audio signaling based on color detection or other programmed conditions.
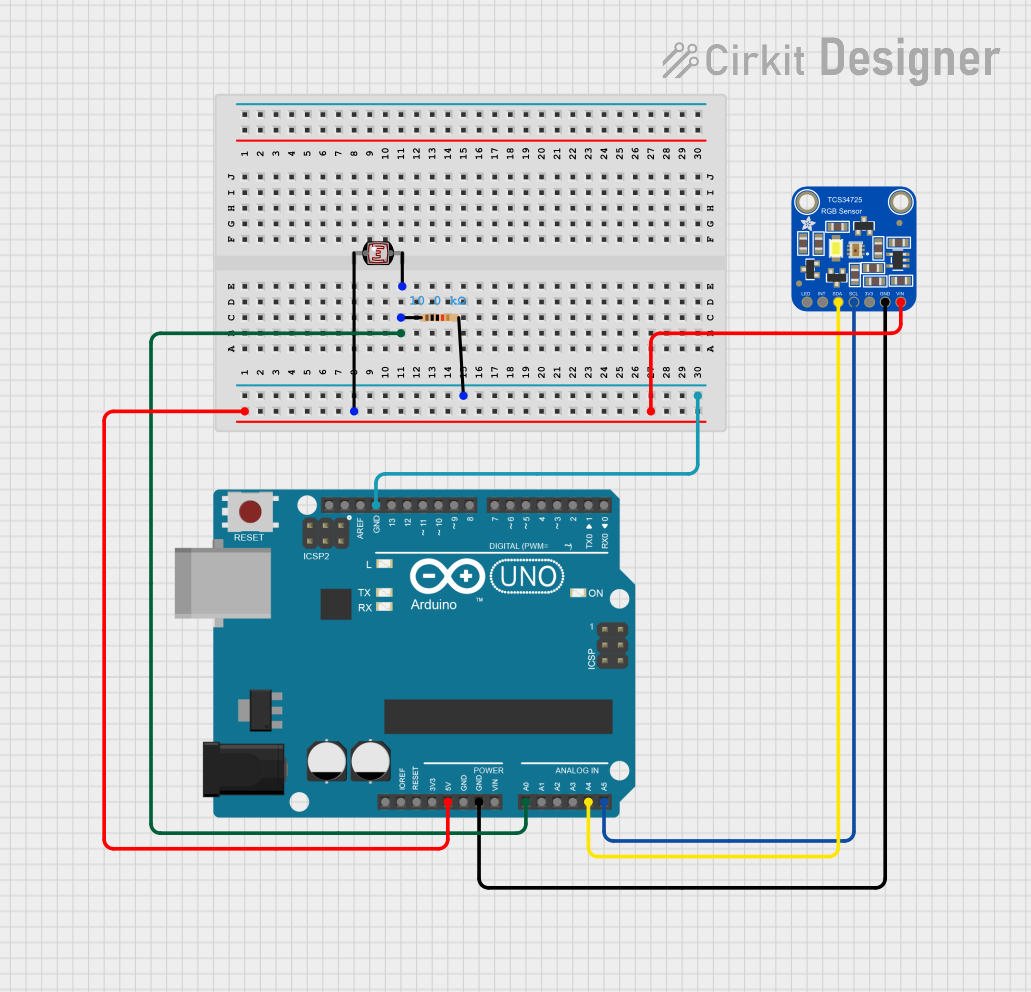
This circuit features an Arduino UNO microcontroller connected to an Adafruit TCS34725 RGB Color Sensor and a photocell (LDR) with a 10k Ohm resistor forming a voltage divider connected to the Arduino's analog input A0. The RGB sensor is interfaced with the Arduino via I2C communication, using SDA and SCL lines. The purpose of this circuit is likely to measure ambient light intensity with the photocell and detect colors with the RGB sensor, both interfaced with the Arduino for processing and potential output of the sensor data.
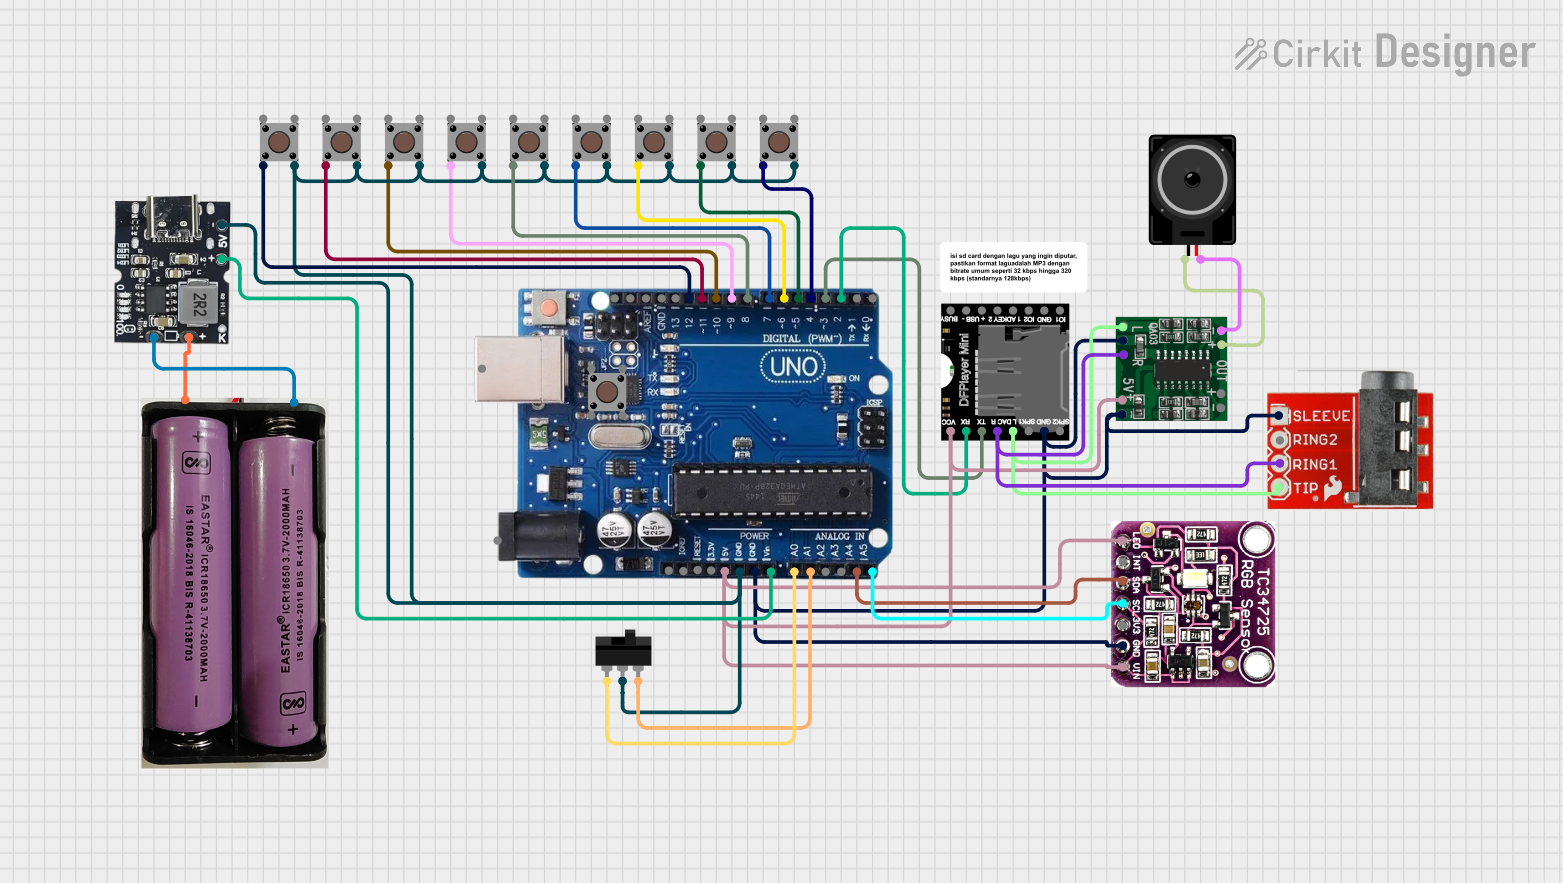
This circuit is a color and shape recognition system using an Arduino Uno, a TCS3472 color sensor, and multiple pushbuttons. It uses a DFPlayer Mini to play audio feedback based on the detected color or shape, with the audio output amplified by a PAM8403 module and played through a loudspeaker.
Interrupt (optional, not used in all applications)
Usage Instructions
How to Use the Component in a Circuit
Power Supply: Connect the 3.3V pin to a 3.3V power source and the GND pin to the ground.
I2C Communication: Connect the SDA pin to the I2C data line and the SCL pin to the I2C clock line of your microcontroller.
Optional Interrupt: If your application requires an interrupt, connect the INT pin to a suitable interrupt pin on your microcontroller.
Important Considerations and Best Practices
Power Supply: Ensure that the sensor is powered with a stable 3.3V supply to avoid inaccurate readings.
I2C Pull-up Resistors: The Qwiic system includes pull-up resistors on the I2C lines. If you are not using the Qwiic system, ensure that appropriate pull-up resistors are in place.
Ambient Light: For accurate color detection, avoid exposing the sensor to direct sunlight or other strong light sources that may interfere with measurements.
Example Code for Arduino UNO
Below is an example code to interface the SparkFun Mini Tristimulus Color Sensor with an Arduino UNO using the Qwiic system.
#include <Wire.h>
#include <SparkFun_TCS34725.h> // Include the SparkFun TCS34725 library

// Create an instance of the TCS34725 class
SparkFun_TCS34725 colorSensor;

void setup() {
  Serial.begin(9600); // Initialize serial communication
  Wire.begin(); // Initialize I2C communication

  // Initialize the color sensor
  if (colorSensor.begin() == false) {
    Serial.println("Color sensor not detected. Check wiring.");
    while (1);
  }
  Serial.println("Color sensor initialized.");
}

void loop() {
  // Variables to store color data
  uint16_t red, green, blue, clear;

  // Read color data from the sensor
  colorSensor.getRawData(&red, &green, &blue, &clear);

  // Print color data to the serial monitor
  Serial.print("Red: ");
  Serial.print(red);
  Serial.print(" Green: ");
  Serial.print(green);
  Serial.print(" Blue: ");
  Serial.print(blue);
  Serial.print(" Clear: ");
  Serial.println(clear);

  delay(1000); // Wait for 1 second before the next reading
}
Troubleshooting and FAQs
Common Issues Users Might Face
Sensor Not Detected: If the sensor is not detected, check the wiring connections and ensure that the I2C address is correct.
Inaccurate Readings: Ensure that the sensor is not exposed to direct sunlight or other strong light sources. Verify that the power supply is stable and within the specified range.
I2C Communication Errors: Check the pull-up resistors on the I2C lines and ensure that the SDA and SCL lines are correctly connected.
Solutions and Tips for Troubleshooting
Check Connections: Verify all connections, especially the I2C lines (SDA and SCL).
Power Supply: Ensure that the sensor is powered with a stable 3.3V supply.
Library Compatibility: Ensure that you are using the correct library for the sensor. The SparkFun TCS34725 library is recommended.
Serial Monitor: Use the serial monitor to print debug information and verify that the sensor is functioning correctly.
By following this documentation, users can effectively integrate and utilize the SparkFun Mini Tristimulus Color Sensor - OPT4048DTSR in their projects, ensuring accurate and reliable color detection.


 Open Project in Cirkit Designer