
How to Use LITTLEBITS_FEMALE: Examples, Pinouts, and Specs
 Design with LITTLEBITS_FEMALE in Cirkit Designer
Introduction
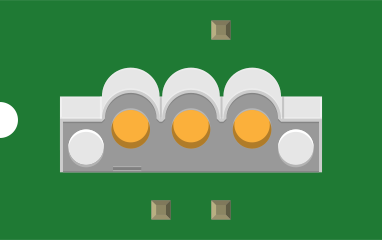
The LITTLEBITS_FEMALE connector is a modular component designed for use in littleBits projects. It serves as a female connector that allows for the seamless attachment and detachment of various littleBits modules. This component simplifies prototyping and experimentation by providing a reliable and reusable connection interface.
Explore Projects Built with LITTLEBITS_FEMALE
 Open Project in Cirkit Designer
 Open Project in Cirkit Designer
 Open Project in Cirkit Designer
 Open Project in Cirkit Designer
Explore Projects Built with LITTLEBITS_FEMALE
Open Project in Cirkit DesignerOpen Project in Cirkit DesignerOpen Project in Cirkit DesignerOpen Project in Cirkit DesignerCommon Applications and Use Cases
- Connecting littleBits modules in educational and prototyping environments.
- Building modular electronic circuits for STEM learning.
- Rapid prototyping of electronic projects without soldering.
- Creating interactive projects with interchangeable components.
Technical Specifications
Key Technical Details
- Connector Type: Female
- Compatibility: littleBits modules
- Material: Durable plastic housing with metal contacts
- Dimensions: 12mm x 10mm x 5mm (approx.)
- Operating Voltage: Up to 5V DC
- Current Rating: Up to 1A
- Durability: Rated for over 1000 connection cycles
Pin Configuration and Descriptions
The LITTLEBITS_FEMALE connector typically has three pins, which are used to transmit power, ground, and signal between modules. The pin configuration is as follows:
| Pin Number | Name | Description |
|---|---|---|
| 1 | VCC | Supplies power to the connected module. |
| 2 | GND | Provides the ground connection. |
| 3 | SIGNAL | Transmits data or control signals. |
Usage Instructions
How to Use the Component in a Circuit
- Identify the Pins: Ensure you understand the pin configuration (VCC, GND, SIGNAL) of the LITTLEBITS_FEMALE connector.
- Connect to a Module: Align the LITTLEBITS_FEMALE connector with the corresponding male connector on a littleBits module. Gently press them together until they click into place.
- Power the Circuit: Provide a power source (e.g., a 9V battery or USB power) to the littleBits power module. The LITTLEBITS_FEMALE connector will transmit power and signals to the connected module.
- Test the Connection: Verify that the connected module is functioning as expected. If not, check the alignment and ensure the pins are properly seated.
Important Considerations and Best Practices
- Avoid Overloading: Do not exceed the maximum voltage (5V) or current (1A) ratings to prevent damage to the connector or modules.
- Proper Alignment: Ensure the connector is properly aligned with the male counterpart to avoid bent pins or poor connections.
- Handle with Care: While the connector is durable, excessive force during attachment or detachment may reduce its lifespan.
- Clean Contacts: Periodically clean the metal contacts with a soft, dry cloth to maintain optimal conductivity.
Example: Connecting to an Arduino UNO
Although the LITTLEBITS_FEMALE connector is primarily designed for littleBits modules, it can be adapted for use with an Arduino UNO. Below is an example of how to connect a littleBits module to an Arduino UNO using jumper wires:
// Example: Reading a signal from a littleBits module via LITTLEBITS_FEMALE
// Connect the SIGNAL pin of the LITTLEBITS_FEMALE to Arduino pin A0
// Connect the VCC pin to 5V and the GND pin to GND on the Arduino

const int signalPin = A0; // Define the analog pin connected to SIGNAL
int signalValue = 0;      // Variable to store the signal value

void setup() {
  Serial.begin(9600); // Initialize serial communication
  pinMode(signalPin, INPUT); // Set the SIGNAL pin as input
}

void loop() {
  signalValue = analogRead(signalPin); // Read the signal value
  Serial.print("Signal Value: ");
  Serial.println(signalValue); // Print the signal value to the Serial Monitor
  delay(500); // Wait for 500ms before the next reading
}
Troubleshooting and FAQs
Common Issues Users Might Face
Loose Connections:
- Problem: The connector does not stay securely attached to the module.
- Solution: Ensure the connector is properly aligned and fully inserted. Check for debris or damage on the connector.
No Power or Signal Transmission:
- Problem: The connected module does not receive power or signals.
- Solution: Verify the power source is functioning and properly connected. Check the pin connections for continuity.
Bent or Damaged Pins:
- Problem: Pins on the connector are bent or damaged, causing poor connections.
- Solution: Carefully straighten bent pins with tweezers. Replace the connector if the damage is severe.
Intermittent Connections:
- Problem: The connection works intermittently or is unstable.
- Solution: Clean the metal contacts with a soft, dry cloth. Avoid moving the modules while in use.
Solutions and Tips for Troubleshooting
- Inspect the Connector: Regularly check the LITTLEBITS_FEMALE connector for signs of wear or damage.
- Test with a Multimeter: Use a multimeter to check for continuity between the pins and the connected module.
- Use Compatible Modules: Ensure the modules you are connecting are compatible with the LITTLEBITS_FEMALE connector.
By following these guidelines, you can maximize the performance and lifespan of your LITTLEBITS_FEMALE connector in littleBits projects.