How to Use Terminal PCB 3 Pin: Examples, Pinouts, and Specs
Introduction
The Terminal PCB 3 Pin is a versatile connector designed to securely join wires to a printed circuit board (PCB). It features three pins, allowing for reliable electrical connections in a variety of applications. This component is widely used in electronics projects, industrial control systems, and prototyping due to its ease of use and robust design.
Explore Projects Built with Terminal PCB 3 Pin
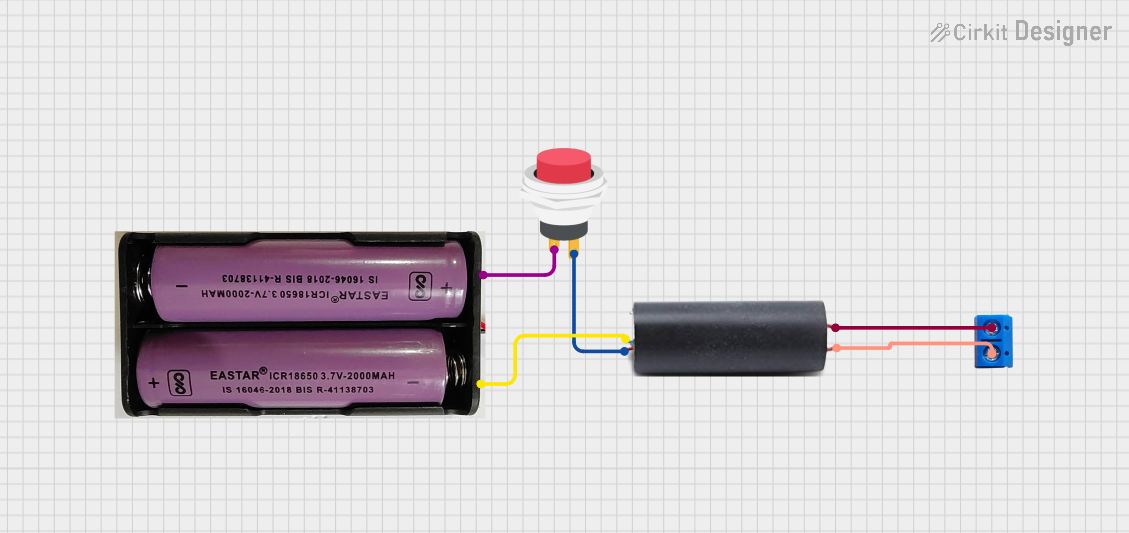


Explore Projects Built with Terminal PCB 3 Pin
Common Applications and Use Cases
- Connecting external devices or sensors to a PCB
- Power distribution in electronic circuits
- Prototyping and testing circuits
- Industrial automation and control systems
- Home automation projects
Technical Specifications
The Terminal PCB 3 Pin is designed to provide a secure and durable connection for low- to medium-power applications. Below are its key technical details:
| Parameter | Specification |
|---|---|
| Number of Pins | 3 |
| Rated Voltage | 250V AC/DC |
| Rated Current | 10A |
| Wire Gauge Support | 26-12 AWG |
| Pitch (Pin Spacing) | 5.08 mm |
| Material | Insulation: Polyamide (PA66), UL94V-0 |
| Contact Material | Copper alloy with tin plating |
| Operating Temperature | -40°C to +105°C |
| Mounting Type | Through-hole |
Pin Configuration and Descriptions
The Terminal PCB 3 Pin has three pins, typically used for connecting wires to a PCB. The pin configuration is as follows:
| Pin Number | Description |
|---|---|
| Pin 1 | Input/Output (Signal 1) |
| Pin 2 | Input/Output (Signal 2) |
| Pin 3 | Ground (GND) |
Note: The pin assignments may vary depending on the circuit design. Always refer to your specific circuit diagram.
Usage Instructions
How to Use the Terminal PCB 3 Pin in a Circuit
Soldering the Terminal to the PCB:
- Align the pins of the terminal with the corresponding holes on the PCB.
- Solder each pin securely to the PCB pads, ensuring no cold solder joints.
- Verify that the terminal is firmly attached to the PCB.
Connecting Wires:
- Strip the insulation from the wire ends (approximately 5-7 mm).
- Insert the stripped wire ends into the terminal's screw clamps.
- Tighten the screws using a small flathead screwdriver to secure the wires.
Testing the Connection:
- Use a multimeter to check for continuity between the wires and the PCB traces.
- Ensure there are no loose connections or short circuits.
Important Considerations and Best Practices
- Wire Gauge Compatibility: Ensure the wires used are within the supported range (26-12 AWG).
- Tightening Screws: Do not overtighten the screws, as this may damage the wire or the terminal.
- Avoid Overloading: Do not exceed the rated voltage and current to prevent overheating or damage.
- PCB Design: Ensure the PCB layout accommodates the terminal's pin spacing (5.08 mm pitch).
Example: Connecting to an Arduino UNO
The Terminal PCB 3 Pin can be used to connect external components, such as sensors or power supplies, to an Arduino UNO. Below is an example of connecting a 5V power supply to the Arduino using the terminal.
Circuit Diagram
- Pin 1: Connect to the 5V pin on the Arduino.
- Pin 2: Connect to the GND pin on the Arduino.
- Pin 3: Connect to an external device or sensor.
Sample Arduino Code
// Example: Reading a sensor connected via Terminal PCB 3 Pin
// Pin 1: Sensor VCC (5V)
// Pin 2: Sensor GND
// Pin 3: Sensor Signal connected to Arduino pin A0

const int sensorPin = A0; // Analog pin connected to the sensor signal
int sensorValue = 0;      // Variable to store the sensor reading

void setup() {
  Serial.begin(9600); // Initialize serial communication
  pinMode(sensorPin, INPUT); // Set the sensor pin as input
}

void loop() {
  sensorValue = analogRead(sensorPin); // Read the sensor value
  Serial.print("Sensor Value: ");
  Serial.println(sensorValue); // Print the sensor value to the Serial Monitor
  delay(500); // Wait for 500ms before the next reading
}
Troubleshooting and FAQs
Common Issues and Solutions
Loose Connections:
- Issue: Wires are not securely attached to the terminal.
- Solution: Ensure the screws are tightened properly and the wires are stripped to the correct length.
Cold Solder Joints:
- Issue: The terminal is not firmly soldered to the PCB.
- Solution: Re-solder the pins, ensuring the solder flows smoothly and forms a solid joint.
Short Circuits:
- Issue: Adjacent pins or wires are shorted.
- Solution: Check for solder bridges or exposed wire strands and correct them.
Overheating:
- Issue: The terminal becomes hot during operation.
- Solution: Verify that the current and voltage do not exceed the rated limits.
FAQs
Q1: Can I use the Terminal PCB 3 Pin for high-power applications?
A1: No, the terminal is rated for a maximum of 10A and 250V. For high-power applications, use a terminal with higher ratings.
Q2: What tools are required to use this terminal?
A2: You will need a soldering iron, solder, a wire stripper, and a small flathead screwdriver.
Q3: Can I use this terminal with stranded wires?
A3: Yes, stranded wires are compatible. Ensure the strands are twisted together before inserting them into the terminal.
Q4: Is the terminal reusable?
A4: Yes, the terminal can be reused, but ensure the screws and contacts are not damaged during removal.
By following this documentation, you can effectively use the Terminal PCB 3 Pin in your electronic projects.