How to Use Matek H743-WING V3: Examples, Pinouts, and Specs
Introduction
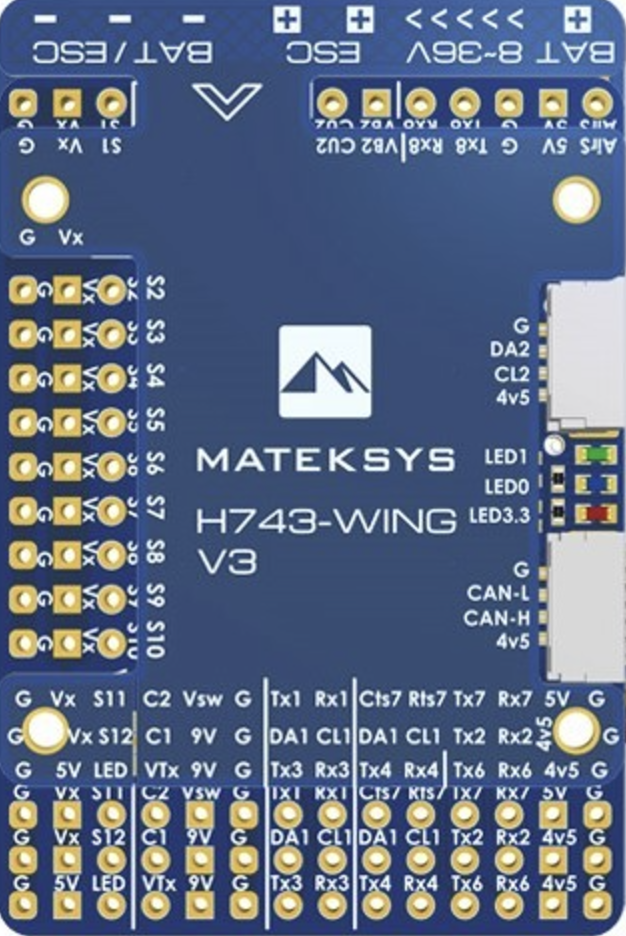
The Matek H743-WING V3 is a high-performance flight controller designed specifically for fixed-wing and VTOL (Vertical Take-Off and Landing) aircraft. Manufactured by Mateksys, this advanced flight controller features an H7 processor, multiple UARTs, and a wide range of connectivity options, making it ideal for complex and demanding flight applications.
Explore Projects Built with Matek H743-WING V3


Explore Projects Built with Matek H743-WING V3
Common Applications and Use Cases
- Fixed-wing aircraft
- VTOL aircraft
- UAVs (Unmanned Aerial Vehicles)
- Drones requiring advanced flight control capabilities
- Research and development in aeronautics
Technical Specifications
Key Technical Details
| Specification | Value |
|---|---|
| Processor | STM32H743VIT6 (H7) |
| IMU | MPU6000 (SPI1) & ICM20602 (SPI4) |
| Barometer | BMP280 (I2C1) |
| Flash Memory | 16MB (SPI2) |
| Input Voltage | 4.5V - 8.4V (2S - 6S LiPo) |
| BEC Output | 5V 2A, 9V 2A |
| UARTs | 8 UARTs |
| I2C | 2 I2C buses |
| CAN | 2 CAN buses |
| PWM Outputs | 12 PWM outputs |
| Dimensions | 50mm x 50mm |
| Weight | 15g |
Pin Configuration and Descriptions
Power and Ground Pins
| Pin Name | Description |
|---|---|
| VCC | Main power input (4.5V-8.4V) |
| GND | Ground |
| 5V | 5V output |
| 9V | 9V output |
UART Pins
| Pin Name | Description |
|---|---|
| UART1_TX | UART1 Transmit |
| UART1_RX | UART1 Receive |
| UART2_TX | UART2 Transmit |
| UART2_RX | UART2 Receive |
| UART3_TX | UART3 Transmit |
| UART3_RX | UART3 Receive |
| UART4_TX | UART4 Transmit |
| UART4_RX | UART4 Receive |
| UART5_TX | UART5 Transmit |
| UART5_RX | UART5 Receive |
| UART6_TX | UART6 Transmit |
| UART6_RX | UART6 Receive |
| UART7_TX | UART7 Transmit |
| UART7_RX | UART7 Receive |
| UART8_TX | UART8 Transmit |
| UART8_RX | UART8 Receive |
PWM Output Pins
| Pin Name | Description |
|---|---|
| PWM1 | PWM Output 1 |
| PWM2 | PWM Output 2 |
| PWM3 | PWM Output 3 |
| PWM4 | PWM Output 4 |
| PWM5 | PWM Output 5 |
| PWM6 | PWM Output 6 |
| PWM7 | PWM Output 7 |
| PWM8 | PWM Output 8 |
| PWM9 | PWM Output 9 |
| PWM10 | PWM Output 10 |
| PWM11 | PWM Output 11 |
| PWM12 | PWM Output 12 |
Usage Instructions
How to Use the Component in a Circuit
Powering the Flight Controller:
- Connect the main power source (4.5V-8.4V) to the VCC pin.
- Ensure the ground (GND) is connected to the power source ground.
Connecting UART Devices:
- Connect the TX pin of the UART device to the corresponding RX pin on the flight controller.
- Connect the RX pin of the UART device to the corresponding TX pin on the flight controller.
Connecting PWM Devices:
- Connect the signal wire of the PWM device to the corresponding PWM output pin.
- Ensure the ground wire of the PWM device is connected to the flight controller ground.
Connecting I2C Devices:
- Connect the SDA and SCL lines of the I2C device to the corresponding I2C pins on the flight controller.
- Ensure the ground wire of the I2C device is connected to the flight controller ground.
Important Considerations and Best Practices
- Power Supply: Ensure the power supply voltage is within the specified range (4.5V-8.4V) to avoid damaging the flight controller.
- Grounding: Proper grounding is essential for reliable operation. Ensure all connected devices share a common ground with the flight controller.
- Firmware: Use the latest firmware compatible with the H743-WING V3 to take advantage of all features and improvements.
- Calibration: Perform sensor calibration (e.g., accelerometer, gyroscope) before the first flight to ensure accurate readings.
Troubleshooting and FAQs
Common Issues Users Might Face
Flight Controller Not Powering On:
- Solution: Check the power supply voltage and connections. Ensure the VCC and GND pins are properly connected.
No Communication with UART Devices:
- Solution: Verify the TX and RX connections. Ensure the baud rate settings match between the flight controller and the UART device.
PWM Outputs Not Working:
- Solution: Check the PWM signal connections. Ensure the PWM device is properly powered and grounded.
I2C Devices Not Detected:
- Solution: Verify the SDA and SCL connections. Ensure the I2C device is properly powered and grounded.
Solutions and Tips for Troubleshooting
- Firmware Update: Ensure the flight controller firmware is up to date. Use the official firmware from Mateksys.
- Connection Check: Double-check all connections for loose or incorrect wiring.
- Sensor Calibration: Recalibrate sensors if experiencing erratic behavior or inaccurate readings.
- Documentation: Refer to the official Mateksys documentation for detailed setup and configuration instructions.
Example Code for Arduino UNO
#include <Wire.h>

#define I2C_ADDRESS 0x76 // Example I2C address for BMP280

void setup() {
  Wire.begin(); // Initialize I2C communication
  Serial.begin(9600); // Initialize serial communication
  Serial.println("Initializing BMP280...");

  Wire.beginTransmission(I2C_ADDRESS);
  Wire.write(0xD0); // Register to read chip ID
  Wire.endTransmission();
  Wire.requestFrom(I2C_ADDRESS, 1);

  if (Wire.available()) {
    uint8_t chipID = Wire.read();
    Serial.print("BMP280 Chip ID: ");
    Serial.println(chipID, HEX);
  } else {
    Serial.println("Failed to read BMP280 Chip ID");
  }
}

void loop() {
  // Main loop code
}
This example code demonstrates how to initialize I2C communication with a BMP280 barometer connected to the Matek H743-WING V3 flight controller and read its chip ID using an Arduino UNO.
This documentation provides a comprehensive overview of the Matek H743-WING V3 flight controller, including its technical specifications, usage instructions, and troubleshooting tips. Whether you are a beginner or an experienced user, this guide will help you effectively utilize this advanced flight controller in your projects.