How to Use USB TO AUDIO JACK: Examples, Pinouts, and Specs
Introduction
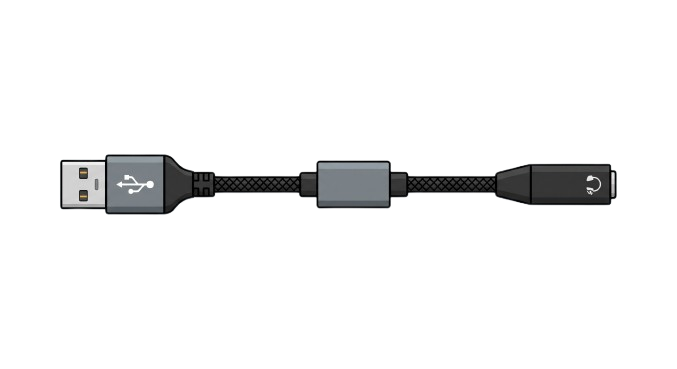
The USB to Audio Jack by Raspberry Pi (Manufacturer Part ID: usb to jack) is a compact and versatile device designed to convert digital audio signals from a USB port into analog audio signals. This allows users to connect standard headphones, speakers, or other audio devices to computers, laptops, or other devices that lack a dedicated audio output. It is an essential accessory for modern devices that have transitioned away from traditional 3.5mm audio jacks.
Explore Projects Built with USB TO AUDIO JACK
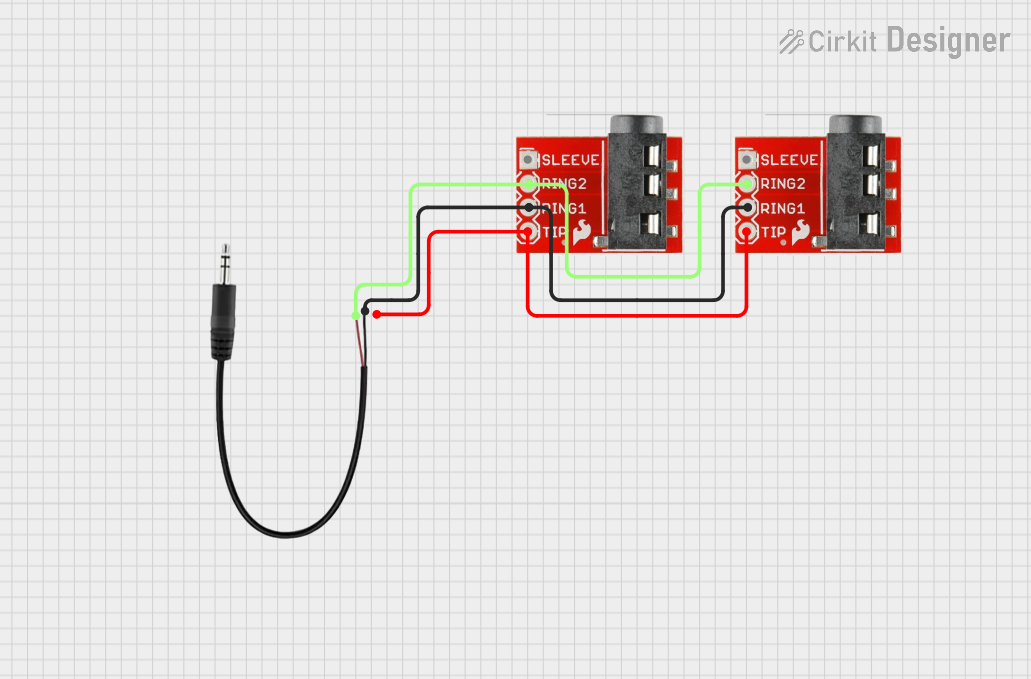
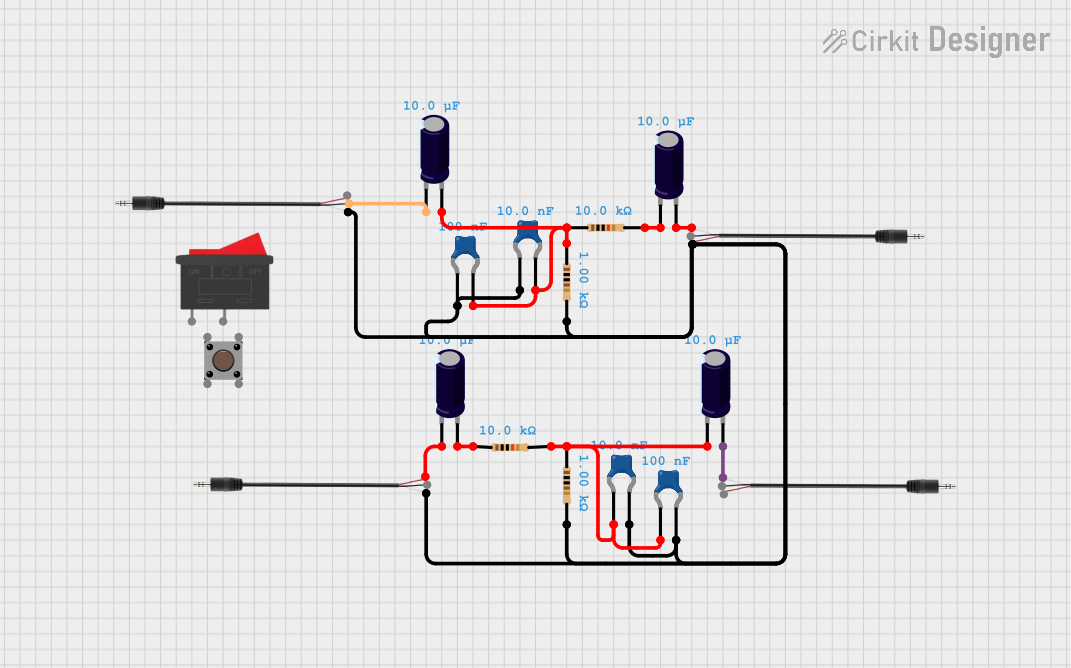

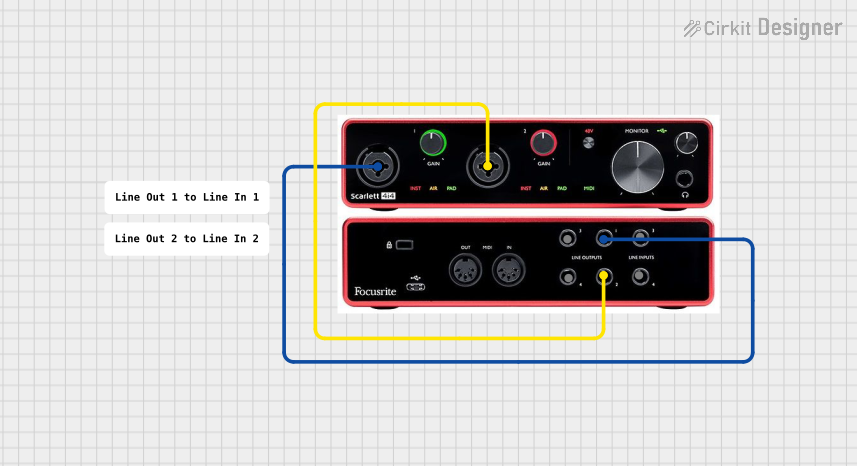
Explore Projects Built with USB TO AUDIO JACK
Common Applications and Use Cases
- Connecting headphones or speakers to laptops or desktops without audio jacks.
- Enabling audio output for Raspberry Pi boards or other single-board computers.
- Providing a simple solution for audio playback on devices with damaged or non-functional audio ports.
- Enhancing audio quality by bypassing onboard sound cards.
Technical Specifications
The following table outlines the key technical details of the USB to Audio Jack:
| Parameter | Specification |
|---|---|
| Manufacturer | Raspberry Pi |
| Part ID | usb to jack |
| Input Interface | USB 2.0/3.0 (Type-A) |
| Output Interface | 3.5mm TRS (Stereo) Audio Jack |
| Supported Audio Format | PCM (Pulse Code Modulation) |
| Sampling Rate | Up to 48 kHz |
| Bit Depth | 16-bit |
| Power Supply | Powered via USB (5V, <100mA) |
| Operating System Compatibility | Windows, macOS, Linux, Raspberry Pi OS |
| Dimensions | 50mm x 20mm x 10mm |
| Weight | 10g |
Pin Configuration and Descriptions
The USB to Audio Jack does not have traditional pins but instead features the following interfaces:
| Interface | Description |
|---|---|
| USB Type-A | Connects to the USB port of the host device to receive digital audio signals. |
| 3.5mm Jack | Outputs analog audio signals to headphones, speakers, or other audio devices. |
Usage Instructions
How to Use the USB to Audio Jack in a Circuit
- Connect the USB Plug: Insert the USB Type-A connector into the USB port of your host device (e.g., laptop, desktop, Raspberry Pi).
- Attach Audio Device: Plug your headphones, speakers, or other audio devices into the 3.5mm audio jack.
- Verify Audio Output:
- On most operating systems, the USB to Audio Jack will be automatically recognized as an external sound card.
- Ensure that the device is selected as the default audio output in your system's sound settings.
Important Considerations and Best Practices
- Driver Installation: For most modern operating systems, no additional drivers are required. However, ensure your system is up to date to avoid compatibility issues.
- Audio Quality: Use high-quality headphones or speakers to fully utilize the device's capabilities.
- Power Supply: The device is powered directly via USB, so ensure the host device provides sufficient power.
- Compatibility with Raspberry Pi: This device works seamlessly with Raspberry Pi boards. Below is an example of how to configure it on Raspberry Pi OS.
Example Code for Raspberry Pi
If you're using the USB to Audio Jack with a Raspberry Pi, you can configure the audio output using the following steps:
- Open the terminal on your Raspberry Pi.
- Use the following commands to set the USB audio device as the default output:
List all audio devices to identify the USB audio device
aplay -l
Open the ALSA configuration file for editing
sudo nano /etc/asound.conf
Add the following lines to set the USB audio device as default
pcm.!default { type hw card 1 # Replace '1' with the card number of your USB audio device }
ctl.!default { type hw card 1 # Replace '1' with the card number of your USB audio device }
Save and exit the file (Ctrl+O, Enter, Ctrl+X)
3. Restart the ALSA sound system to apply the changes:
```bash
sudo systemctl restart alsa
- Test the audio output:
Play a test sound to verify the configuration
speaker-test -t wav -c 2
Troubleshooting and FAQs
Common Issues and Solutions
No Sound Output:
- Ensure the USB to Audio Jack is properly connected to the USB port.
- Verify that the device is selected as the default audio output in your system's sound settings.
- Check the volume levels on both the host device and the connected audio device.
Device Not Recognized:
- Update your operating system to the latest version.
- Try connecting the device to a different USB port.
- On Linux systems, use the
lsusbcommand to check if the device is detected.
Poor Audio Quality:
- Ensure the connected audio device is functioning properly.
- Avoid using excessively long or damaged audio cables.
- Check for electromagnetic interference from nearby devices.
Intermittent Audio:
- Verify that the USB port is providing a stable power supply.
- Avoid moving or wiggling the USB connector during use.
FAQs
Q: Does this device support microphone input?
A: No, the USB to Audio Jack is designed for audio output only and does not support microphone input.
Q: Can I use this device with a smartphone or tablet?
A: This device is primarily designed for use with computers and Raspberry Pi boards. It may not work with smartphones or tablets unless they support USB audio output.
Q: Is it compatible with USB-C ports?
A: The device has a USB Type-A connector. To use it with USB-C ports, you will need a USB-C to USB-A adapter.
Q: Does it require external power?
A: No, the device is powered directly via the USB port of the host device.
By following this documentation, you can effectively use the Raspberry Pi USB to Audio Jack for your audio needs.