Cirkit Designer Logo
Cirkit Designer
Your all-in-one circuit design IDE
Home / 
Component Documentation

How to Use Adafruit PyPortal - CircuitPython Powered Internet Display: Examples, Pinouts, and Specs

Image of Adafruit PyPortal - CircuitPython Powered Internet Display
Cirkit Designer LogoDesign with Adafruit PyPortal - CircuitPython Powered Internet Display in Cirkit Designer

Introduction

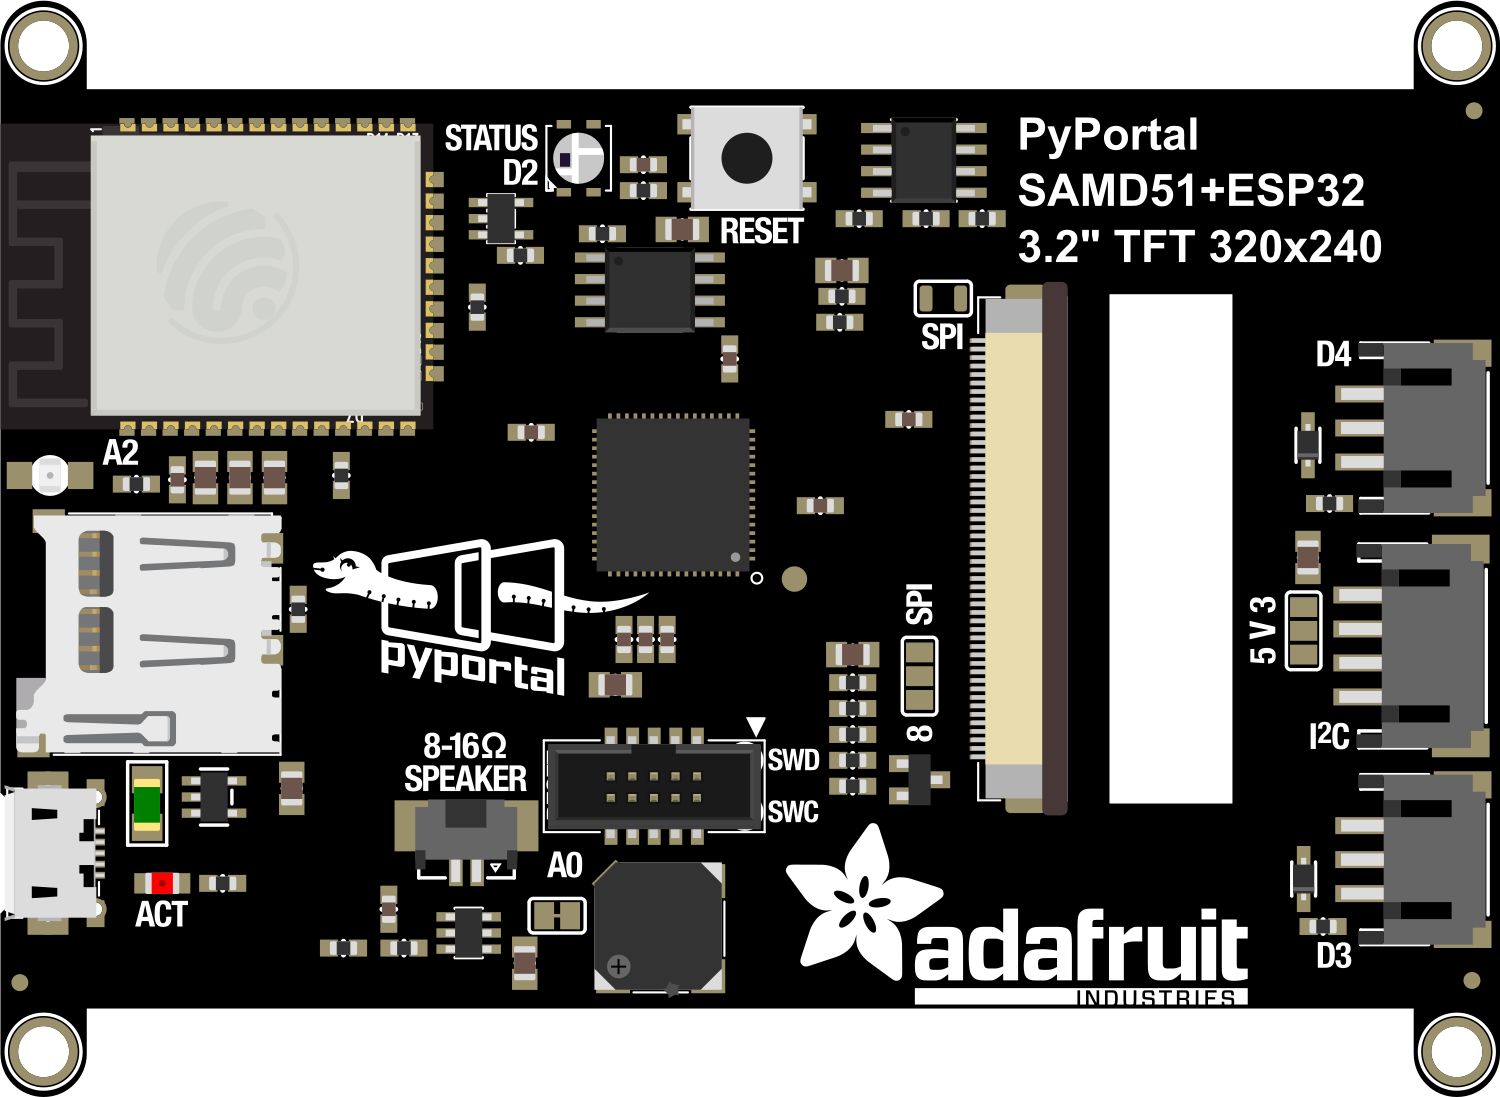
The Adafruit PyPortal is an innovative and versatile internet-connected display that simplifies the creation of Internet of Things (IoT) projects. With its 3.2-inch touchscreen, integrated WiFi module, and support for CircuitPython, the PyPortal is designed for ease of use and rapid development. It's perfect for displaying information from the web, controlling smart devices, or serving as an interactive interface for your projects.

Explore Projects Built with Adafruit PyPortal - CircuitPython Powered Internet Display

Use Cirkit Designer to design, explore, and prototype these projects online. Some projects support real-time simulation. Click "Open Project" to start designing instantly!
Battery-Powered Smart Light with Proximity Sensor and OLED Display using Adafruit QT Py RP2040
Image of lab: A project utilizing Adafruit PyPortal - CircuitPython Powered Internet Display in a practical application
This circuit is a portable, battery-powered system featuring an Adafruit QT Py RP2040 microcontroller that interfaces with an OLED display, a proximity sensor, an accelerometer, and an RGB LED strip. The system is powered by a lithium-ion battery with a step-up boost converter to provide 5V for the LED strip, and it includes a toggle switch for power control. The microcontroller communicates with the sensors and display via I2C.
Cirkit Designer LogoOpen Project in Cirkit Designer
ESP8266 NodeMCU OLED Display: Wi-Fi Enabled Hello World Project
Image of oled: A project utilizing Adafruit PyPortal - CircuitPython Powered Internet Display in a practical application
This circuit features an ESP8266 NodeMCU microcontroller connected to a 1.3-inch OLED display via I2C communication. The microcontroller initializes the display and renders basic graphics and text, demonstrating a simple interface for visual output.
Cirkit Designer LogoOpen Project in Cirkit Designer
ESP32-Powered NTP Clock with Multiple GC9A01 Displays
Image of InfoOrbsFork: A project utilizing Adafruit PyPortal - CircuitPython Powered Internet Display in a practical application
This circuit features an ESP32 microcontroller connected to multiple GC9A01 displays and a USB Type C breakout for power. The ESP32 runs a sketch to retrieve the current time from an NTP server over WiFi and displays the hours and minutes across the GC9A01 displays, with each display showing a single digit or colon separator. Pushbuttons are connected to GPIOs on the ESP32, potentially for user input to control display functions or settings.
Cirkit Designer LogoOpen Project in Cirkit Designer
Raspberry Pi Pico W UV Monitoring System with OLED Display and RTC
Image of PCB_UV_METER: A project utilizing Adafruit PyPortal - CircuitPython Powered Internet Display in a practical application
This circuit features a Raspberry Pi Pico W microcontroller interfaced with a 128x64 OLED display, an RTC module, and an ML8511 UV sensor. The microcontroller reads UV sensor data and can display information on the OLED screen while keeping track of time using the RTC module. Power and ground connections are shared among all components.
Cirkit Designer LogoOpen Project in Cirkit Designer

Explore Projects Built with Adafruit PyPortal - CircuitPython Powered Internet Display

Use Cirkit Designer to design, explore, and prototype these projects online. Some projects support real-time simulation. Click "Open Project" to start designing instantly!
Image of lab: A project utilizing Adafruit PyPortal - CircuitPython Powered Internet Display in a practical application
Battery-Powered Smart Light with Proximity Sensor and OLED Display using Adafruit QT Py RP2040
This circuit is a portable, battery-powered system featuring an Adafruit QT Py RP2040 microcontroller that interfaces with an OLED display, a proximity sensor, an accelerometer, and an RGB LED strip. The system is powered by a lithium-ion battery with a step-up boost converter to provide 5V for the LED strip, and it includes a toggle switch for power control. The microcontroller communicates with the sensors and display via I2C.
Cirkit Designer LogoOpen Project in Cirkit Designer
Image of oled: A project utilizing Adafruit PyPortal - CircuitPython Powered Internet Display in a practical application
ESP8266 NodeMCU OLED Display: Wi-Fi Enabled Hello World Project
This circuit features an ESP8266 NodeMCU microcontroller connected to a 1.3-inch OLED display via I2C communication. The microcontroller initializes the display and renders basic graphics and text, demonstrating a simple interface for visual output.
Cirkit Designer LogoOpen Project in Cirkit Designer
Image of InfoOrbsFork: A project utilizing Adafruit PyPortal - CircuitPython Powered Internet Display in a practical application
ESP32-Powered NTP Clock with Multiple GC9A01 Displays
This circuit features an ESP32 microcontroller connected to multiple GC9A01 displays and a USB Type C breakout for power. The ESP32 runs a sketch to retrieve the current time from an NTP server over WiFi and displays the hours and minutes across the GC9A01 displays, with each display showing a single digit or colon separator. Pushbuttons are connected to GPIOs on the ESP32, potentially for user input to control display functions or settings.
Cirkit Designer LogoOpen Project in Cirkit Designer
Image of PCB_UV_METER: A project utilizing Adafruit PyPortal - CircuitPython Powered Internet Display in a practical application
Raspberry Pi Pico W UV Monitoring System with OLED Display and RTC
This circuit features a Raspberry Pi Pico W microcontroller interfaced with a 128x64 OLED display, an RTC module, and an ML8511 UV sensor. The microcontroller reads UV sensor data and can display information on the OLED screen while keeping track of time using the RTC module. Power and ground connections are shared among all components.
Cirkit Designer LogoOpen Project in Cirkit Designer

Common Applications and Use Cases

  • Smart home control panels
  • Data visualization and dashboards
  • Interactive art installations
  • Educational tools and learning platforms
  • Custom IoT interfaces

Technical Specifications

Key Technical Details

  • Display: 3.2" diagonal TFT LCD, 320x240 pixels
  • Touchscreen: Resistive touch overlay
  • Processor: ATSAMD51J20
  • Memory: 8 MB SPI Flash storage
  • Wireless Connectivity: Single-band 2.4 GHz Wi-Fi (802.11b/g/n)
  • I/O Pins: Digital I/O and analog inputs
  • Power Ratings:
    • Input Voltage (VIN): 5V DC
    • Logic Level: 3.3V

Pin Configuration and Descriptions

Pin Number Name Description
1 GND Ground
2 3V3 3.3V power
3 VIN 5V input
... ... ...
n Dn Digital pin n

Note: This is a simplified representation. Refer to the official datasheet for complete pinout information.

Usage Instructions

Integrating with a Circuit

  1. Powering the PyPortal: Connect a 5V power supply to the VIN pin and GND to the ground.
  2. Programming: Connect the PyPortal to your computer via USB and follow the Adafruit guide to set up CircuitPython.
  3. Displaying Content: Use the displayio library to control the screen and display text, images, or graphics.
  4. Touchscreen Interaction: Utilize the touchscreen library to detect and respond to touch events.

Important Considerations and Best Practices

  • Always ensure that the power supply is within the specified voltage range to prevent damage.
  • When handling the touchscreen, be cautious to avoid scratches and pressure marks.
  • Use proper ESD precautions when working with the device to avoid static damage.
  • Keep the firmware and libraries updated to the latest versions for optimal performance and security.

Troubleshooting and FAQs

Common Issues

  • Display not responding: Ensure that the display connections are secure and the correct libraries are installed.
  • WiFi connectivity issues: Check the WiFi credentials and signal strength. Update the firmware if necessary.
  • Touchscreen inaccuracies: Calibrate the touchscreen using the calibration script provided by Adafruit.

Solutions and Tips for Troubleshooting

  • Resetting the PyPortal: Sometimes, a simple reset can resolve issues. Use the reset button on the board to reboot the system.
  • Updating Libraries: Make sure all CircuitPython libraries are up to date, as they are frequently improved and updated.
  • Consult the Adafruit Forums: The Adafruit community is a valuable resource for troubleshooting and advice.

Example Code for Arduino UNO


Import necessary libraries

import board import displayio import adafruit_touchscreen import adafruit_pyportal

Initialize the PyPortal

pyportal = adafruit_pyportal.PyPortal()

Define the display context

display = board.DISPLAY

Create a bitmap with two colors

bitmap = displayio.Bitmap(320, 240, 2)

Create a two color palette

palette = displayio.Palette(2) palette[0] = 0x000000 # Black palette[1] = 0xFFFFFF # White

Create a TileGrid using the Bitmap and Palette

tile_grid = displayio.TileGrid(bitmap, pixel_shader=palette)

Create a Group to hold the TileGrid

group = displayio.Group()

Add the TileGrid to the Group

group.append(tile_grid)

Show the Group on the Display

display.show(group)

Loop forever so you can enjoy your image

while True: pass


*Note: This example assumes you have the necessary CircuitPython libraries installed on your PyPortal.*

Remember to keep your code comments concise and within the 80 character line length limit. This ensures readability and maintainability of your code.