Cirkit Designer Logo
Cirkit Designer
Your all-in-one circuit design IDE
Home / 
Component Documentation

How to Use DFRobot EC Sensor: Examples, Pinouts, and Specs

Image of DFRobot EC Sensor
Cirkit Designer LogoDesign with DFRobot EC Sensor in Cirkit Designer

Introduction

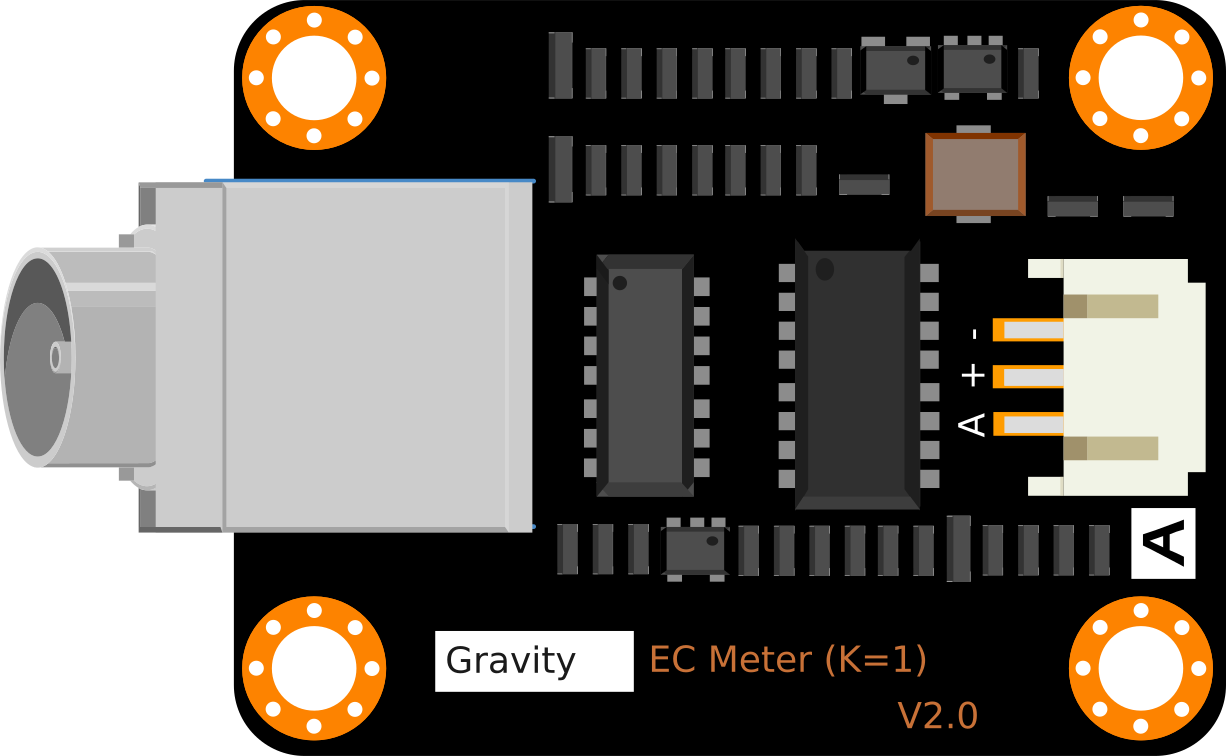
The DFRobot EC Sensor is a high-precision sensor designed to measure the electrical conductivity (EC) of a solution. Electrical conductivity is a key parameter in determining the concentration of ions in water, making this sensor an essential tool for applications such as water quality monitoring, hydroponics, aquaculture, and environmental research. By providing accurate and reliable measurements, the DFRobot EC Sensor helps users maintain optimal water conditions for various applications.

Explore Projects Built with DFRobot EC Sensor

Use Cirkit Designer to design, explore, and prototype these projects online. Some projects support real-time simulation. Click "Open Project" to start designing instantly!
Arduino UNO-Based Battery-Powered Robotic System with Ultrasonic Sensors and Magnetometer
Image of Autonomous Mobile robot v1: A project utilizing DFRobot EC Sensor in a practical application
This circuit is a sensor-based robotic system controlled by an Arduino UNO. It includes three HC-SR04 ultrasonic sensors for distance measurement, a QMC5883L magnetometer for orientation detection, and an L298N motor driver to control two DC motors, all powered by a Li-ion 18650 battery.
Cirkit Designer LogoOpen Project in Cirkit Designer
ESP32 CAM and Ultrasonic Sensor-Based Wi-Fi Controlled Robotic Vehicle
Image of Mitra: A project utilizing DFRobot EC Sensor in a practical application
This circuit is a robotic system that uses an ESP32 CAM for image processing, multiple IR sensors for obstacle detection, and an HC-SR04 ultrasonic sensor for distance measurement. The system is controlled by a DRIVER SHIELD L293D, which also drives several DC motors and motorized wheels, powered by a 12V battery with a rocker switch and battery indicator for power management.
Cirkit Designer LogoOpen Project in Cirkit Designer
ESP32-Controlled Obstacle Avoidance Robot with L298N Motor Driver and HC-SR04 Sensors
Image of Robot TUDONG: A project utilizing DFRobot EC Sensor in a practical application
This circuit is designed for a robot with obstacle avoidance capabilities, utilizing three HC-SR04 ultrasonic sensors for detecting obstacles in front, left, and right directions. An ESP32 microcontroller processes the distance data from the sensors and controls the movement of the robot through an L298N DC motor driver, which in turn drives two gearmotors attached to the robot's wheels. The robot can move forward, backward, and turn left or right based on sensor inputs to navigate around obstacles.
Cirkit Designer LogoOpen Project in Cirkit Designer
Arduino Mega and ESP32 Powered Robotic Controller with Distance Sensing and Line Tracking
Image of PID Line Following Robot (Removing Second BB): A project utilizing DFRobot EC Sensor in a practical application
This circuit is designed for a mobile robot with environmental sensing and precise motor control. It features dual microcontroller architecture for complex tasks, integrating motion control, distance measurement, and surface detection, all powered by a rechargeable battery system with power management.
Cirkit Designer LogoOpen Project in Cirkit Designer

Explore Projects Built with DFRobot EC Sensor

Use Cirkit Designer to design, explore, and prototype these projects online. Some projects support real-time simulation. Click "Open Project" to start designing instantly!
Image of Autonomous Mobile robot v1: A project utilizing DFRobot EC Sensor in a practical application
Arduino UNO-Based Battery-Powered Robotic System with Ultrasonic Sensors and Magnetometer
This circuit is a sensor-based robotic system controlled by an Arduino UNO. It includes three HC-SR04 ultrasonic sensors for distance measurement, a QMC5883L magnetometer for orientation detection, and an L298N motor driver to control two DC motors, all powered by a Li-ion 18650 battery.
Cirkit Designer LogoOpen Project in Cirkit Designer
Image of Mitra: A project utilizing DFRobot EC Sensor in a practical application
ESP32 CAM and Ultrasonic Sensor-Based Wi-Fi Controlled Robotic Vehicle
This circuit is a robotic system that uses an ESP32 CAM for image processing, multiple IR sensors for obstacle detection, and an HC-SR04 ultrasonic sensor for distance measurement. The system is controlled by a DRIVER SHIELD L293D, which also drives several DC motors and motorized wheels, powered by a 12V battery with a rocker switch and battery indicator for power management.
Cirkit Designer LogoOpen Project in Cirkit Designer
Image of Robot TUDONG: A project utilizing DFRobot EC Sensor in a practical application
ESP32-Controlled Obstacle Avoidance Robot with L298N Motor Driver and HC-SR04 Sensors
This circuit is designed for a robot with obstacle avoidance capabilities, utilizing three HC-SR04 ultrasonic sensors for detecting obstacles in front, left, and right directions. An ESP32 microcontroller processes the distance data from the sensors and controls the movement of the robot through an L298N DC motor driver, which in turn drives two gearmotors attached to the robot's wheels. The robot can move forward, backward, and turn left or right based on sensor inputs to navigate around obstacles.
Cirkit Designer LogoOpen Project in Cirkit Designer
Image of PID Line Following Robot (Removing Second BB): A project utilizing DFRobot EC Sensor in a practical application
Arduino Mega and ESP32 Powered Robotic Controller with Distance Sensing and Line Tracking
This circuit is designed for a mobile robot with environmental sensing and precise motor control. It features dual microcontroller architecture for complex tasks, integrating motion control, distance measurement, and surface detection, all powered by a rechargeable battery system with power management.
Cirkit Designer LogoOpen Project in Cirkit Designer

Technical Specifications

  • Model: DFRobot EC Sensor
  • Measurement Range: 0–20 mS/cm
  • Accuracy: ±2% F.S. (Full Scale)
  • Operating Voltage: 3.3V–5.5V
  • Output Signal: Analog voltage
  • Temperature Compensation: Supported (requires an external temperature sensor)
  • Operating Temperature: 0°C–60°C
  • Connector Type: BNC
  • Dimensions: 42mm x 32mm (PCB)

Pin Configuration and Descriptions

The DFRobot EC Sensor module has a 3-pin interface for connecting to a microcontroller. Below is the pin configuration:

Pin Name Description
1 VCC Power supply input (3.3V–5.5V)
2 GND Ground connection
3 AOUT Analog output signal proportional to EC value

Usage Instructions

How to Use the DFRobot EC Sensor in a Circuit

  1. Connect the Sensor:

    • Connect the VCC pin to the 5V (or 3.3V) pin of your microcontroller.
    • Connect the GND pin to the ground (GND) of your microcontroller.
    • Connect the AOUT pin to an analog input pin on your microcontroller (e.g., A0 on an Arduino UNO).
  2. Calibrate the Sensor:

    • Before using the sensor, it is essential to calibrate it using a standard EC solution (e.g., 1413 µS/cm).
    • Follow the calibration procedure provided in the DFRobot EC Sensor manual to ensure accurate readings.
  3. Temperature Compensation:

    • For accurate measurements, use a temperature sensor (e.g., DS18B20) to perform temperature compensation.
    • The EC value changes with temperature, so compensation is necessary for precise results.
  4. Read the Analog Signal:

    • The sensor outputs an analog voltage signal proportional to the EC value. Use an ADC (Analog-to-Digital Converter) on your microcontroller to read this signal.

Important Considerations and Best Practices

  • Avoid Air Bubbles: Ensure the probe is fully submerged in the solution without air bubbles, as they can affect the accuracy of the readings.
  • Clean the Probe: Rinse the probe with distilled water after each use to prevent contamination.
  • Avoid Corrosion: Do not leave the probe in highly acidic or alkaline solutions for extended periods.
  • Use Shielded Cables: To minimize electrical noise, use shielded cables for the sensor connections.

Example Code for Arduino UNO

Below is an example code snippet to interface the DFRobot EC Sensor with an Arduino UNO:

// Include necessary libraries
const int EC_PIN = A0; // Analog pin connected to the sensor's AOUT pin
float voltage;         // Variable to store the sensor's output voltage
float ecValue;         // Variable to store the calculated EC value

void setup() {
  Serial.begin(9600); // Initialize serial communication at 9600 baud
  pinMode(EC_PIN, INPUT); // Set the EC_PIN as an input
}

void loop() {
  // Read the analog voltage from the sensor
  int sensorValue = analogRead(EC_PIN);
  
  // Convert the analog value to voltage (assuming 5V reference)
  voltage = sensorValue * (5.0 / 1023.0);
  
  // Calculate the EC value (example formula, adjust based on calibration)
  ecValue = voltage * 1000; // Convert voltage to EC in µS/cm
  
  // Print the EC value to the Serial Monitor
  Serial.print("EC Value: ");
  Serial.print(ecValue);
  Serial.println(" µS/cm");
  
  delay(1000); // Wait for 1 second before the next reading
}

Troubleshooting and FAQs

Common Issues and Solutions

  1. No Output or Incorrect Readings:

    • Cause: Loose or incorrect connections.
    • Solution: Double-check all connections, ensuring the VCC, GND, and AOUT pins are properly connected.
  2. Fluctuating Readings:

    • Cause: Electrical noise or air bubbles in the solution.
    • Solution: Use shielded cables to reduce noise and ensure the probe is fully submerged without air bubbles.
  3. Inaccurate Measurements:

    • Cause: Calibration not performed or incorrect calibration.
    • Solution: Calibrate the sensor using a standard EC solution before use.
  4. Probe Corrosion:

    • Cause: Prolonged exposure to extreme pH levels or improper cleaning.
    • Solution: Rinse the probe with distilled water after each use and avoid leaving it in extreme solutions for long periods.

FAQs

Q1: Can the DFRobot EC Sensor be used in seawater?
A1: Yes, the sensor can measure the EC of seawater, but ensure it is calibrated for high EC ranges.

Q2: How often should I calibrate the sensor?
A2: It is recommended to calibrate the sensor before each use or at least once a week for consistent accuracy.

Q3: Can I use the sensor without temperature compensation?
A3: Yes, but the readings may not be accurate if the solution's temperature deviates significantly from the calibration temperature.

Q4: What is the lifespan of the probe?
A4: The probe's lifespan depends on usage and maintenance. With proper care, it can last for several years.

By following this documentation, users can effectively integrate and utilize the DFRobot EC Sensor in their projects for accurate and reliable EC measurements.