Cirkit Designer Logo
Cirkit Designer
Your all-in-one circuit design IDE
Home / 
Component Documentation

How to Use BME680: Examples, Pinouts, and Specs

Image of BME680
Cirkit Designer LogoDesign with BME680 in Cirkit Designer

Introduction

The BME680 is a versatile digital sensor designed to measure temperature, humidity, pressure, and air quality. This sensor is widely used in environmental monitoring and Internet of Things (IoT) applications due to its compact size, low power consumption, and high accuracy. The BME680 integrates gas, pressure, humidity, and temperature sensors, making it an ideal choice for applications such as weather stations, smart home devices, and wearable technology.

Explore Projects Built with BME680

Use Cirkit Designer to design, explore, and prototype these projects online. Some projects support real-time simulation. Click "Open Project" to start designing instantly!
Arduino UNO with Adafruit BME680 Sensor Data Logger
Image of Adafruit BME680 + Arduino UNO: A project utilizing BME680 in a practical application
This circuit connects an Adafruit BME680 sensor to an Arduino UNO for the purpose of measuring environmental data such as temperature, pressure, humidity, gas resistance, and altitude. The BME680 is interfaced with the Arduino over I2C, with power supplied from the Arduino's 5V pin. The embedded code on the Arduino reads the sensor data and outputs it to the serial monitor, allowing for real-time environmental monitoring.
Cirkit Designer LogoOpen Project in Cirkit Designer
Wi-Fi Enabled Weather Station with Wemos D1 Mini and BME680
Image of BME680 ESP8266 Air Qlty: A project utilizing BME680 in a practical application
This circuit consists of a Wemos D1 Mini microcontroller connected to a BME680 environmental sensor for measuring temperature, humidity, and air quality. The Wemos D1 Mini is powered via a USB C chassis mount, and it communicates with the BME680 sensor using I2C protocol.
Cirkit Designer LogoOpen Project in Cirkit Designer
Arduino Uno and BME680 Sensor-Based Environmental Monitoring System
Image of BME680: A project utilizing BME680 in a practical application
This circuit consists of an Arduino Uno R3 connected to a BME680 environmental sensor. The Arduino reads temperature, pressure, humidity, and gas resistance data from the BME680 via I2C communication and outputs the data to the Serial Monitor every 2 seconds.
Cirkit Designer LogoOpen Project in Cirkit Designer
ESP32-Based Environmental Monitoring System with Solar Charging
Image of IoT Ola (Final): A project utilizing BME680 in a practical application
This circuit features an ESP32 microcontroller interfaced with a BME/BMP280 sensor for environmental monitoring and an MH-Z19B sensor for CO2 measurement, both communicating via I2C (SCL, SDA) and serial (TX, RX) connections respectively. It includes a SIM800L module for GSM communication, connected to the ESP32 via serial (TXD, RXD). Power management is handled by two TP4056 modules for charging 18650 Li-ion batteries via solar panels, with a step-up boost converter to provide consistent voltage to the MH-Z19B, and voltage regulation for the SIM800L. Decoupling capacitors are used to stabilize the power supply to the BME/BMP280 and ESP32.
Cirkit Designer LogoOpen Project in Cirkit Designer

Explore Projects Built with BME680

Use Cirkit Designer to design, explore, and prototype these projects online. Some projects support real-time simulation. Click "Open Project" to start designing instantly!
Image of Adafruit BME680 + Arduino UNO: A project utilizing BME680 in a practical application
Arduino UNO with Adafruit BME680 Sensor Data Logger
This circuit connects an Adafruit BME680 sensor to an Arduino UNO for the purpose of measuring environmental data such as temperature, pressure, humidity, gas resistance, and altitude. The BME680 is interfaced with the Arduino over I2C, with power supplied from the Arduino's 5V pin. The embedded code on the Arduino reads the sensor data and outputs it to the serial monitor, allowing for real-time environmental monitoring.
Cirkit Designer LogoOpen Project in Cirkit Designer
Image of BME680 ESP8266 Air Qlty: A project utilizing BME680 in a practical application
Wi-Fi Enabled Weather Station with Wemos D1 Mini and BME680
This circuit consists of a Wemos D1 Mini microcontroller connected to a BME680 environmental sensor for measuring temperature, humidity, and air quality. The Wemos D1 Mini is powered via a USB C chassis mount, and it communicates with the BME680 sensor using I2C protocol.
Cirkit Designer LogoOpen Project in Cirkit Designer
Image of BME680: A project utilizing BME680 in a practical application
Arduino Uno and BME680 Sensor-Based Environmental Monitoring System
This circuit consists of an Arduino Uno R3 connected to a BME680 environmental sensor. The Arduino reads temperature, pressure, humidity, and gas resistance data from the BME680 via I2C communication and outputs the data to the Serial Monitor every 2 seconds.
Cirkit Designer LogoOpen Project in Cirkit Designer
Image of IoT Ola (Final): A project utilizing BME680 in a practical application
ESP32-Based Environmental Monitoring System with Solar Charging
This circuit features an ESP32 microcontroller interfaced with a BME/BMP280 sensor for environmental monitoring and an MH-Z19B sensor for CO2 measurement, both communicating via I2C (SCL, SDA) and serial (TX, RX) connections respectively. It includes a SIM800L module for GSM communication, connected to the ESP32 via serial (TXD, RXD). Power management is handled by two TP4056 modules for charging 18650 Li-ion batteries via solar panels, with a step-up boost converter to provide consistent voltage to the MH-Z19B, and voltage regulation for the SIM800L. Decoupling capacitors are used to stabilize the power supply to the BME/BMP280 and ESP32.
Cirkit Designer LogoOpen Project in Cirkit Designer

Technical Specifications

Key Technical Details

Parameter Value
Operating Voltage 1.7V to 3.6V
Current Consumption 0.15mA (typical)
Temperature Range -40°C to +85°C
Humidity Range 0% to 100% RH
Pressure Range 300 hPa to 1100 hPa
Gas Measurement VOCs (Volatile Organic Compounds)
Interface I2C, SPI

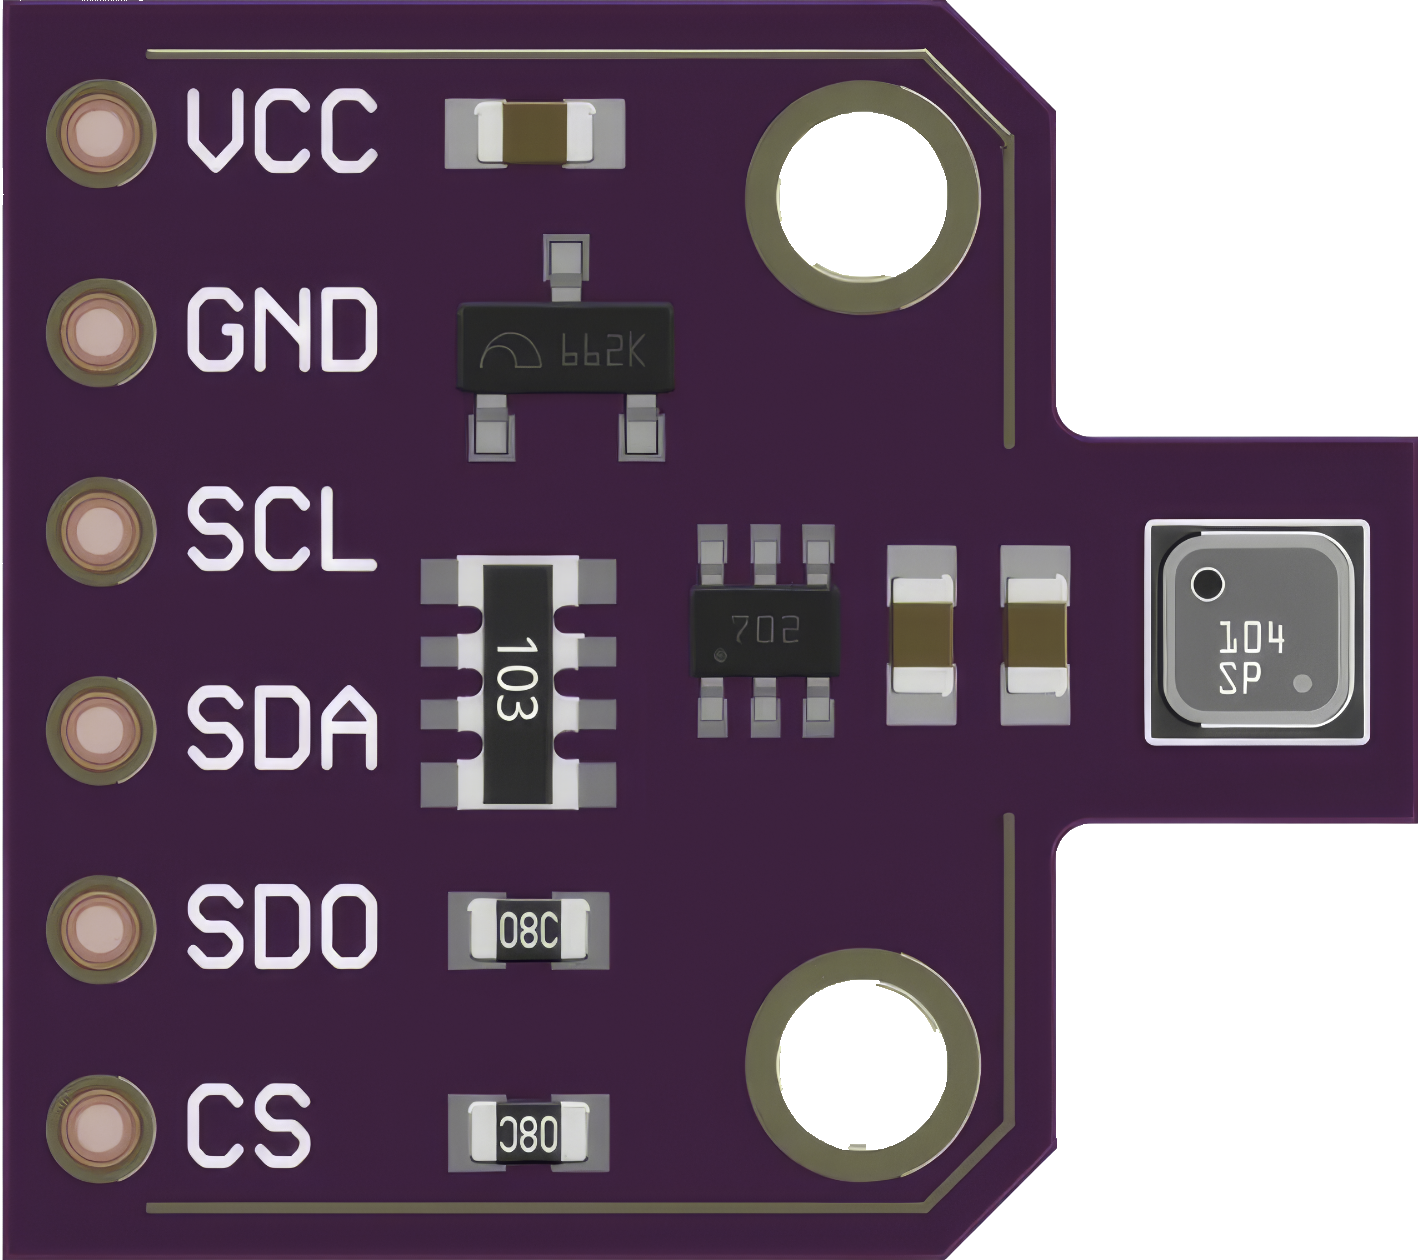
Pin Configuration and Descriptions

Pin Name Description
1 VDD Power Supply (1.7V to 3.6V)
2 GND Ground
3 SCL Serial Clock Line (I2C) / SPI Clock
4 SDA Serial Data Line (I2C) / SPI Data Input/Output
5 CSB Chip Select (SPI)
6 SDO Serial Data Output (SPI)

Usage Instructions

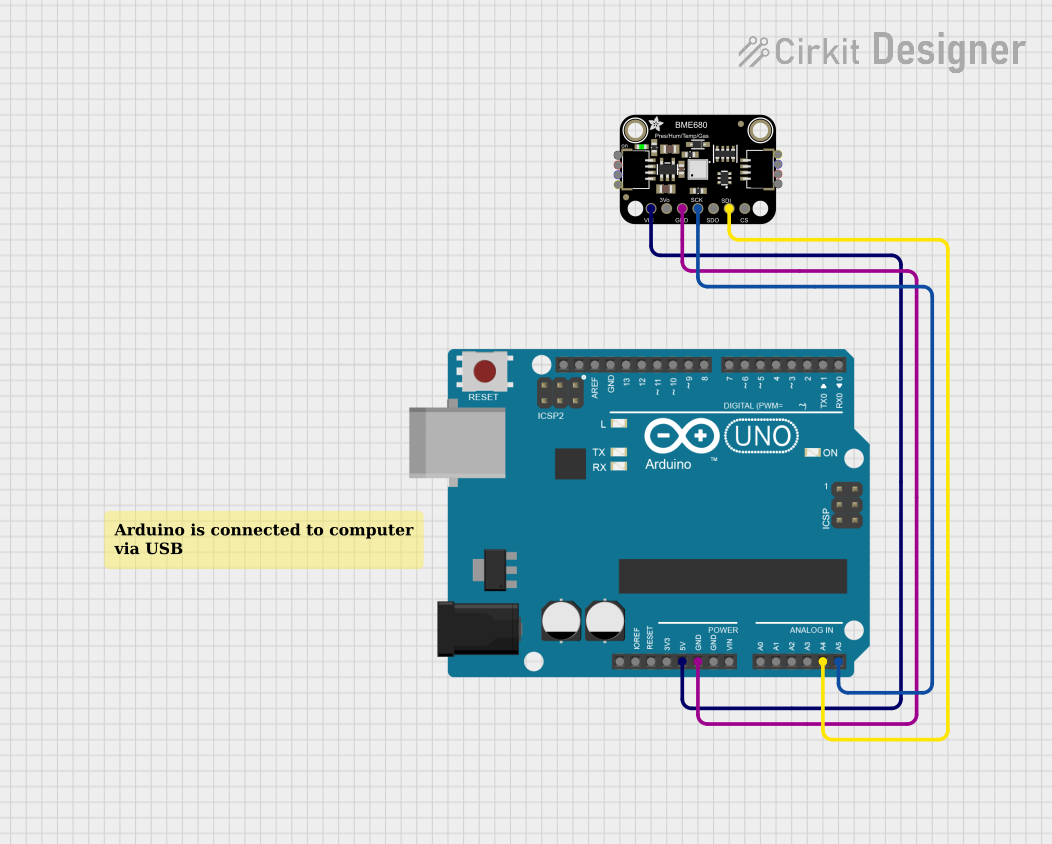
How to Use the BME680 in a Circuit

  1. Power Supply: Connect the VDD pin to a power supply (1.7V to 3.6V) and the GND pin to the ground.
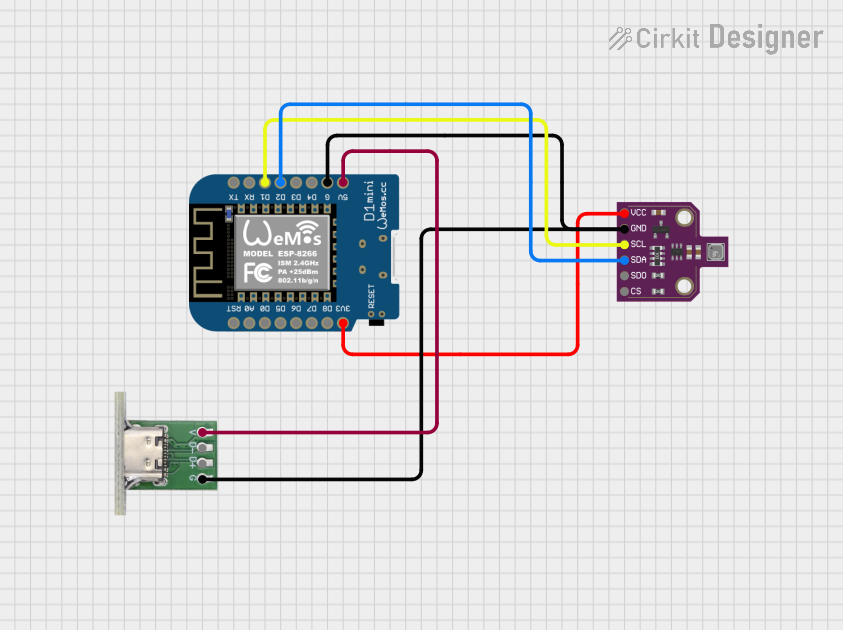
  2. Communication Interface: Choose between I2C or SPI for communication.
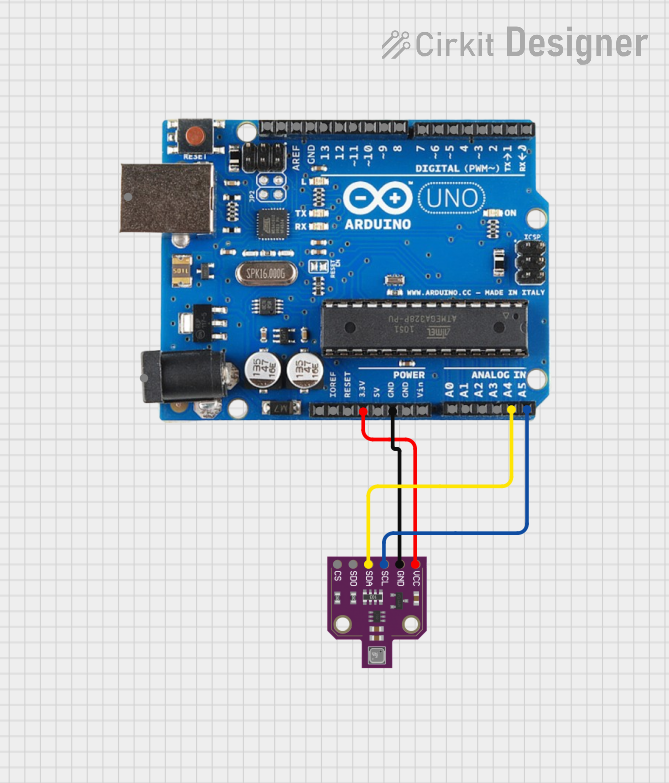
    • For I2C: Connect the SCL pin to the I2C clock line and the SDA pin to the I2C data line.
    • For SPI: Connect the SCL pin to the SPI clock, SDA to SPI data input/output, CSB to chip select, and SDO to SPI data output.
  3. Pull-up Resistors: If using I2C, ensure that pull-up resistors (typically 4.7kΩ) are connected to the SCL and SDA lines.

Important Considerations and Best Practices

  • Power Supply: Ensure a stable power supply within the specified range to avoid inaccurate readings.
  • Placement: Place the sensor in an area with good airflow for accurate environmental measurements.
  • Calibration: Perform calibration if required, especially for gas measurements, to ensure accuracy.
  • I2C Address: The default I2C address for the BME680 is 0x76. Ensure no address conflicts if multiple I2C devices are used.

Example Code for Arduino UNO

Below is an example code to interface the BME680 with an Arduino UNO using the I2C interface.

#include <Wire.h>
#include <Adafruit_Sensor.h>
#include <Adafruit_BME680.h>

// Create an instance of the BME680 sensor
Adafruit_BME680 bme;

void setup() {
  Serial.begin(9600);
  while (!Serial);

  // Initialize the BME680 sensor
  if (!bme.begin()) {
    Serial.println("Could not find a valid BME680 sensor, check wiring!");
    while (1);
  }

  // Set up oversampling and filter initialization
  bme.setTemperatureOversampling(BME680_OS_8X);
  bme.setHumidityOversampling(BME680_OS_2X);
  bme.setPressureOversampling(BME680_OS_4X);
  bme.setIIRFilterSize(BME680_FILTER_SIZE_3);
  bme.setGasHeater(320, 150); // 320°C for 150 ms
}

void loop() {
  // Perform a reading
  if (!bme.performReading()) {
    Serial.println("Failed to perform reading :(");
    return;
  }

  // Print sensor readings to the Serial Monitor
  Serial.print("Temperature = ");
  Serial.print(bme.temperature);
  Serial.println(" °C");

  Serial.print("Humidity = ");
  Serial.print(bme.humidity);
  Serial.println(" %");

  Serial.print("Pressure = ");
  Serial.print(bme.pressure / 100.0);
  Serial.println(" hPa");

  Serial.print("Gas = ");
  Serial.print(bme.gas_resistance / 1000.0);
  Serial.println(" KOhms");

  Serial.println();
  delay(2000); // Wait for 2 seconds before the next reading
}

Troubleshooting and FAQs

Common Issues

  1. Sensor Not Detected:

    • Solution: Check the wiring and ensure the correct I2C address is used. Verify that the power supply is within the specified range.
  2. Inaccurate Readings:

    • Solution: Ensure the sensor is placed in an area with good airflow. Perform calibration if necessary. Check for any sources of interference or contamination near the sensor.
  3. Communication Errors:

    • Solution: Verify the connections for the chosen communication interface (I2C or SPI). Ensure pull-up resistors are used for I2C lines.

FAQs

  1. Can the BME680 measure CO2 levels?

    • No, the BME680 measures VOCs (Volatile Organic Compounds) but not CO2 directly.
  2. What is the typical response time for the BME680?

    • The typical response time for temperature and humidity measurements is less than 1 second. Gas measurements may take longer due to the heating element.
  3. Is the BME680 suitable for outdoor use?

    • The BME680 can be used outdoors, but it should be protected from direct exposure to water and extreme conditions to ensure longevity and accuracy.

By following this documentation, users can effectively integrate the BME680 sensor into their projects, ensuring accurate environmental measurements and reliable performance.