Cirkit Designer Logo
Cirkit Designer
Your all-in-one circuit design IDE
Home / 
Component Documentation

How to Use Raspberry Pi 3B: Examples, Pinouts, and Specs

Image of Raspberry Pi 3B
Cirkit Designer LogoDesign with Raspberry Pi 3B in Cirkit Designer

Introduction

The Raspberry Pi 3B is a highly versatile, credit card-sized single-board computer that has gained popularity due to its affordability and powerful features. It is equipped with a quad-core ARM Cortex-A53 processor and 1GB of RAM, which provides ample power for a wide range of applications. With built-in Wi-Fi and Bluetooth connectivity, the Raspberry Pi 3B is ideal for projects in robotics, gaming, home automation, and as a general-purpose computing platform for programming and educational purposes.

Explore Projects Built with Raspberry Pi 3B

Use Cirkit Designer to design, explore, and prototype these projects online. Some projects support real-time simulation. Click "Open Project" to start designing instantly!
Raspberry Pi 3B-Based Smart Robot with Sensor Integration
Image of Float Robot: A project utilizing Raspberry Pi 3B in a practical application
This circuit integrates a Raspberry Pi 3B with various sensors and a motor driver to create a multi-functional system. It includes a DS18B20 temperature sensor, MPU-6050 accelerometer and gyroscope, QMC5883L magnetometer, and an L298N motor driver controlling two DC motors. The Raspberry Pi handles sensor data and motor control through its GPIO pins.
Cirkit Designer LogoOpen Project in Cirkit Designer
Raspberry Pi 4B-Controlled Biometric Access System with Dual Stepper Motor Actuation
Image of wiring: A project utilizing Raspberry Pi 3B in a practical application
This circuit features a Raspberry Pi 4B as the central controller, interfacing with various sensors and modules. It includes a vl53l0xv2 time-of-flight sensor and an AS5600 magnetic encoder for position sensing, both connected via I2C (SDA/SCL lines). The circuit also controls two DRV8825 stepper motor drivers connected to NEMA 17 stepper motors, receives temperature data from a DS18B20 sensor, and communicates with a fingerprint scanner for biometric input. A TM1637 display module is included for user feedback. Power management is handled by a buck converter and a 12V power supply, with the Raspberry Pi and other 3.3V components powered through the buck converter's regulated output.
Cirkit Designer LogoOpen Project in Cirkit Designer
Raspberry Pi 4B-Controlled Relay System with Environmental Sensing and Power Monitoring
Image of smart_power_meter: A project utilizing Raspberry Pi 3B in a practical application
This circuit is designed to interface a Raspberry Pi 4B with various sensors and output devices. It includes a 4-channel relay for controlling external loads, an ADS1115 for analog-to-digital conversion of signals from a current sensor and a ZMPT101B voltage sensor, a DHT11 for temperature and humidity readings, and a 0.96" OLED display for data output. The Raspberry Pi 4B serves as the central controller, managing data acquisition from the sensors, processing the information, and driving the relay and display based on the sensor inputs and programmed logic.
Cirkit Designer LogoOpen Project in Cirkit Designer
Raspberry Pi 3B Smart Home Automation with Relay Control and DHT11 Sensor
Image of Mycodo v1: A project utilizing Raspberry Pi 3B in a practical application
This circuit integrates a Raspberry Pi 3B with a DHT11 temperature and humidity sensor, a DS3231 RTC module, and a two-channel relay. The Raspberry Pi controls the relay channels and reads data from the DHT11 sensor and the RTC module via GPIO and I2C connections, respectively, enabling environmental monitoring and time-based control applications.
Cirkit Designer LogoOpen Project in Cirkit Designer

Explore Projects Built with Raspberry Pi 3B

Use Cirkit Designer to design, explore, and prototype these projects online. Some projects support real-time simulation. Click "Open Project" to start designing instantly!
Image of Float Robot: A project utilizing Raspberry Pi 3B in a practical application
Raspberry Pi 3B-Based Smart Robot with Sensor Integration
This circuit integrates a Raspberry Pi 3B with various sensors and a motor driver to create a multi-functional system. It includes a DS18B20 temperature sensor, MPU-6050 accelerometer and gyroscope, QMC5883L magnetometer, and an L298N motor driver controlling two DC motors. The Raspberry Pi handles sensor data and motor control through its GPIO pins.
Cirkit Designer LogoOpen Project in Cirkit Designer
Image of wiring: A project utilizing Raspberry Pi 3B in a practical application
Raspberry Pi 4B-Controlled Biometric Access System with Dual Stepper Motor Actuation
This circuit features a Raspberry Pi 4B as the central controller, interfacing with various sensors and modules. It includes a vl53l0xv2 time-of-flight sensor and an AS5600 magnetic encoder for position sensing, both connected via I2C (SDA/SCL lines). The circuit also controls two DRV8825 stepper motor drivers connected to NEMA 17 stepper motors, receives temperature data from a DS18B20 sensor, and communicates with a fingerprint scanner for biometric input. A TM1637 display module is included for user feedback. Power management is handled by a buck converter and a 12V power supply, with the Raspberry Pi and other 3.3V components powered through the buck converter's regulated output.
Cirkit Designer LogoOpen Project in Cirkit Designer
Image of smart_power_meter: A project utilizing Raspberry Pi 3B in a practical application
Raspberry Pi 4B-Controlled Relay System with Environmental Sensing and Power Monitoring
This circuit is designed to interface a Raspberry Pi 4B with various sensors and output devices. It includes a 4-channel relay for controlling external loads, an ADS1115 for analog-to-digital conversion of signals from a current sensor and a ZMPT101B voltage sensor, a DHT11 for temperature and humidity readings, and a 0.96" OLED display for data output. The Raspberry Pi 4B serves as the central controller, managing data acquisition from the sensors, processing the information, and driving the relay and display based on the sensor inputs and programmed logic.
Cirkit Designer LogoOpen Project in Cirkit Designer
Image of Mycodo v1: A project utilizing Raspberry Pi 3B in a practical application
Raspberry Pi 3B Smart Home Automation with Relay Control and DHT11 Sensor
This circuit integrates a Raspberry Pi 3B with a DHT11 temperature and humidity sensor, a DS3231 RTC module, and a two-channel relay. The Raspberry Pi controls the relay channels and reads data from the DHT11 sensor and the RTC module via GPIO and I2C connections, respectively, enabling environmental monitoring and time-based control applications.
Cirkit Designer LogoOpen Project in Cirkit Designer

Technical Specifications

General Features

  • Processor: Broadcom BCM2837, Quad-core ARM Cortex-A53
  • CPU Speed: 1.2 GHz
  • RAM: 1GB LPDDR2
  • Networking: 10/100 Ethernet, 2.4GHz 802.11n wireless
  • Bluetooth: Bluetooth 4.1 Classic, Bluetooth Low Energy
  • Storage: MicroSD
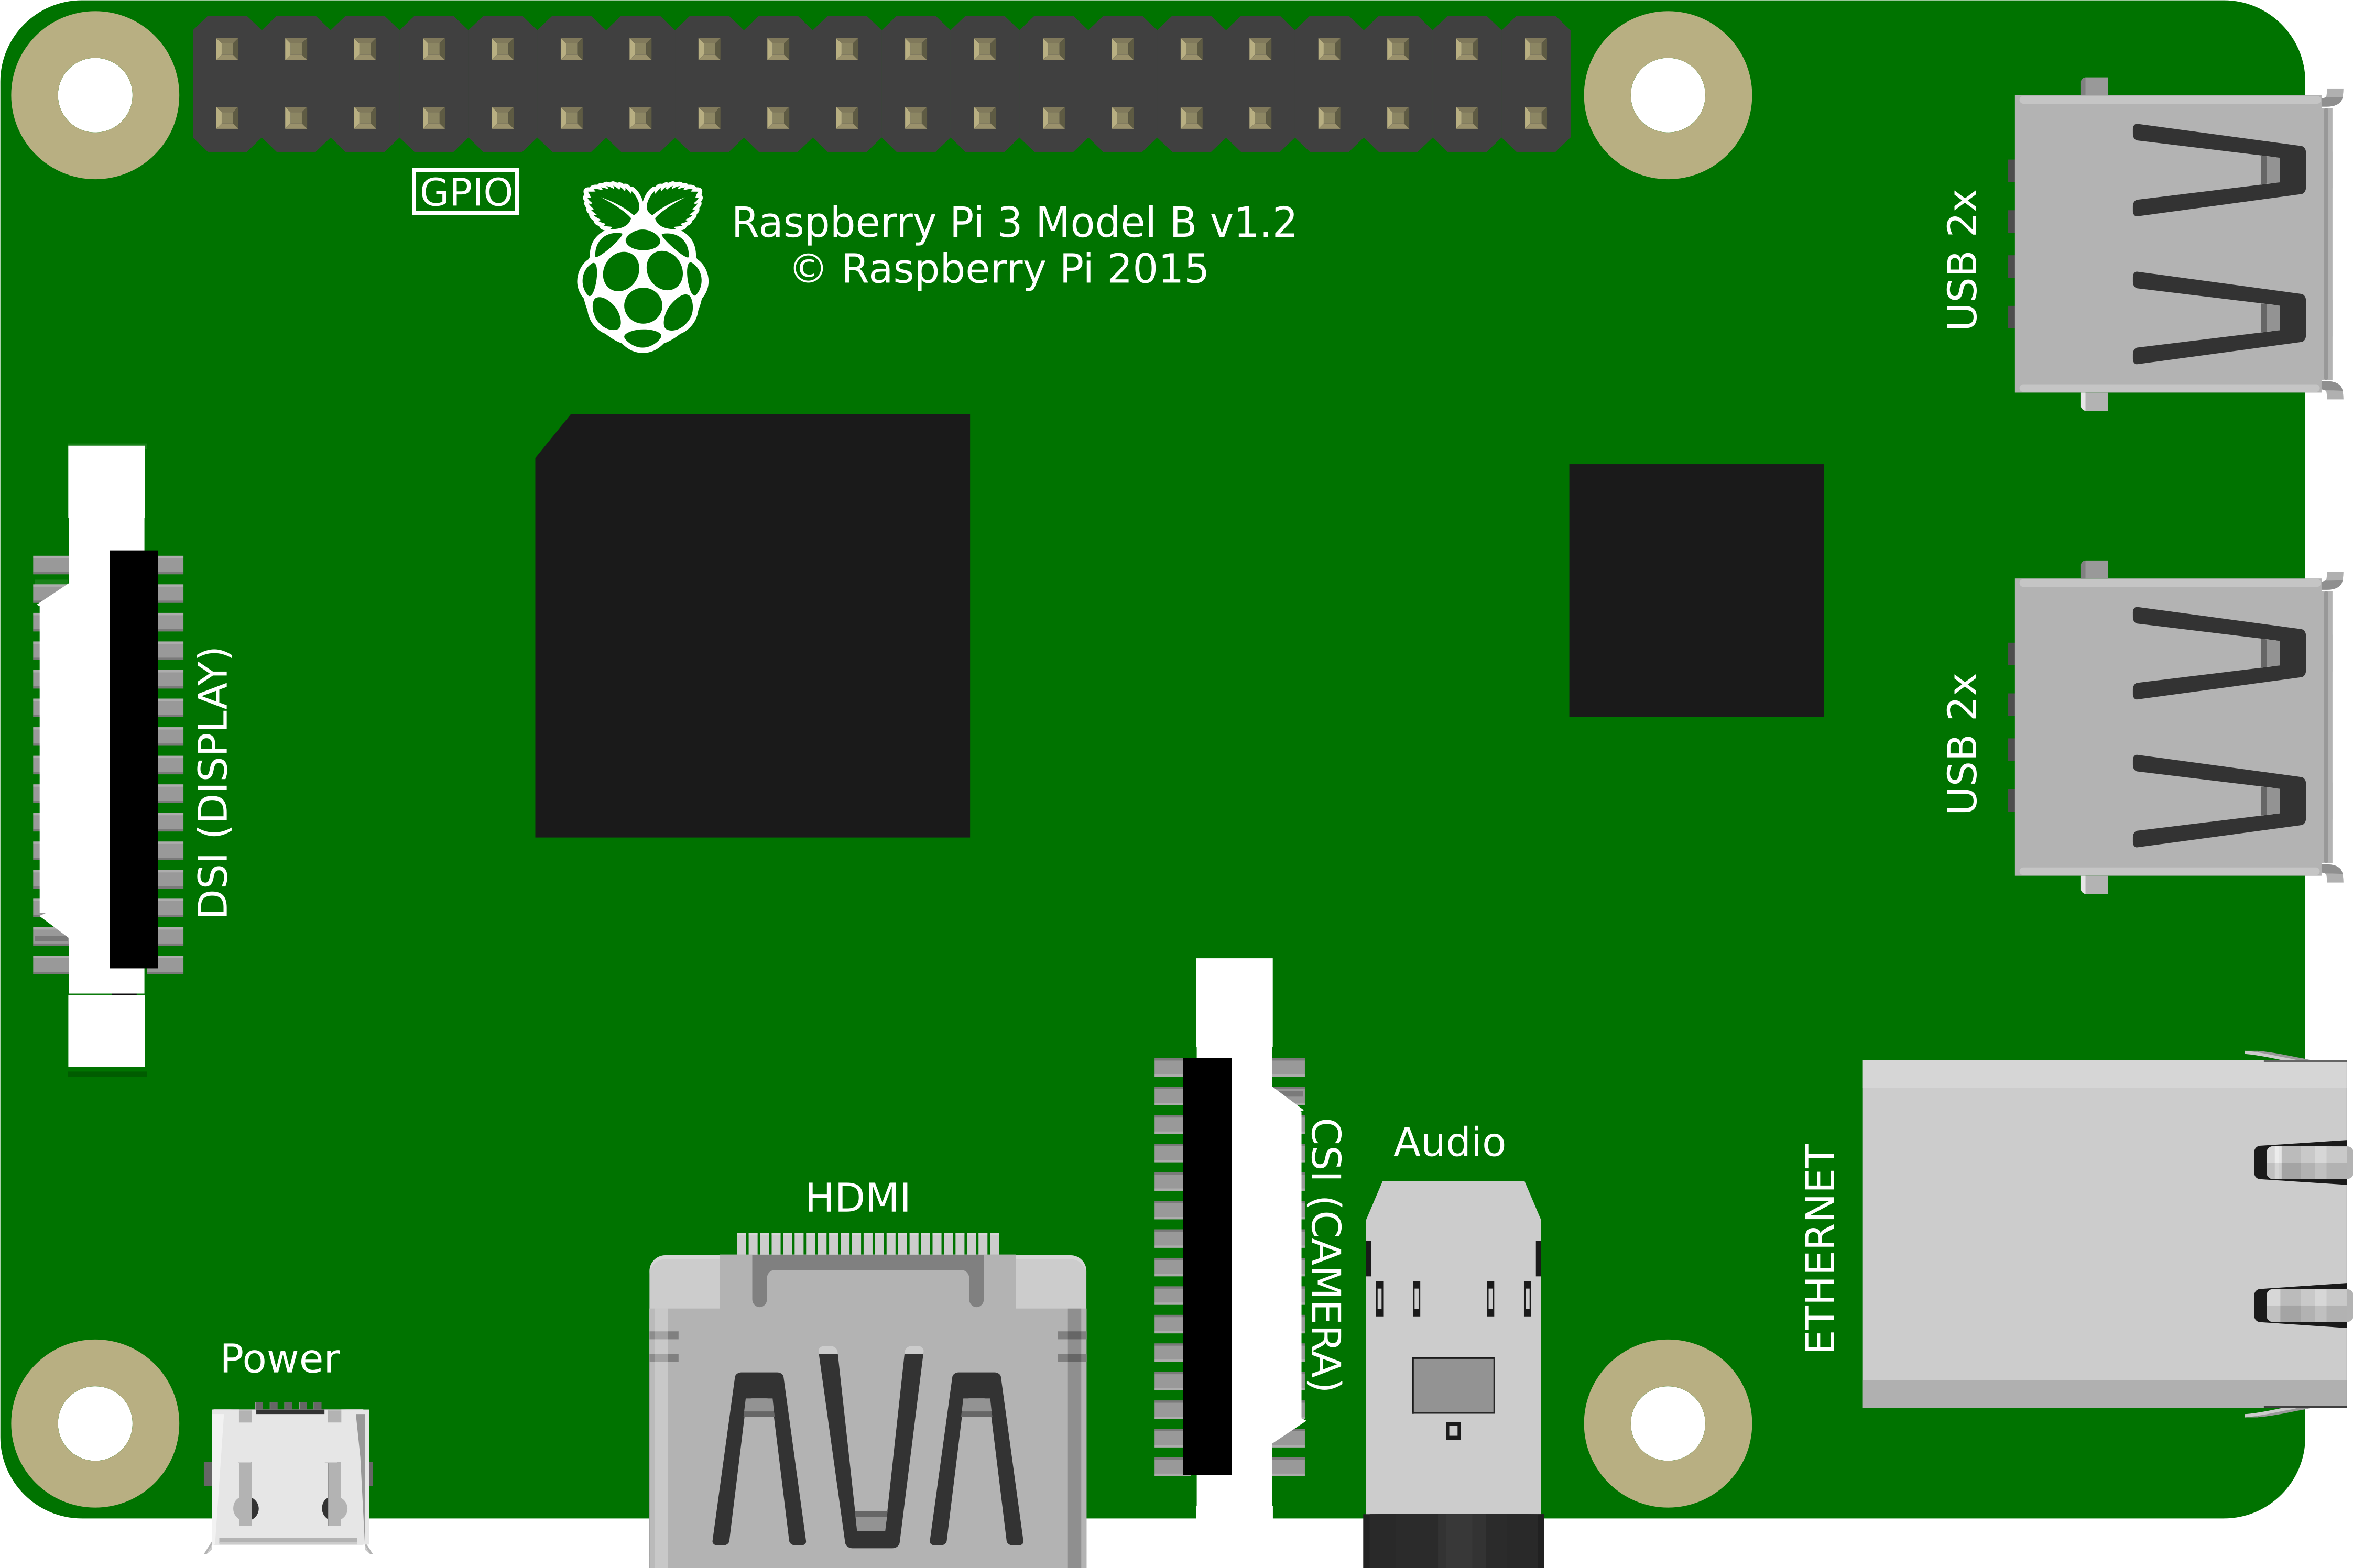
  • GPIO: 40-pin header, populated
  • USB Ports: 4x USB 2.0
  • Video Output: HDMI, Composite video (3.5mm jack)
  • Audio Output: 3.5mm jack, HDMI
  • Power Input: 5V/2.5A DC via micro USB or GPIO
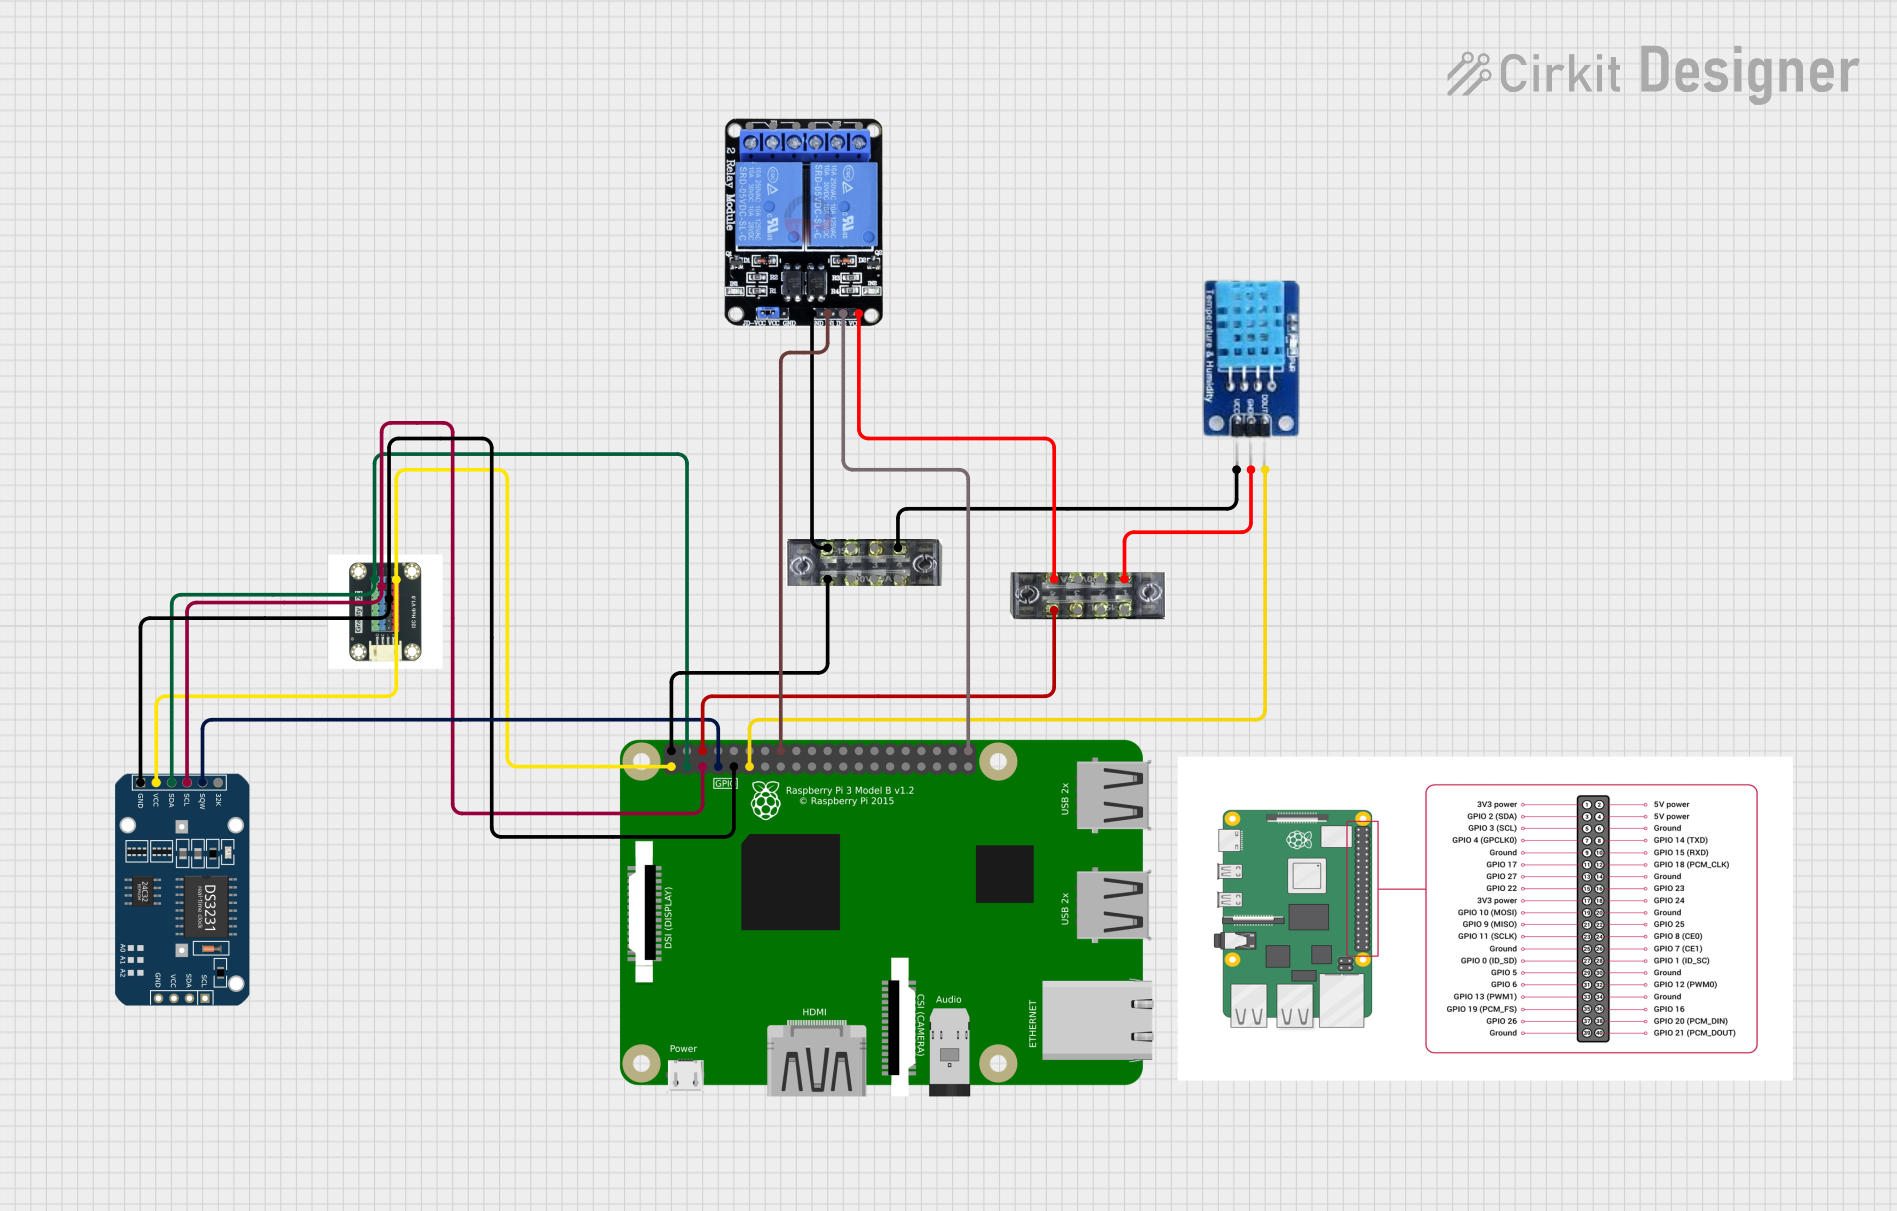
Pin Configuration

Pin Number Description Pin Number Description
1 3.3V Power 2 5V Power
3 GPIO2 (SDA1, I2C) 4 5V Power
5 GPIO3 (SCL1, I2C) 6 Ground
... ... ... ...
39 Ground 40 GPIO21 (SPI0_MISO)

Note: This table is not exhaustive. Refer to the official GPIO pinout diagram for complete details.

Usage Instructions

Setting Up the Raspberry Pi 3B

  1. Prepare the MicroSD Card:

    • Download the latest version of Raspberry Pi OS (formerly Raspbian) or another compatible operating system.
    • Use software like balenaEtcher to flash the OS image onto the MicroSD card.
  2. Connect Peripherals:

    • Insert the MicroSD card into the slot on the Raspberry Pi.
    • Connect a keyboard, mouse, and monitor to the USB and HDMI ports, respectively.
  3. Power Up:

    • Plug in the micro USB power supply, ensuring it meets the 5V/2.5A specification.
  4. Initial Configuration:

    • Follow the on-screen setup instructions to configure your Raspberry Pi, including setting up Wi-Fi and updating the system.

Best Practices

  • Use a high-quality power supply to prevent power-related issues.
  • Always shut down the Raspberry Pi properly before disconnecting the power.
  • Use heat sinks and ensure proper ventilation to prevent overheating.
  • Keep the Raspberry Pi and its connectors clean and free from dust.

Troubleshooting and FAQs

Common Issues

  • Power Issues: If the Raspberry Pi does not boot, ensure the power supply is adequate and the MicroSD card is properly inserted.
  • Overheating: If the Raspberry Pi is overheating, consider using heat sinks or a cooling fan.
  • Network Connectivity: For Wi-Fi issues, check the network settings and ensure the signal strength is adequate.

FAQs

  • Q: Can I use the Raspberry Pi 3B as a desktop computer?

    • A: Yes, with a suitable operating system, it can perform basic desktop computing tasks.
  • Q: What should I do if my Raspberry Pi is not booting?

    • A: Check the power supply, MicroSD card, and HDMI connection. Also, look for the red LED indicator to troubleshoot power issues.

Example Code for GPIO LED Blink (Python)

import RPi.GPIO as GPIO
import time

Set up the GPIO channel

GPIO.setmode(GPIO.BCM) # Use BCM GPIO numbering GPIO.setup(18, GPIO.OUT) # Set GPIO 18 as an output

try: while True: # Turn the LED on GPIO.output(18, GPIO.HIGH) time.sleep(1) # Wait for one second # Turn the LED off GPIO.output(18, GPIO.LOW) time.sleep(1) # Wait for one second except KeyboardInterrupt: # Clean up GPIO on CTRL+C exit GPIO.cleanup()

GPIO.cleanup() # Clean up GPIO on normal exit


*Note: This code assumes an LED is connected to GPIO 18 with a suitable resistor and the other leg to ground.*

This documentation provides an overview of the Raspberry Pi 3B, its technical specifications, usage instructions, and troubleshooting tips. For more detailed information, refer to the official Raspberry Pi documentation and community forums.