Cirkit Designer Logo
Cirkit Designer
Your all-in-one circuit design IDE
Home / 
Component Documentation

How to Use EBYTE LoRa E220: Examples, Pinouts, and Specs

Image of EBYTE LoRa E220
Cirkit Designer LogoDesign with EBYTE LoRa E220 in Cirkit Designer

Introduction

The EBYTE LoRa E220 module is a versatile and powerful wireless transceiver that leverages the Semtech SX1276 chip to provide long-range communication capabilities in the 868/915 MHz frequency bands. This module is designed for IoT and industrial applications where reliable and low-power communication is essential. Common applications include remote sensor networks, home automation, smart agriculture, and other IoT systems.

Explore Projects Built with EBYTE LoRa E220

Use Cirkit Designer to design, explore, and prototype these projects online. Some projects support real-time simulation. Click "Open Project" to start designing instantly!
Arduino UNO and LoRa E220 Wireless Communication Module with Resistor Network
Image of Conexion LoRa: A project utilizing EBYTE LoRa E220 in a practical application
This circuit features an Arduino UNO microcontroller interfaced with an EBYTE LoRa E220 module for wireless communication. The circuit includes two resistors for signal conditioning, with one resistor connected to the Arduino's D9 pin and the other forming part of the connection between the LoRa module's RXD pin and ground. The Arduino controls the LoRa module's mode and communication through its digital pins.
Cirkit Designer LogoOpen Project in Cirkit Designer
Battery-Powered Arduino Nano Weather Station with LoRa Communication
Image of Aduino LoRa Transmitter: A project utilizing EBYTE LoRa E220 in a practical application
This circuit is a wireless sensor system that uses an Arduino Nano to collect data from a DHT22 temperature and humidity sensor and an ACS712 current sensor. The data is transmitted via an EBYTE LoRa E220 module, and the system is powered by a 18650 battery with a TP4056 charging module and a step-up boost converter to ensure a stable 5V supply.
Cirkit Designer LogoOpen Project in Cirkit Designer
ESP8266 NodeMCU with LoRa and RS-485 Communication and Ethernet Connectivity
Image of Wiring Diagram LoRa: A project utilizing EBYTE LoRa E220 in a practical application
This circuit serves as a multi-protocol communication hub featuring two ESP8266 NodeMCUs for processing, each connected to a LoRa Ra-02 SX1278 for long-range wireless communication. One NodeMCU is also connected to an RS-485 module for serial communication and a W5500 Ethernet module for network connectivity, with MB102 modules supplying power.
Cirkit Designer LogoOpen Project in Cirkit Designer
ESP8266 NodeMCU with GPS and LoRa Connectivity
Image of Copy of lora based gps traking: A project utilizing EBYTE LoRa E220 in a practical application
This circuit comprises an ESP8266 NodeMCU microcontroller interfaced with a LoRa Ra-02 SX1278 module for long-range communication and a GPS NEO 6M module for location tracking. The ESP8266 reads GPS data via UART and transmits it using the LoRa module, which is connected via SPI. A 3.7v battery powers the system, making it suitable for remote tracking applications.
Cirkit Designer LogoOpen Project in Cirkit Designer

Explore Projects Built with EBYTE LoRa E220

Use Cirkit Designer to design, explore, and prototype these projects online. Some projects support real-time simulation. Click "Open Project" to start designing instantly!
Image of Conexion LoRa: A project utilizing EBYTE LoRa E220 in a practical application
Arduino UNO and LoRa E220 Wireless Communication Module with Resistor Network
This circuit features an Arduino UNO microcontroller interfaced with an EBYTE LoRa E220 module for wireless communication. The circuit includes two resistors for signal conditioning, with one resistor connected to the Arduino's D9 pin and the other forming part of the connection between the LoRa module's RXD pin and ground. The Arduino controls the LoRa module's mode and communication through its digital pins.
Cirkit Designer LogoOpen Project in Cirkit Designer
Image of Aduino LoRa Transmitter: A project utilizing EBYTE LoRa E220 in a practical application
Battery-Powered Arduino Nano Weather Station with LoRa Communication
This circuit is a wireless sensor system that uses an Arduino Nano to collect data from a DHT22 temperature and humidity sensor and an ACS712 current sensor. The data is transmitted via an EBYTE LoRa E220 module, and the system is powered by a 18650 battery with a TP4056 charging module and a step-up boost converter to ensure a stable 5V supply.
Cirkit Designer LogoOpen Project in Cirkit Designer
Image of Wiring Diagram LoRa: A project utilizing EBYTE LoRa E220 in a practical application
ESP8266 NodeMCU with LoRa and RS-485 Communication and Ethernet Connectivity
This circuit serves as a multi-protocol communication hub featuring two ESP8266 NodeMCUs for processing, each connected to a LoRa Ra-02 SX1278 for long-range wireless communication. One NodeMCU is also connected to an RS-485 module for serial communication and a W5500 Ethernet module for network connectivity, with MB102 modules supplying power.
Cirkit Designer LogoOpen Project in Cirkit Designer
Image of Copy of lora based gps traking: A project utilizing EBYTE LoRa E220 in a practical application
ESP8266 NodeMCU with GPS and LoRa Connectivity
This circuit comprises an ESP8266 NodeMCU microcontroller interfaced with a LoRa Ra-02 SX1278 module for long-range communication and a GPS NEO 6M module for location tracking. The ESP8266 reads GPS data via UART and transmits it using the LoRa module, which is connected via SPI. A 3.7v battery powers the system, making it suitable for remote tracking applications.
Cirkit Designer LogoOpen Project in Cirkit Designer

Technical Specifications

General Features

  • Frequency Range: 868/915 MHz (selectable via software)
  • Sensitivity: up to -148 dBm
  • Output Power: up to +20 dBm
  • Range: up to 5 km in open space (varies based on environment)
  • Serial Interface: UART
  • Supply Voltage: 3.3V - 5.5V
  • Operating Temperature: -40°C to +85°C

Pin Configuration and Descriptions

Pin Number Name Description
1 GND Ground connection
2 VCC Power supply (3.3V - 5.5V)
3 TXD UART Transmit
4 RXD UART Receive
5 AUX Auxiliary output (indicates module status)
6 M0 Mode selection input 0
7 M1 Mode selection input 1
8 RESET Reset pin (active low)

Usage Instructions

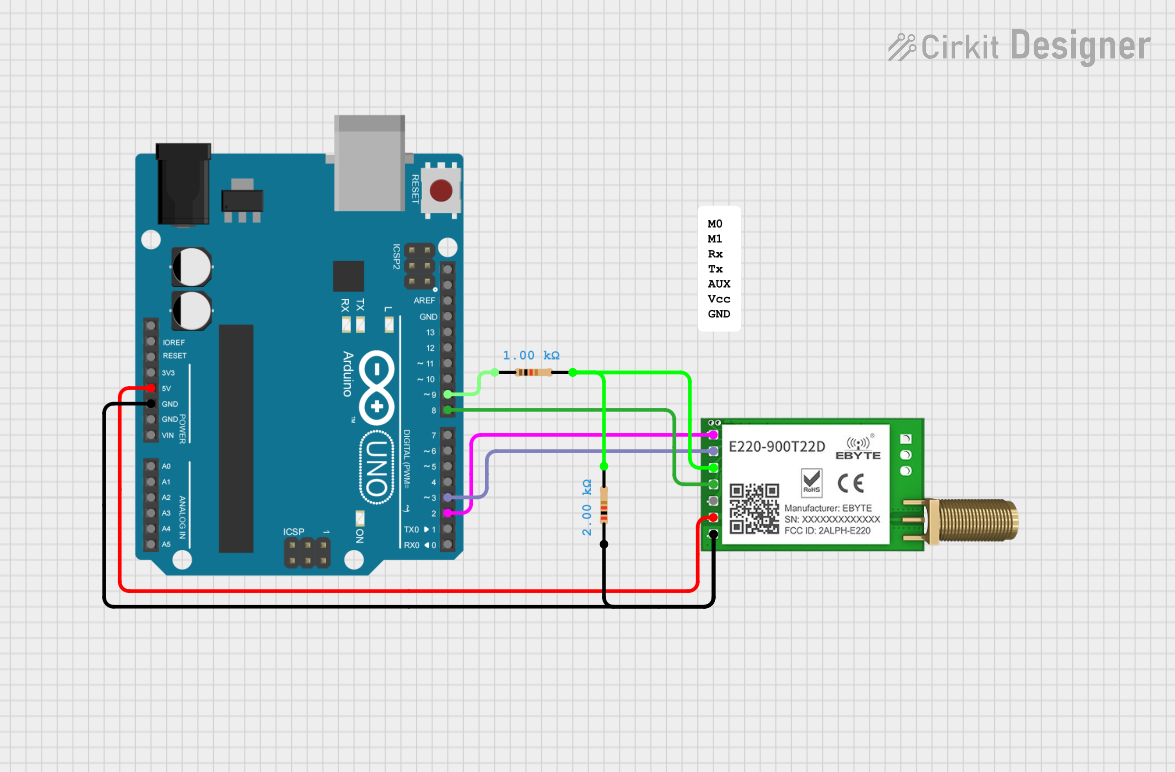
Wiring the E220 to an Arduino UNO

  1. Connect the E220's VCC pin to the 3.3V output on the Arduino UNO.
  2. Connect the E220's GND pin to one of the GND pins on the Arduino UNO.
  3. Connect the E220's TXD pin to the RX pin (D0) on the Arduino UNO.
  4. Connect the E220's RXD pin to the TX pin (D1) on the Arduino UNO.
  5. The M0 and M1 pins are used to select the operating mode. For normal operation, both should be connected to GND.
  6. The AUX pin can be connected to an input pin on the Arduino if status monitoring is required.

Programming the Arduino UNO for E220 Communication

#include <SoftwareSerial.h>

// Define the RX and TX pins connected to the E220 module
#define E220_RX 10
#define E220_TX 11

// Create a software serial port for the E220
SoftwareSerial e220Serial(E220_RX, E220_TX);

void setup() {
  // Start the hardware serial port for debugging
  Serial.begin(9600);
  // Start the software serial port for communicating with the E220
  e220Serial.begin(9600);
  
  Serial.println("EBYTE E220 LoRa Module Test");
}

void loop() {
  // Check if data has been received from the E220
  if (e220Serial.available()) {
    Serial.write(e220Serial.read()); // Send it to the hardware serial
  }
  
  // Check if data has been received from the hardware serial
  if (Serial.available()) {
    e220Serial.write(Serial.read()); // Send it to the E220
  }
}

Important Considerations and Best Practices

  • Ensure that the power supply is stable and within the specified voltage range.
  • Use proper antenna for the selected frequency band to maximize range.
  • Avoid placing the module near metal objects or electronic devices that may cause interference.
  • When programming the module, ensure that the UART baud rate matches the rate set in your code.

Troubleshooting and FAQs

Common Issues

  • No Communication: Ensure that the wiring is correct and that the module is powered.
  • Short Range: Check the antenna connection and orientation. Also, ensure there are no obstructions or sources of interference.
  • Module Not Responding: Verify that the module is not in sleep mode and that the M0 and M1 pins are set correctly.

FAQs

Q: Can the E220 module be used with a 5V Arduino? A: Yes, but ensure that the logic level for TX and RX is 3.3V to avoid damaging the module.

Q: How do I change the frequency band? A: The frequency band can be changed via AT commands or configuration software provided by EBYTE.

Q: What is the maximum power consumption of the E220? A: The E220 module consumes up to 120 mA during transmission, depending on the output power setting.

Q: Can I use multiple E220 modules in the same area? A: Yes, but ensure that each module operates on a different frequency or uses a different spreading factor to avoid collisions.

For further assistance, consult the EBYTE E220 module datasheet or contact EBYTE's technical support.