How to Use Contactor Fuji: Examples, Pinouts, and Specs
Introduction
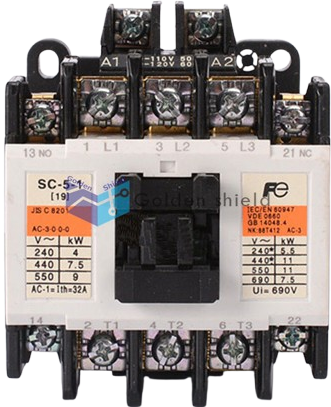
The Fuji SC 5-1 contactor, manufactured by Brand Fuji, is an electromechanical switch designed to control high-power circuits using low-power signals. It is widely recognized for its reliability, efficiency, and durability in industrial applications. This contactor is commonly used for motor control, lighting systems, and other electrical load management tasks, ensuring safe and effective operation in demanding environments.
Explore Projects Built with Contactor Fuji


Explore Projects Built with Contactor Fuji
Common Applications
- Motor control in industrial machinery
- Lighting and HVAC systems
- Power distribution and load management
- Automation systems in manufacturing plants
Technical Specifications
Key Technical Details
| Parameter | Specification |
|---|---|
| Manufacturer | Brand Fuji |
| Part Number | SC 5-1 |
| Rated Operational Voltage | 690V AC |
| Rated Current | 50A |
| Coil Voltage Options | 24V AC/DC, 110V AC, 220V AC |
| Frequency | 50/60 Hz |
| Number of Poles | 3 (Three-phase) |
| Mechanical Durability | 10 million operations |
| Electrical Durability | 1 million operations |
| Operating Temperature | -5°C to +55°C |
| Mounting Type | DIN rail or screw mounting |
| Auxiliary Contacts | 1 NO + 1 NC (Normally Open + Normally Closed) |
Pin Configuration and Descriptions
The Fuji SC 5-1 contactor has the following terminal layout:
Power Terminals
| Terminal Label | Description |
|---|---|
| L1, L2, L3 | Input terminals for three-phase power supply |
| T1, T2, T3 | Output terminals to the load (e.g., motor) |
Coil Terminals
| Terminal Label | Description |
|---|---|
| A1, A2 | Coil terminals for control voltage |
Auxiliary Contacts
| Terminal Label | Description |
|---|---|
| 13-14 | Normally Open (NO) auxiliary contact |
| 21-22 | Normally Closed (NC) auxiliary contact |
Usage Instructions
How to Use the Fuji SC 5-1 Contactor in a Circuit
Power Connections:
- Connect the three-phase power supply to the input terminals (L1, L2, L3).
- Connect the load (e.g., motor) to the output terminals (T1, T2, T3).
Control Circuit:
- Connect the control voltage to the coil terminals (A1, A2). Ensure the voltage matches the coil rating (e.g., 24V AC/DC, 110V AC, or 220V AC).
Auxiliary Contacts:
- Use the auxiliary contacts (13-14 for NO, 21-22 for NC) for signaling or interlocking purposes in the control circuit.
Mounting:
- Mount the contactor on a DIN rail or secure it using screws, depending on your setup.
Testing:
- After wiring, test the contactor by energizing the coil. The main contacts should close, allowing current to flow to the load.
Important Considerations and Best Practices
- Voltage Matching: Ensure the control voltage matches the coil voltage rating to avoid damage.
- Overload Protection: Use an appropriate overload relay in series with the contactor to protect the load.
- Wiring: Use properly rated wires for the current and voltage levels in your application.
- Environment: Avoid exposure to excessive dust, moisture, or vibration to ensure long-term reliability.
- Maintenance: Periodically inspect the contactor for wear, loose connections, or carbon deposits on the contacts.
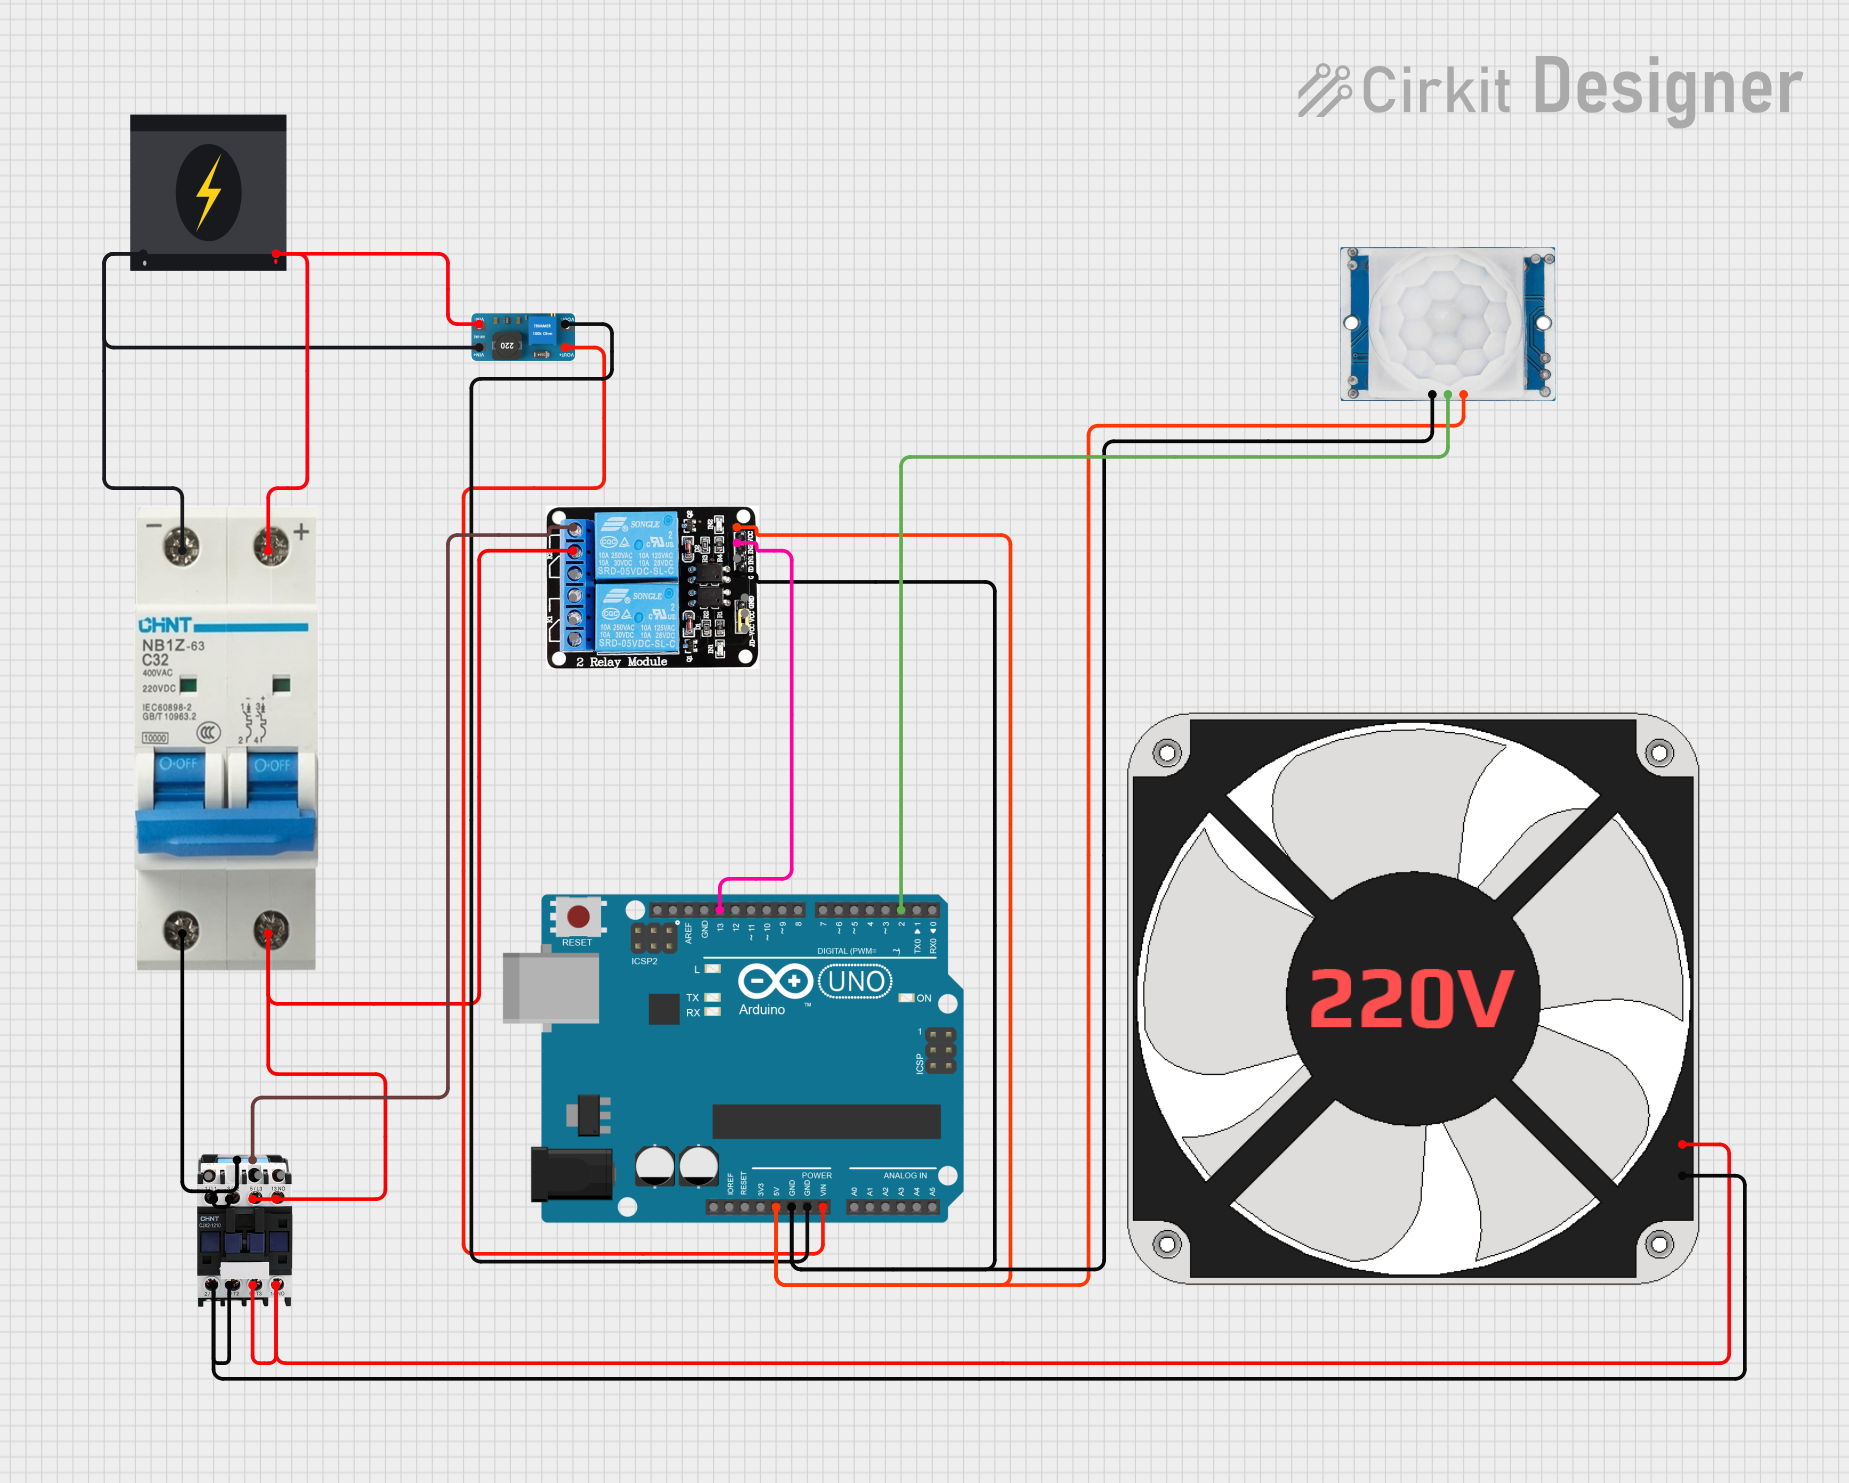
Example: Connecting the Fuji SC 5-1 to an Arduino UNO
The Fuji SC 5-1 can be controlled using an Arduino UNO by energizing its coil with a relay module. Below is an example code snippet:
// Example: Controlling Fuji SC 5-1 Contactor with Arduino UNO
// This code energizes the contactor coil using a relay module connected to pin 7.

const int relayPin = 7; // Pin connected to the relay module

void setup() {
  pinMode(relayPin, OUTPUT); // Set relay pin as output
  digitalWrite(relayPin, LOW); // Ensure relay is off initially
}

void loop() {
  // Turn on the contactor
  digitalWrite(relayPin, HIGH); // Energize the relay
  delay(5000); // Keep the contactor on for 5 seconds

  // Turn off the contactor
  digitalWrite(relayPin, LOW); // De-energize the relay
  delay(5000); // Wait for 5 seconds before repeating
}
Note: Use a relay module with an optocoupler to isolate the Arduino from the high-power circuit. Ensure the relay module can handle the coil voltage and current of the Fuji SC 5-1.
Troubleshooting and FAQs
Common Issues and Solutions
Contactor Does Not Energize:
- Cause: Incorrect control voltage or loose connections.
- Solution: Verify the control voltage matches the coil rating and check all connections.
Excessive Noise During Operation:
- Cause: Worn-out coil or mechanical parts.
- Solution: Inspect the contactor and replace the coil or contactor if necessary.
Contacts Overheat:
- Cause: Overcurrent or poor contact.
- Solution: Check the load current and ensure the contactor is rated for the application. Tighten connections.
Auxiliary Contacts Not Working:
- Cause: Miswiring or damaged auxiliary contacts.
- Solution: Verify the wiring and test the auxiliary contacts for continuity.
FAQs
Q: Can the Fuji SC 5-1 be used for single-phase applications?
A: Yes, but only two poles (L1 and L2) will be used for the single-phase connection.Q: How often should the contactor be maintained?
A: Perform routine inspections every 6 months or after 100,000 operations, whichever comes first.Q: Can I use the Fuji SC 5-1 outdoors?
A: The contactor is not designed for outdoor use unless housed in a weatherproof enclosure.Q: What is the maximum motor size the SC 5-1 can control?
A: The maximum motor size depends on the voltage and current ratings. For example, at 400V, it can control motors up to approximately 22 kW.
By following this documentation, users can effectively integrate the Fuji SC 5-1 contactor into their electrical systems, ensuring safe and reliable operation.