How to Use OLED display: Examples, Pinouts, and Specs
Introduction
The OLED (Organic Light Emitting Diode) display is a type of display technology that uses organic compounds to emit light when an electric current is applied. Unlike traditional LCDs, OLED displays do not require a backlight, resulting in higher contrast ratios, vibrant colors, and energy efficiency. These displays are available in various sizes and resolutions, making them suitable for a wide range of applications.
Common applications of OLED displays include:
- Wearable devices (e.g., smartwatches, fitness trackers)
- Consumer electronics (e.g., smartphones, cameras)
- Embedded systems and IoT projects
- Industrial equipment and control panels
- Prototyping with microcontrollers like Arduino and Raspberry Pi
Explore Projects Built with OLED display


Explore Projects Built with OLED display
Technical Specifications
Below are the general technical specifications for a typical small OLED display module (e.g., 128x64 resolution):
| Parameter | Value |
|---|---|
| Display Type | OLED (Organic Light Emitting Diode) |
| Resolution | 128x64 pixels |
| Interface | I2C or SPI |
| Operating Voltage | 3.3V - 5V |
| Operating Current | ~20mA (varies with brightness) |
| Viewing Angle | >160° |
| Pixel Color | Monochrome (white, blue, or yellow) |
| Dimensions | Varies (e.g., 0.96", 1.3") |
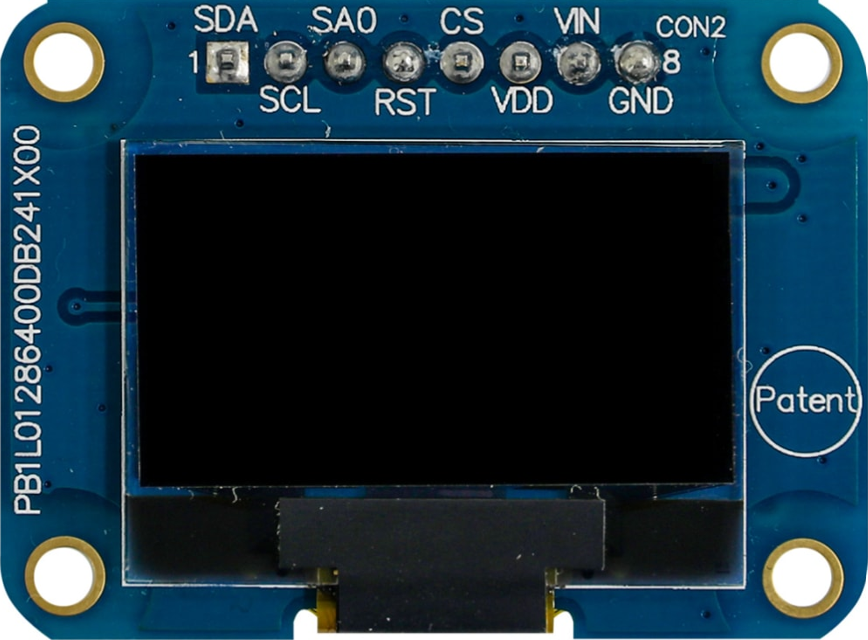
Pin Configuration (I2C Interface)
| Pin Name | Description |
|---|---|
| VCC | Power supply (3.3V or 5V) |
| GND | Ground |
| SCL | Serial Clock Line (I2C clock) |
| SDA | Serial Data Line (I2C data) |
Pin Configuration (SPI Interface)
| Pin Name | Description |
|---|---|
| VCC | Power supply (3.3V or 5V) |
| GND | Ground |
| SCK | Serial Clock (SPI clock) |
| MOSI | Master Out Slave In (SPI data) |
| RES | Reset pin |
| DC | Data/Command control pin |
| CS | Chip Select |
Usage Instructions
Connecting the OLED Display to an Arduino UNO (I2C Interface)
Wiring: Connect the OLED display to the Arduino UNO as follows:
- VCC → 5V
- GND → GND
- SCL → A5 (I2C clock on Arduino UNO)
- SDA → A4 (I2C data on Arduino UNO)
Install Required Libraries:
- Open the Arduino IDE.
- Go to
Sketch>Include Library>Manage Libraries.... - Search for and install the following libraries:
Adafruit GFX LibraryAdafruit SSD1306
Upload Example Code: Use the following example code to display text on the OLED:
// Include necessary libraries
#include <Adafruit_GFX.h>       // Graphics library for OLED
#include <Adafruit_SSD1306.h>  // Driver for SSD1306 OLED

// Define OLED display dimensions
#define SCREEN_WIDTH 128
#define SCREEN_HEIGHT 64

// Create an instance of the display object
Adafruit_SSD1306 display(SCREEN_WIDTH, SCREEN_HEIGHT, &Wire, -1);

void setup() {
  // Initialize the display
  if (!display.begin(SSD1306_I2C_ADDRESS, 0x3C)) {
    // Check if the display is connected
    Serial.println(F("SSD1306 allocation failed"));
    for (;;); // Stop execution if initialization fails
  }

  // Clear the display buffer
  display.clearDisplay();

  // Set text size and color
  display.setTextSize(1);      // Text size multiplier
  display.setTextColor(SSD1306_WHITE); // White text

  // Display a message
  display.setCursor(0, 0);     // Set cursor position
  display.println(F("Hello, OLED!")); // Print text
  display.display();           // Update the display
}

void loop() {
  // Nothing to do here
}
Important Considerations and Best Practices
- Power Supply: Ensure the OLED display is powered within its operating voltage range (3.3V or 5V).
- I2C Address: The default I2C address for most OLED displays is
0x3C. If the display does not work, check the address using an I2C scanner sketch. - Contrast and Brightness: Prolonged use at maximum brightness may reduce the lifespan of the OLED display.
- Avoid Static Damage: Handle the display carefully to prevent damage from static electricity.
Troubleshooting and FAQs
Common Issues
The display does not turn on:
- Verify the wiring connections.
- Ensure the power supply voltage matches the display's requirements.
- Check if the I2C address in the code matches the display's address.
The display shows random or garbled characters:
- Ensure the correct libraries are installed and included in the code.
- Verify that the display resolution in the code matches the actual display.
The display flickers or dims:
- Check the power supply for stability.
- Reduce the brightness in the code to minimize power consumption.
FAQs
Can I use the OLED display with a 3.3V microcontroller?
- Yes, most OLED displays are compatible with both 3.3V and 5V systems. Check the datasheet for confirmation.
How do I change the I2C address of the display?
- Some OLED modules have solder pads or jumpers to change the I2C address. Refer to the module's documentation for details.
Can I use the OLED display with a Raspberry Pi?
- Yes, the OLED display can be used with a Raspberry Pi via I2C or SPI. Use libraries like
luma.oledfor Python programming.
- Yes, the OLED display can be used with a Raspberry Pi via I2C or SPI. Use libraries like
By following this documentation, you can successfully integrate and use an OLED display in your projects!