Cirkit Designer
Your all-in-one circuit design IDE
Home /
Component Documentation
How to Use Xiao ESP32 C3: Examples, Pinouts, and Specs
Introduction
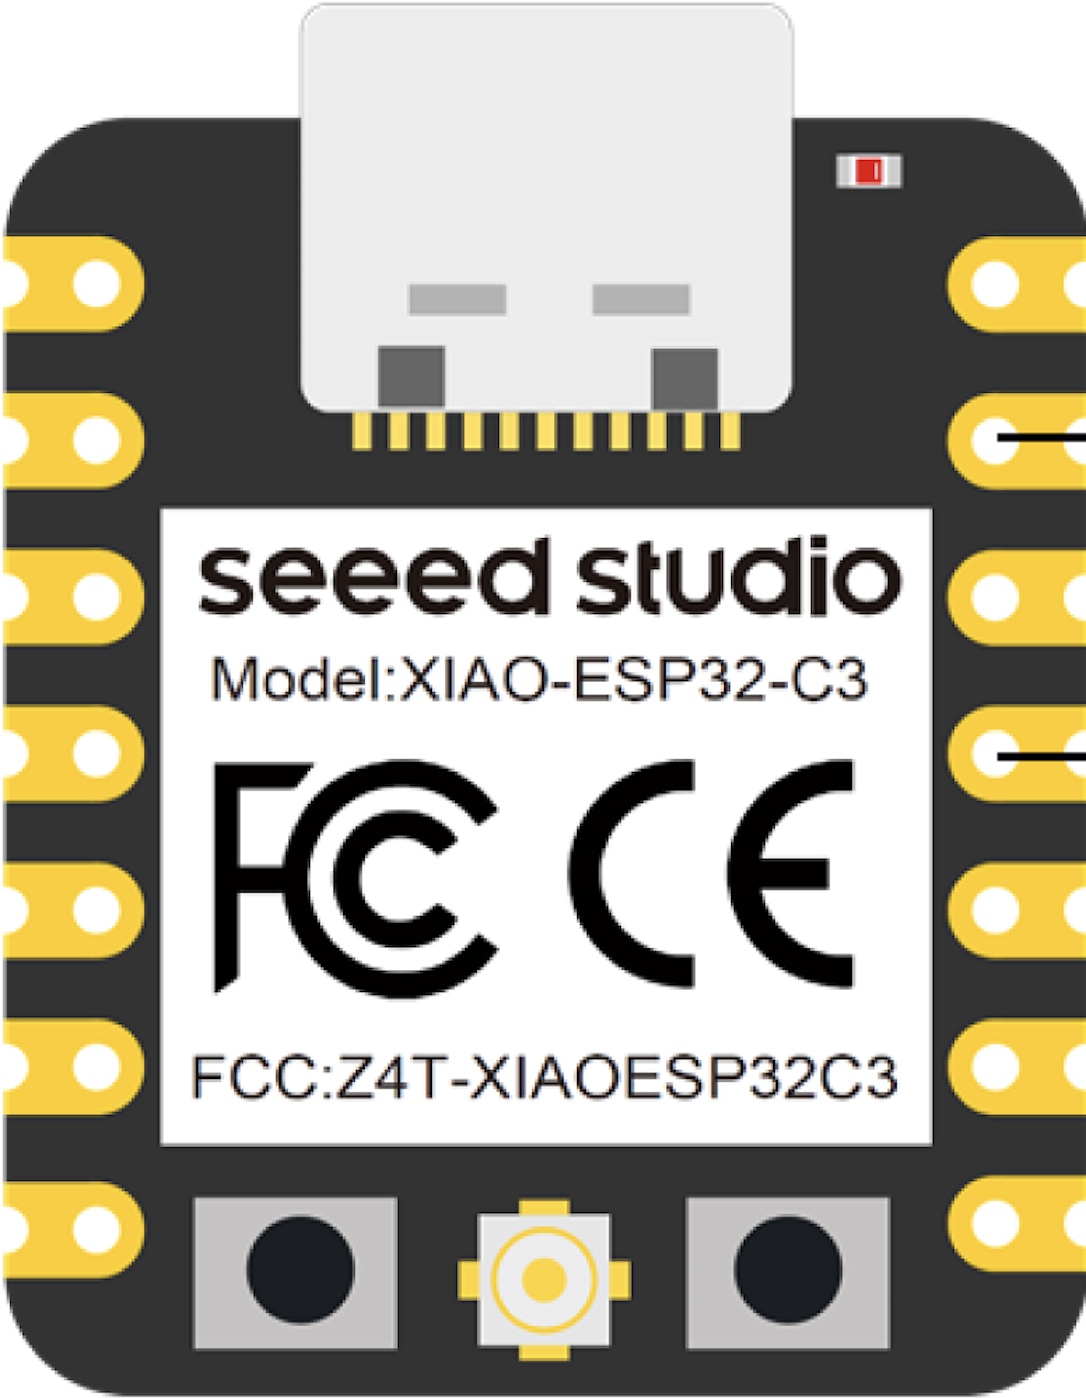
The Xiao ESP32 C3 is a highly integrated microcontroller board designed by Seeed Studio, featuring the Espressif ESP32-C3 chip. This board is tailored for Internet of Things (IoT) applications due to its compact size, low power consumption, and wireless communication capabilities. It is an ideal choice for projects that require Wi-Fi and/or Bluetooth connectivity in a small form factor.
Explore Projects Built with Xiao ESP32 C3
Xiao ESP32 C3 and Adafruit RFM9x LoRa Radio Communication Module
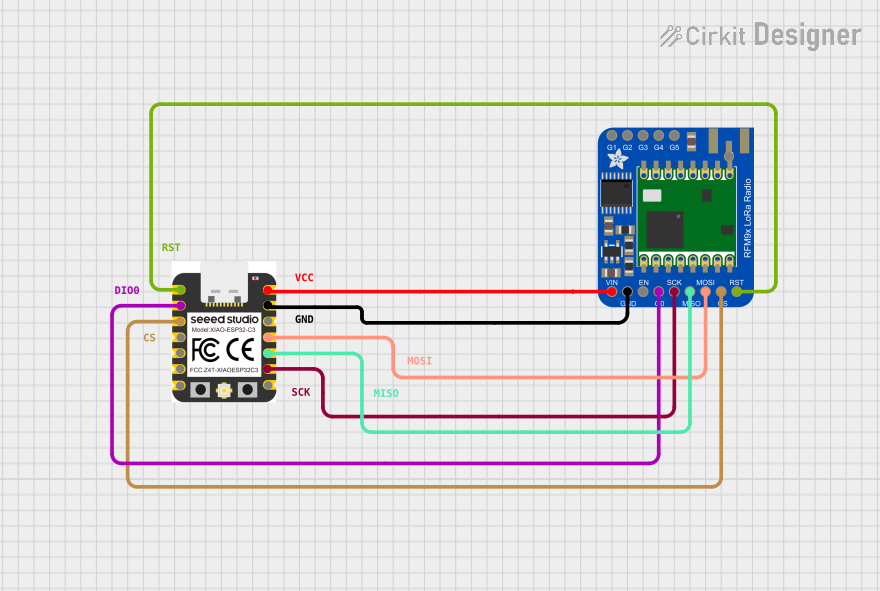
This circuit connects a Xiao ESP32 C3 microcontroller to an Adafruit RFM9x LoRa Radio module. The ESP32 C3 provides power to the LoRa module and interfaces with it using SPI communication (SCK, MISO, MOSI, CS) and control lines (RST, DIO0). This setup is likely intended for wireless communication using LoRa technology, with the ESP32 handling data processing and network protocol tasks.
Xiao ESP32 C3 Based Temperature and Humidity Monitoring System
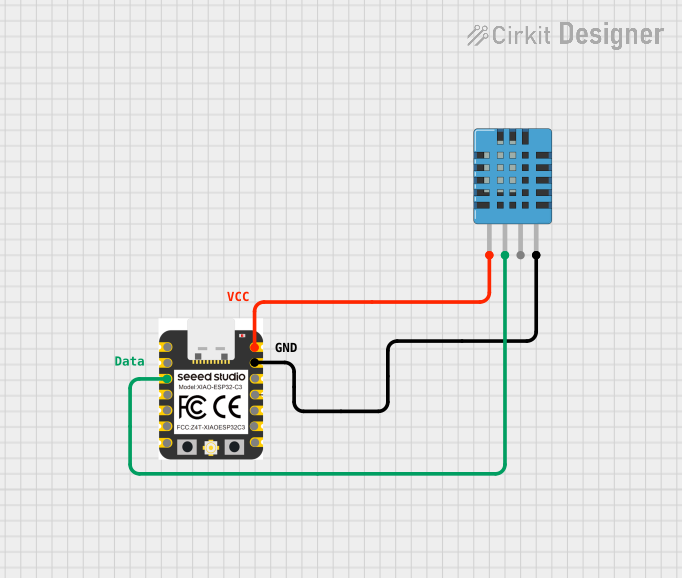
This circuit features a Xiao ESP32 C3 microcontroller connected to a DHT11 Humidity and Temperature Sensor. The ESP32 C3 provides power to the DHT11 sensor through its VUSB pin and receives data from the sensor's DATA pin via the ESP32's D2 pin. The circuit is designed to measure environmental temperature and humidity, with the microcontroller processing and potentially communicating the sensor data.
ESP32C3 and LoRa-Enabled Environmental Sensing Node

This circuit features an ESP32C3 Supermini microcontroller connected to a LORA_RA02 module and a DHT11 temperature and humidity sensor. The ESP32C3 handles communication with the LORA module via SPI (using GPIO05, GPIO06, GPIO10, and GPIO04 for MISO, MOSI, NSS, and SCK respectively) and GPIO01 and GPIO02 for additional control signals. The DHT11 sensor is interfaced through GPIO03 for data reading, and all components share a common power supply through the 3.3V and GND pins.
Xiao ESP32 C3 and ADS1115-Based Light Intensity Data Logger
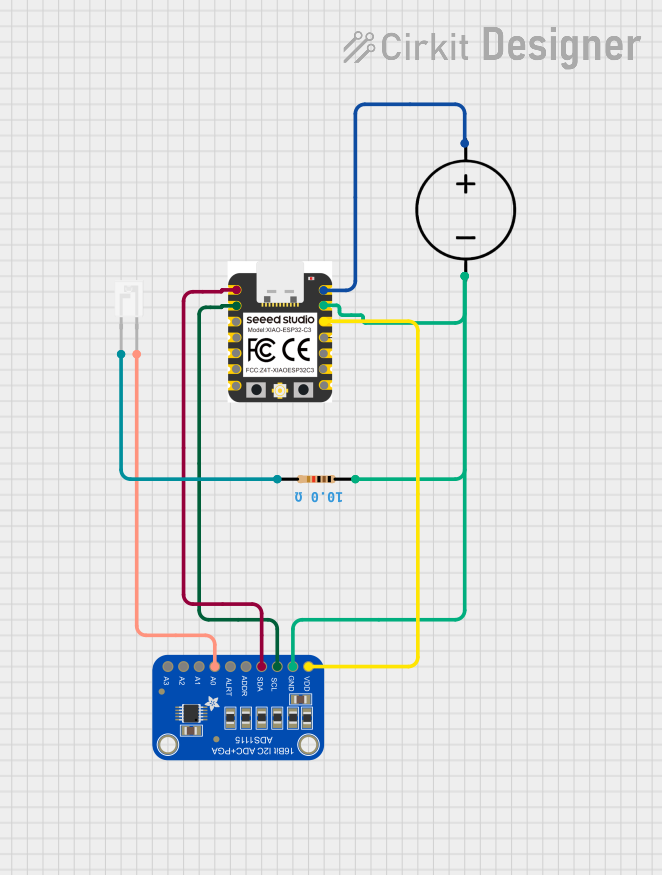
This circuit features a Xiao ESP32 C3 microcontroller interfaced with an Adafruit ADS1115 16-bit ADC via I2C for reading analog signals from a phototransistor. The phototransistor's output is conditioned by a resistor and fed into the ADC, which converts the light intensity into a digital signal. The ESP32 C3 reads the ADC values and outputs the readings to the serial monitor, allowing for light intensity monitoring.
Explore Projects Built with Xiao ESP32 C3
Xiao ESP32 C3 and Adafruit RFM9x LoRa Radio Communication Module
This circuit connects a Xiao ESP32 C3 microcontroller to an Adafruit RFM9x LoRa Radio module. The ESP32 C3 provides power to the LoRa module and interfaces with it using SPI communication (SCK, MISO, MOSI, CS) and control lines (RST, DIO0). This setup is likely intended for wireless communication using LoRa technology, with the ESP32 handling data processing and network protocol tasks.
Xiao ESP32 C3 Based Temperature and Humidity Monitoring System
This circuit features a Xiao ESP32 C3 microcontroller connected to a DHT11 Humidity and Temperature Sensor. The ESP32 C3 provides power to the DHT11 sensor through its VUSB pin and receives data from the sensor's DATA pin via the ESP32's D2 pin. The circuit is designed to measure environmental temperature and humidity, with the microcontroller processing and potentially communicating the sensor data.
ESP32C3 and LoRa-Enabled Environmental Sensing Node
This circuit features an ESP32C3 Supermini microcontroller connected to a LORA_RA02 module and a DHT11 temperature and humidity sensor. The ESP32C3 handles communication with the LORA module via SPI (using GPIO05, GPIO06, GPIO10, and GPIO04 for MISO, MOSI, NSS, and SCK respectively) and GPIO01 and GPIO02 for additional control signals. The DHT11 sensor is interfaced through GPIO03 for data reading, and all components share a common power supply through the 3.3V and GND pins.
Xiao ESP32 C3 and ADS1115-Based Light Intensity Data Logger
This circuit features a Xiao ESP32 C3 microcontroller interfaced with an Adafruit ADS1115 16-bit ADC via I2C for reading analog signals from a phototransistor. The phototransistor's output is conditioned by a resistor and fed into the ADC, which converts the light intensity into a digital signal. The ESP32 C3 reads the ADC values and outputs the readings to the serial monitor, allowing for light intensity monitoring.
Common Applications and Use Cases
- Smart home devices
- Wearable electronics
- Wireless sensors
- IoT nodes
- Low-power embedded systems
Technical Specifications
Key Technical Details
- Microcontroller: ESP32-C3 RISC-V MCU
- Operating Voltage: 3.3V
- Input Voltage (recommended): 5V via USB-C or battery input
- Digital I/O Pins: 11
- Analog Input Pins: 4
- Flash Memory: 4MB
- SRAM: 400 KB
- Clock Speed: 160 MHz
- Wireless Connectivity: Wi-Fi 802.11 b/g/n, Bluetooth 5 (LE)
- USB: USB-C for power and programming
Pin Configuration and Descriptions
| Pin Number | Function | Description |
|---|---|---|
| 1 | 3V3 | 3.3V power supply |
| 2 | GND | Ground |
| 3 | ADC/DAC/GPIO | Analog-to-Digital/Digital-to-Analog Converter |
| 4 | GPIO | General Purpose Input/Output |
| 5 | GPIO | General Purpose Input/Output |
| ... | ... | ... |
| n | USB-C | USB-C interface for power and programming |
Note: The full pinout diagram is available in the manufacturer's datasheet.
Usage Instructions
How to Use the Component in a Circuit
- Powering the Xiao ESP32 C3: Connect the USB-C cable to the board and a power source, or attach a battery to the specified battery input pins.
- Connecting I/O: Utilize the GPIO pins for interfacing with sensors, actuators, or other peripherals as required by your application.
- Programming: Use the Arduino IDE or other compatible development environments to write and upload code to the Xiao ESP32 C3.
Important Considerations and Best Practices
- Ensure that the input voltage does not exceed the recommended levels to prevent damage.
- When using Wi-Fi or Bluetooth, consider the power consumption and plan for power management strategies in battery-operated devices.
- Follow proper ESD precautions when handling the board to avoid electrostatic damage to the sensitive components.
Troubleshooting and FAQs
Common Issues Users Might Face
- Board not recognized by the computer: Check the USB cable and connections, try a different port or cable if necessary.
- Failure to connect to Wi-Fi: Verify the network credentials and signal strength, and ensure the antenna is not obstructed.
- Unexpected resets or crashes: Check for power supply stability and avoid drawing excessive current from the GPIO pins.
Solutions and Tips for Troubleshooting
- Always start with simple sketches to test basic functionality before moving on to complex code.
- Use serial output to debug and track the program flow and variable states.
- Consult the Seeed Studio forums and community for support and shared experiences from other users.
Example Code for Arduino UNO
#include <WiFi.h>

// Replace with your network credentials
const char* ssid = "your_SSID";
const char* password = "your_PASSWORD";

void setup() {
  Serial.begin(115200);

  // Connect to Wi-Fi
  WiFi.begin(ssid, password);
  while (WiFi.status() != WL_CONNECTED) {
    delay(500);
    Serial.println("Connecting to WiFi...");
  }

  Serial.println("Connected to WiFi");
}

void loop() {
  // Put your main code here, to run repeatedly:
}
Note: The above code is a simple example to connect the Xiao ESP32 C3 to a Wi-Fi network. Ensure that you have the correct board and port selected in the Arduino IDE.
For more detailed information, refer to the Seeed Studio documentation and datasheets provided with the Xiao ESP32 C3.